There have been reports of encountering the Steam error message “FATAL ERROR: Failed to connect with local Steam Client process” while launching a game on Steam. However, it has been observed by many users that the error appears exclusively after launching Counter-Strike: Global Offensive or similar Valve games.
Are you not able to play any game on Steam due to this error message? Then, you have landed in the right post. In this article, you will find a list of solutions that can help you resolve this Steam error on your Windows PC.
Solution 1: Log out and log in back into the Steam Client
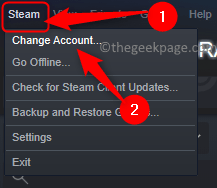
1. On your Steam client, click on the Steam menu and select Change Account… in the menu that opens up.
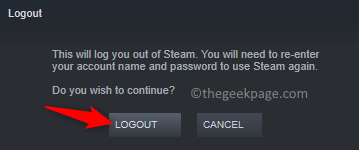
2. In the confirmation dialog, click on Logout to confirm logging out from your Steam account.
3. Launch the Steam Client again.
Sign in to your account using your login credentials.
4. After the Steam client loads, check if the error still appears while trying to launch the problematic game.
Solution 2: Check for Updates to the Steam Client
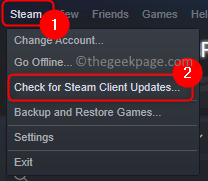
1. Having the Steam Client open, click on Steam on the menu bar at the top.
Then, choose the option Check for Steam Client Updates in the menu that appears.
2. Wait for Steam to look for any new updates, and download and install them.
After Steam is updated, check if the problem is resolved.
Solution 3: Opt-in the Steam Beta Client
1. Launch Steam.
Click on Steam –> Settings.
2. In the Settings window, select the Account tab on the left pane.
On the right side, click on the Change… button present in the Beta participation section.
3. In the Steam Beta participation window, use the dropdown below Beta participation and choose Steam Beta Update.
Click on OK.
4. You will be prompted to restart Steam to bring the changes into effect.
On this prompt, click on Restart Steam.
5. Once Steam restarts after the change, check if you are able to launch the game without seeing the error message.
Solution 4: Verify the Integrity of Game Files
1. Open the Steam Client on your system.
2. Go to the Library tab on the top.
3. In the list of games in the left pane, right-click on the game that was showing this error and choose Properties.
4. In the Properties window for the game, go to the Local files tab.
Then, click on Verify Integrity of Game Files button.
5. Wait for the verification process to complete.
This process should download any missing files and you must be able to open the problematic game without seeing the FATAL ERROR.
Solution 5: Run Steam with Admin Privileges
1. Locate the Steam shortcut on your desktop.
Right-click on the shortcut and select Properties in the context menu.
2. Go to the Compatibility tab in the Properties window.
3. Check the box next to Run this program as an administrator in the Settings section.
4. Then, click on Apply and OK to save the changes.
5. Relaunch Steam.
Now, Steam opens with admin privileges. Open the game and check if the Fatal Error still persists or not.
Solution 6: Change the Compatibility Mode for the Problematic Game
1. Go to your Steam client.
2. Navigate to the Library tab.
Here, right-click on the faulty game and choose Properties.
3. In the game’s Properties window, select the Local Files tab.
On the right side, click on the Browse… button.
4. This opens the File Explorer in the game’s installation folder.
Now, right-click on the game’s exe file and choose Properties.
5. Select the Compatibility tab.
In the Compatibility mode section, check the box associated with Run this program in compatibility mode for and choose Windows 8 in the dropdown below it.
Finally, click on Apply and then on OK.
6. Relaunch Steam and then check if the error is resolved while launching the game.
Solution 7: Reinstall the Steam Client
Copy the Steamapps folder to preserve Game data
1. Open File Explorer using the Windows + E keys.
2. Navigate to the Steam default installation directory.
By default, the path is C:\Program Files(x86)\Steam.
3. Locate the steamapps folder here.
Copy this folder to another folder on your computer.
Uninstall and Reinstall Steam
1. Press Windows + R to open Run.
Type ms-settings:appsfeatures and hit Enter.
2. Locate Steam in the list of applications on the Apps & features page.
Click on the three-dot menu associated with Steam and choose Uninstall.
On the confirmation prompt that pops up, click on Uninstall again.
3. Wait for the Steam client to be completely uninstalled from your PC.
Reboot your system after the uninstall.
4. Go to the Official Steam website and download the latest version of Steam and install it on your computer.
After reinstalling Steam, go back to the default Steam installation directory.
Copy and paste the steamapps folder back into the Steam folder.
Launch the Steam client and check if the error is fixed.
That’s it!
Thanks for reading.
We hope that the FATAL ERROR: Failed to connect with the local Steam Client process has been resolved on your Windows PC following the methods mentioned in this article. If you found this article helpful, comment and let us know the fix that worked for you.


