When you prepare a PowerPoint presentation, it’s very common that you will need to include a lot of pictures in it. Most of the time, including a picture can be done straight away without any complications. But some other times, you might need to blur portions of the picture to protect the privacy of the people present in it. Well, using an external software, you can easily blur the area of the image you want to be blurred and put it back on the presentation. That definitely is one solution. But it takes so much extra effort so use one more application and we always wonder whether there is a way you can get this task done easily with only MS PowerPoint in your hand? Well, sure there is!
In this article, we explain in detail how you can easily blur a portion of an image using only MS PowerPoint. This is a simple PowerPoint hack that is super easy to master. Read on, to learn how!
Example Scenario
Let’s say you have the following image, of a man walking across a street, that you want to be used in your PowerPoint presentation. To keep the privacy of the person present in the picture, you might want to blur his face from the image. Let’s see how this can be done easily.
Solution
There is no straightforward solution using which you can blur a portion of an image using MS PowerPoint. We would have to duplicate the image and stack the duplicate on top of the original image and crop the duplicate image leaving only the potion that we want to blur. Once we have the cropped image, we can blur it straight away using an inbuilt PowerPoint image effect named blur. Though this method might sound complex, the steps are quite simple. Let’s see how we can easily get the task done in the steps below.
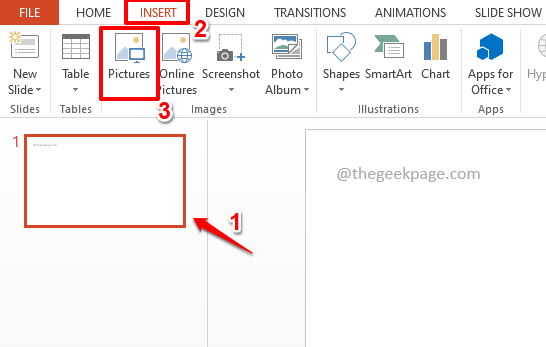
Step 1: Firstly, let’s insert the image. For that, click on the slide where you want to insert the image at. Then click on the INSERT tab from the top ribbon and then on the Pictures button under the INSERT options.
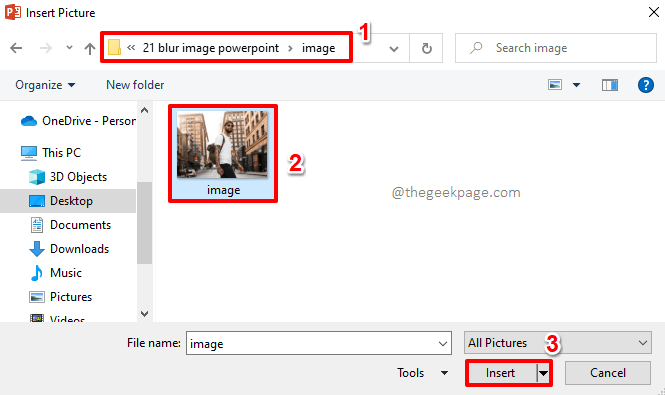
Step 2: On the Insert Picture window, navigate to the location where your image is present, click on it to select it, and then finally hit the Insert button.
Step 3: You can now see that the image is successfully inserted.
Step 4: Now, we need to duplicate the image and stack the duplicate over the original.
For that, click on the image and then hit the keys CTRL + C together to copy it, and then press CTRL + V keys simultaneously to paste it.
Step 5: Now click on the duplicate image and drag it on top of the original image so that they are perfectly aligned and looks like it’s just one single image as shown in the screenshot below.
Step 6: Now, let’s crop the second image and leave only the portion that you want to blur in it.
For that, right click on the image first. When you right click, it will automatically be on the second image as that is the one at the top.
From the right click context menu, click on the Crop option.
Step 7: On the image, now you will be able to see the resize icons to crop the image.
Click and drag them to crop the image.
Step 8: Since we want to blur only the face in the picture, the second image should be cropped to fit only the face portion as shown in the screenshot below.
Step 9: If you click elsewhere, you can now see distinct borders around your second image. And below the second image, you can see the first image.
Step 10: Now let’s blur the face. For that, we will just be blurring the second image, which is the cropped image.
Simply click on the cropped second image.
Now click on the FORMAT tab at the top of the ribbon.
As next, click on the dropdown menu associated with the Artistic Effects button. From the list of options that get expanded out, click on the blur option.
You can now see that only the face portion is blurred.
Step 11: Now if you would like to adjust the level of the blur effect, just right click on the second image and then click on the Format Picture option.
Step 12: On the right side of the window, you will now have the Format Picture options.
Expand the Artistic Effects section and adjust the Radius slider to increase or decrease the blur level. Moving the slider to the right increases the blurring and moving it to the left decreases the blurring.
Step 13: If you click and drag on any of the 2 images, you will now notice an issue. The 2 images separate and the blurring, which is on the second image, is no longer in place. Let’s see how we can solve this issue in the coming steps.
Step 14: Firstly, hold down the CTRL key and then click on both the images one by one, to select both of them.
Once you have selected both the images, right click anywhere on the images and then click on the Group option. As next, click on the Group option once again from the sub-options.
Step 15: That’s it. If you now try to click and drag any of the images, you can see that the images move together, eliminating the issue of the blur being out of place when you move one of the images.
Please tell us in the comments section if you could successfully blur a portion of your image following our little PowerPoint hack. If you have any concerns regarding any of the steps, just remember that we are only a comment away!
Stay tuned for more amazing tricks, tips, how-tos, and hacks! Happy Geeking!


