Backing up your new Mac device is the wisest option you can think of. Even though Macs are not prone to failure, mishaps can happen at any time. So, you should back up your Mac at regular intervals or set the machine to automatically do so.
There are many ways you can do this. But, the most trusted and efficient method is to use Apple’s own Time Machine tool.
Way 1 – Using the Time Machine
You can use the Time Machine to back up the Mac safely in an external drive. This also gives you the option to chart an automatic update plan for the device.
NOTE – Time Machine formats the external device before setting it up as a backup drive. So, if you have some important files in it, you should back them up in another drive.
Step 1 – On your Mac, click on the “Apple” icon and then tap “System Settings” to open it.
[If you are using an older version before macOS Ventura, then, you have to click the “Apple” logo and click “System Preferences” to do the same]
Step 2 – Now, tap “Time Machine“.
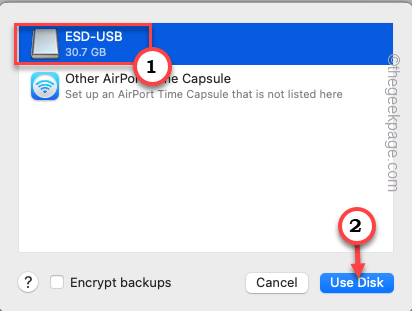
Step 3 – On the following page of Time Machine, you can select the device drivers from the wizard.
Step 4 – After this, tap “Use disk” to use that disk*.
After this, Time Machine starts a countdown to stage the next backup. So, wait for the timer to reach zero for the backup process to kick in.
Step 5 – If you look at the Time Machine screen, you can easily view the status of the backup process. Depending on the files, and apps you have, this process may take longer.
Once the backing process is complete, you will see the following message in the notification –
Time Machine has finished the first backup to
This way, you can easily create a backup using Time Machine.
*NOTE –
If your drive is not empty, Time Machine will give you a prompt to erase all the data on the drive.
So, you can just tap “Erase” to erase the drive completely and start the process.
Automate the Backup process
You can set the Time Machine to back up the system automatically.
Step 1 – On your Mac, tap the “Apple” icon. Now, tap “System Settings” to open it.
[In the older generation of Mac devices, this same setting is called “System Preferences“.]
Step 2 – Look for the “Time Machine” app. You can find it at the bottom part of the menu. Click it. a
Step 3 – When Time Machine opens up, make sure you have checked the “Back Up Automatically“.
You may now close the Time Machine tab. It will now take care of the backup situation automatically. Usually, it creates the system snapshot on a daily basis.
Way 2 – Using iCloud to backup the Mac
You can use your iCloud space to back up your Mac device. This clone feature is one of the convenient features of iCloud. When you will need it, you can use this clone to easily recreate the system image.
Step 1 – Click on the Spotlight icon ![]() or press the Command+Space bar to open the Spotlight.
or press the Command+Space bar to open the Spotlight.
Step 2 – Then, type “cloud” in the search bar.
Step 3 – Now, click “iCloud Drive” to open it.
Step 4 – If you haven’t yet permitted iCloud for storage, it will show you a prompt to permit it to use iCloud Drive.
Step 5 – Just tap “Open Apple ID Preferences…” to open it.
If you haven’t yet used/created your Apple ID to log in to the Mac device, do that first.
Step 6 – Once you are logged in with your Apple ID, just make sure the “iCloud Drive” option is checked.
Mac will take a few moments to read the iCloud Drive.
Step 7 – Now, click “Options…” to open the additional options page.
Step 8 – Here you will see the list of apps that can store data on the Cloud. So, make sure that you have checked the items absolutely necessary, like the Desktop folder, Pages, System Preferences, etc.
Step 9 – Tap “Done” to save the settings.
NOTE – iCloud space is free only up to 5GB, which is significantly small. But, you can easily increase this storage limit via paid Apple icloud+ services. Here we have listed the following prices for your better understanding –
- UK: 79p (50GB), £2.49 (200GB), £6.99 (2TB)
- US: 99c (50GB), $2.99 (200GB), $9.99 (2TB)
- Euros: 99c (50GB), €2.99 (200GB), €9.99 (2TB)
- India – ₹75 (50GB), ₹219(200GB), ₹749 (2TB)
All the rates mentioned here are given w.r.t conversion rates and pricing for the month of Feb’23. You will have current information from icloud+ plans.
Way 3 – Using other cloud drives
There are paid cloud drives like Dropbox, Google Drive, and Microsoft OneDrive that you can use to back up the data of your Mac. But, unlike Time Machine or iCloud, it won’t be that easy to use that backup to restore your Mac device. In simpler words, you have to set up the backup on your own. You know how these cloud solutions work on any device and they do the same for Mac as well.
Way 4 – Using web-based backup
The last in the line for you to use web-based backup solutions like Carbonite. It will create a backup of your Mac over the internet and store it in its servers. When and if you need it, you can use the app to restore the system from an image stored on the server. This is a great solution not only for individual users, organizations can safely create a backup for their systems.

