Whatever document be it, if it doesn’t have a Table of Contents Section, it sure is going to be difficult to navigate through it. What makes Microsoft Word very special is its simplicity, and its ability to make the users’ jobs much easier. That being said, Microsoft Word sure has an inbuilt method using which users can insert a perfectly formed Table of Contents into their Word documents. what makes it even more embraceable is the fact that the Table of Contents can be automatically updated even if you make any changes to your document after you insert it.
In this article, we explain in detail how you can easily insert the Table of Contents section to your word document, how to update it automatically when the document contents change and how to navigate through your document using the Table of Contents. Read on, to master this super amazing Word trick.
Note: The Table of Contents is created based on the headings of your word document.
Section 1: How to Automatically Create Table of Contents in your Word Document
Step 1: Firstly, make sure you have the basic structure ready with all the headings and subheadings well in place, as the Table of Contents section is generated based on the headings in your document.
In the example below, we have a document with headings, sub-headings, and sub-sub-headings. There can be text under each of these headings too. For simplicity, we have added only the section headers.
Step 2: As next, use the heading formatting tabs at the top ribbon to properly format your headings.
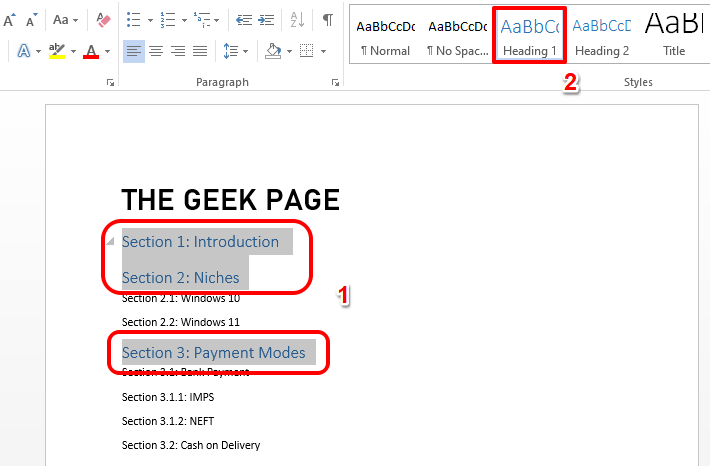
Firstly, press the CTRL key down. Now click and select all the main headings. Once all the main headings are selected, click on Heading 1 formatting style at the top ribbon.
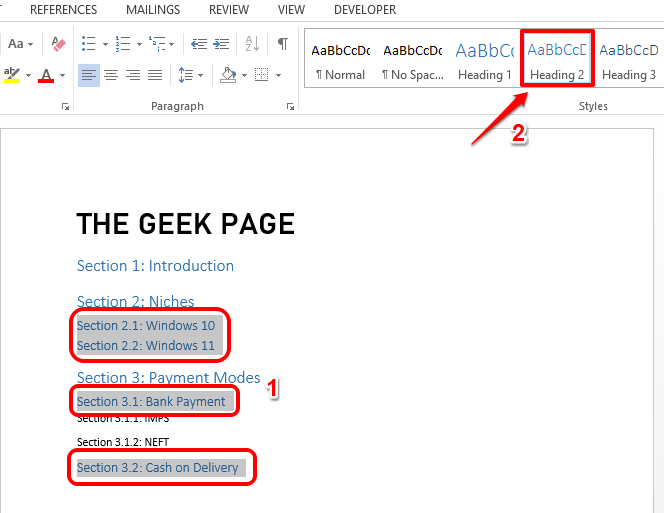
Step 3: Just like how you formatted Heading 1, select all the secondary headers next and then click on the Heading 2 formatting style at the top.
Step 4: Then select all the tertiary headers and format them with the Heading 3 formatting. Likewise, you can format as many header levels as you want.
Steps 5 to 7 are optional. These steps are used to customize your header formatting style. If you do not wish to conditionally customize your headers, then you can jump to Step 8, skipping steps 5, 6, and 7.
Step 5: Firstly, format your header 1 in any way you want. You can use the options available in the HOME tab for this purpose. For example, you can change the color of the font, you can make it bold, make it italics, underline it, or make it bigger or smaller, change the font type, etc.
Once you have formatted the header as per your preference, click and select the text.
After selecting the text, right click on its corresponding header formatting, in this case Heading 1, and then click on the option Update Heading 1 to Match Selection.
Step 6: This will instantly apply your header formatting to all your Heading 1 texts.
Step 7: Likewise, you can apply text formatting to all the headers in your document, say Header 1, Header 2, Header 3, etc.
Step 8: Once you are all set, click on the initial point of your document. This would be the very first point in the very first line of your whole document.
After that, click on the INSERT tab at the top, then click on the button Page Break as shown in the screenshot below.
Step 9: The previous step would add a blank page before Page 1 of your document.
Step 10: Now let’s add the Table of Contents.
For that, click on the blank page that you just created. Then click on the REFERENCES tab at the very top.
As next, click on the dropdown button named Table of Contents. Choose a format of your choice. We have decided to go with the second format, which is, Automatic Table 2.
Step 11: Bravo! You can see that the Table of Contents section is now automatically added to your document along with respective page numbers. Yes, it is indeed that simple.
Note: Table of Contents gets added onto Page 1 of the document and the actual document starts from Page 2.
Section 2: How to Update the Table of Contents if any Changes are Made to Document Headers
Now, let’s say you updated your document section headers. Say you added one more section at the end of the document. In that case, you need to update the Table of Contents, but this is also automatic. You can follow the steps below to achieve this task perfectly.
Step 1: Firstly, add the extra section header or modify the existing section header.
Then click on the Table of Contents somewhere to reveal the Update Table button at the top. Click on it.
In the Update Table of Contents window, choose the radio button corresponding to the option Update entire table and hit the OK button.
Step 2: You can now see that the Table of Contents is now automatically updated.
Section 3: How to Navigate the Document using Table of Contents
Once you have the Table of Contents ready, simply hover over it. Now you will see a small toast message saying you need to CTRL + Click on the line you hovered over, to follow the link.
So simply hover over any line on the Table of Contents and then CTRL + Click it, to go to its actual location in the document. Yes, navigation across a huge Word document cannot get any simpler than this!
Please tell us in the comments section whether you found the article useful.
Keep coming back for more tricks, tips, and how-tos.


