PowerPoints presentations could be boring. But what if you can add some custom music to your slides to make them more interesting? You can add a particular music to a particular slide or you can have one single music set to be played across all your slides, the choice is yours to make. Whatever be your requirement, if it involves adding music to your PowerPoint slides, this article is the best one that will meet all your needs and answer all your queries.
Read on, to learn all about adding music to your PowerPoint slides, editing the music that you added, and a lot more. Hope you enjoy reading!
Solution
Step 1: Launch the PowerPoint presentation first, to which you want to add music.
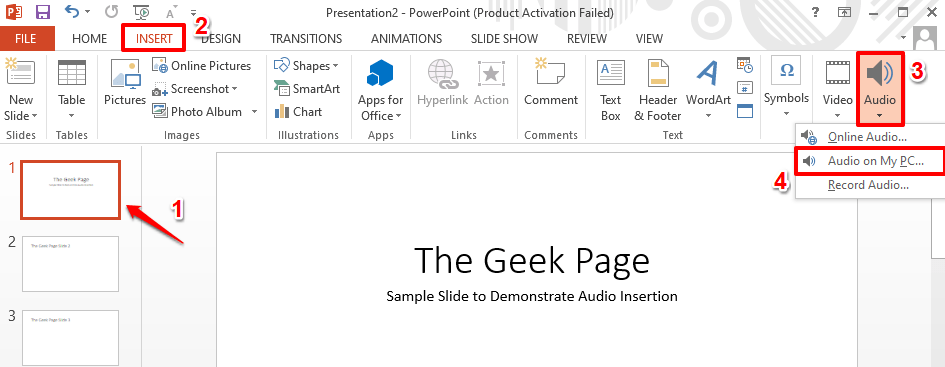
As next, click on the slide where you want the music to be added. Then click on the INSERT tab at the top ribbon and then click on the Audio dropdown button and choose an option of your choice to insert the music.
If you want to search online for the music, click on Online Audio option. Else if you want to record your own audio using your microphone, click on Record Audio option, or if you already have the music present in your machine and would like to use it, then click on the Audio on MY PC option. I already have the audio in my machine and thus I have clicked on the Audio on My PC option.
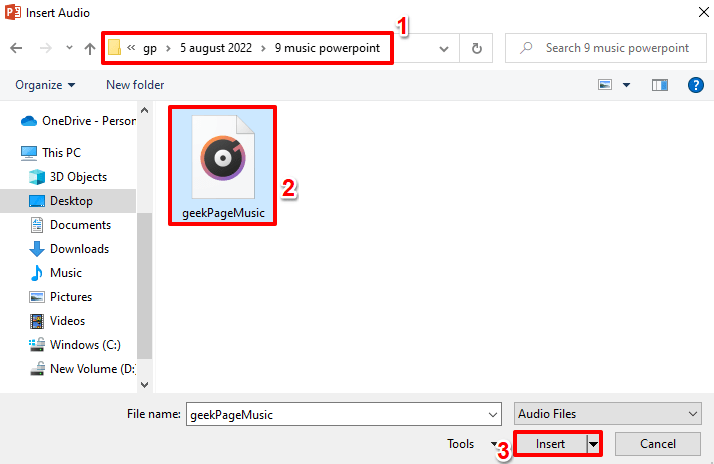
Step 2: When the Insert Audio window opens up, navigate to the location where your audio file is present, click on it to select it and then hit the Insert button at the bottom of the window.
Note: If you want to add a different music to a different slide, you can do so by repeating the same steps above. Firstly, select the slide and then insert the music. Also, please keep Step 6 – Point 2 in mind when you add multiple music files to your PowerPoint presentation.
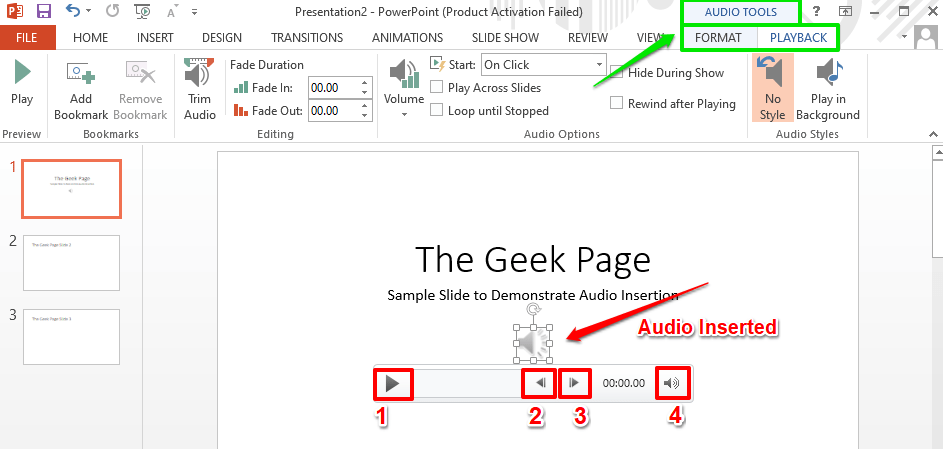
Step 3: You can now see that an Audio icon is added to your slide. If you click on it, you will be able to see the contextual tab for audio, namely AUDIO TOOLS, at the top of the window, marked in green in the screenshot below. The AUDIO TOOLS contextual tab will have 2 sub tabs by the name FORMAT and PLAYBACK.
Now let’s explore some of the quick audio controls. These are marked in red with numbers in the screenshot below. Each numbered part is detailed in the following points.
- The play button is the button using which you can play the music.
- Using the rewind button, you can rewind the music.
- Obviously, using the forward button, you can fast forward your music.
- The Volume icon can be used to increase or decrease the volume of the music.
Step 4: You can simply click and drag the Audio icon to move it anywhere inside your slide. In the screenshot below, I have moved the icon to the top right corner of the slide.
Step 5: Now, let’s explore some advanced audio control options. For that click on the Audio icon once again. This time, from the top ribbon, click on the contextual tab named PLAYBACK.
Step 6: Under the PLAYBACK tab, there will be a group named Audio Options. Let’s see what each of the functionalities in the Audio Options group are for.
- Start dropdown menu: If you click on this dropdown menu, you can choose between On Click and Automatically options. The On Click option would play your music on the event of a click when you run your slideshow. Whereas, Automatically option would automatically play the song without any triggers.
- Play Across Slides checkbox: This checkbox needs to be ticked if you need the music needs to be played for all the slides. If you want the music to be played only on the slide where the audio is inserted, then you need to untick the Play Across Slides checkbox.
- Loop Until Stopped checkbox: If you check this checkbox, when your music finishes playing, it will automatically start over and get played in a loop till the slideshow is stopped.
- Hide During Show checkbox: If you don’t want the Audio icon to be displayed on your slide while the presentation is going on, then you need to have this checkbox ticked.
- Rewind after Playing checkbox: If you want the audio to be rewinded after it is done playing, you need to make sure that this checkbox is ticked.
Step 7: Now, let’s see how you can easily trim the audio that you have inserted.
For this, under the PLAYBACK tab, look for the group named Editing. Click on the button Trim Audio next.
When the Trim Audio window pops open, you can drag the Start Slider (in green) and the End slider (in red) to adjust the starting and ending point of your music.
Once you are all done, hit the OK button to proceed.
Step 8: You also can set the fade duration of your music under the Editing group under the section Fade Duration. You can use the Fade In and Fade Out fields to set the fade in and fade out duration of your music, if you requrie the fade effect. If both the Fade In and Fade Out fields are set to 00.00, then there will be no fade effect.
Step 9: Let’s now try to run the slideshow. To enter the presentation mode, click on the SLIDE SHOW tab from the top ribbon and then hit the button named From Beginning under the Start Slide Show section.
Step 10: You can now see that the music is playing, but the audio icon is well hidden. Enjoy!
Please tell us in the comments section whether you could successfully insert music to your PowerPoint presentation following the steps mentioned in our article.
Stay tuned for more and more extra amazing tricks, tips, how-tos, and hacks! Happy Geeking!


