Some Windows processes run in the foreground, and almost all the other processes run in the background. “SystemSettings.exe” is one of those processes that run to ensure Windows Settings work efficiently. So, if the Settings is crashing on your system and you will notice this error message “SystemSettings.exe has stopped working” has appeared on your screen.
Fix 1 – Run some powershell commands
Try running these powershell commands to fix the issue.
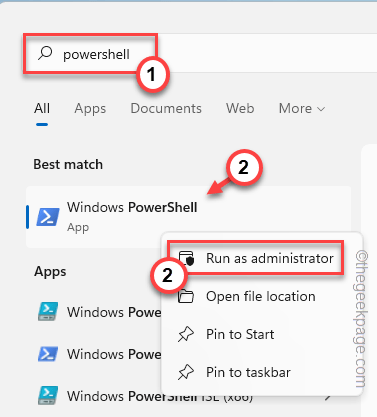
1. Press the Win key and write “powershell” in the search box.
2. Then, right-tap the “Windows PowerShell” and click “Run as administrator” to access it.
3. Now, paste this code into the PowerShell terminal and hit Enter.
Get-AppXPackage -AllUsers -Name windows.immersivecontrolpanel | Foreach {Add-AppxPackage -DisableDevelopmentMode -Register “$($_.InstallLocation)\AppXManifest.xml” -Verbose}
4. After that, run this code as well.
PowerShell -ExecutionPolicy Unrestricted -Command "& {$manifest = (Get-AppxPackage *immersivecontrolpanel*).InstallLocation + '\AppxManifest.xml' ; Add-AppxPackage -DisableDevelopmentMode -Register $manifest}"
After that, close the PowerShell terminal. Then, reboot your system, and once your device restarts, test if this works.
Fix 2 – Pause the antivirus
Antivirus may restrict SystemSettings.exe from working properly. Try pausing the antivirus and putting it on the exclusions list.
1. Close the Settings app, if it is opened yet.
2. Look carefully at the left corner of your taskbar. You will notice an upward arrow icon. Click on it.
3. Here, you will find several hidden icons alongside the antivirus that you are using.
4. Just right-tap the antivirus software and tap “Pause protection” to pause it temporarily.
Now, launch the Settings panel and check if it works.
There is another thing you can do in your antivirus setting so that it excuses the settings app from it.
Steps to put Settings.exe in the exclusion list
We have shown how to put Settings.exe in the exclusion list of the antivirus in Windows Security. The steps should be the same for any other antivirus software as well.
1. Open the Windows Security.
2. When it opens up, tap the “Home icon“ and then click on the “Virus & threat protection“.
4. If you scroll down to the ‘Virus & threat protection settings’ click on the “Manage settings“.
5. Tap the “Add or remove exclusions“.
7. Now, tap the “Add an exclusion“.
8. From the drop-down select the “File” type.
9. Then, go to this location –
C:\Windows\ImmersiveControlPanel
10. Select the “SystemSettings” application inside this folder and tap “Open“.
This way, you can put SystemSettings.exe in the exclusion list of the antivirus.
Settings should work just fine on your system.
Fix 3 – Run a simple DISM check
If there are some core files missing from your system, running the SFC and DISM scan should help.
1. You can initiate both scans from the CMD terminal. So, press the Windows key and the R key.
2. When the Run box appears, write “cmd” in the Run panel. Just press the Ctrl+Shift+Enter keys together.

3. Paste this code in the terminal and hit Enter.
sfc /scannow
Allow Windows a while to run and complete the scanning process.
4. Once the scanning completes, run this code to restore the system files with a DISM check.
DISM.exe /Online /Cleanup-image /Restorehealth
Once the scanning process is complete, close the terminal. Then, check whether the Settings is working or not.


