Windows users sometimes report weird issues from time to time in the Microsoft forum. Some users have reported this issue where they notice the Client Server Runtime Process and Desktop Window Manager apps are eating up their GPU resources out of nowhere while just moving their mouse or scrolling through a page.
It may be normal
If you are experiencing this problem on a device where you have just installed Windows 11, this is quite normal. At the first startup, several features like Windows Update, Windows Security, and Antimalware Service Executable looks for new packages, and definitions in the background. Apart from this, Windows performs the file indexing operation as well.
So, if you are having a stuttery, sluggish experience, don’t worry. Just wait for a few minutes and everything should be back to normal again.
Fix 1 – Install Windows Update, Security Definitions
After upgrading to Windows 11 or a fresh startup, you should check and install all the available windows updates on your computer.
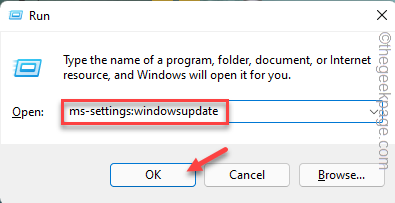
1. Open the Run box. If you press the Windows key+R keys it will open that.
2. Then, copy-paste this term in there and hit Enter.
ms-settings:windowsupdate
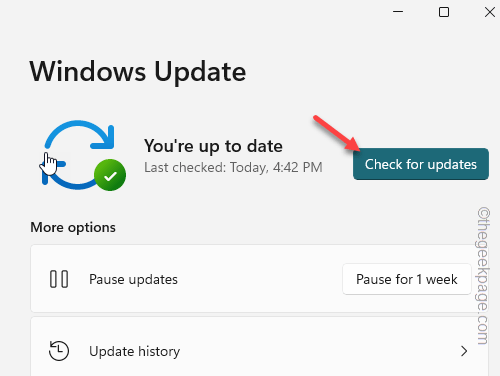
This will open the Windows Update page directly. When it does, take a look at the right-hand pane. Check whether any packages or security definitions are downloading.
3. If there are no updates downloading, tap “Check for updates“.
Windows will connect to the server and download the latest package.
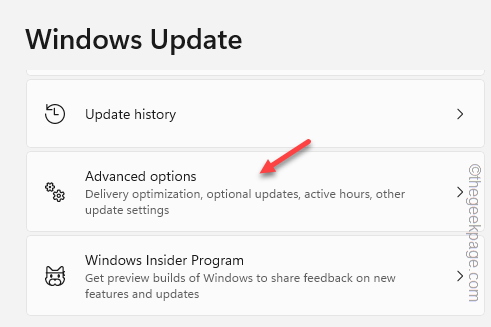
4. While you are waiting for these updates are downloading, click on “Advanced options“.
5. In there, click on “Optional updates” to explore all the optional updates available for your device.
These updates usually contain driver packages.
6. Now, check all the optional updates and click “Download & Install” to download and install those as well.
Once these optional updates are installed, you can come back to the main update page.
When all the updates are downloaded and installed, you can come back to the
7. Finally, when you come “Restart now” to restart the machine.
Fix 2 – Disable the hardware acceleration features
You should disable the hardware-accelerated GPU scheduling feature to fix the problem.
1. Just right-click once on your desktop, and tap “Display settings” on the context menu.
2. When you reach the Display settings page, go all the way down and tap “Graphics“.
3. In th Graphics settings page, look for the “Hardware-accelerated GPU scheduling” setting.
4. Turn it “Off” to disable this feature on your computer.
Once you have turned this feature off, you will see this prompt “Restart your PC to apply your changes.“. So, close all the apps that you have opened and restart the system.
The problem will be gone once your reboot your computer.
Fix 3 – Stop using transparency effects
Sometimes the transparency effects on your system can create this GPU overusage issue.
1. Open Settings. Pressing the Windows key+I keys together.
2. Now, tap “Personalizations” on the left-hand side of the screen.
3. Now, go to the right-hand pane, and click the “Colors” option.
4. Now, make sure the “Transparency effects” option is turned to “Off“.
Close the Settings page. Then, go back to the Task manager page again.
Fix 4 – Restart the graphics driver
One of the quickest ways to solve GPU-related issues is to restart the graphics driver on your computer. There is no standard way to restart the graphics driver.
You have to press the Ctrl+Windows key+ Shift +B all these four keys together.
Now, the screen will turn black, as the graphics driver turns off and within a few seconds it will be back again, as the driver restarts. Now, head on to the Task Manager and check whether the Client Server Runtime Process and/or Desktop Window Manager is taking up huge GPU resources.
Fix 5 – Set the PMM to Maximum mode
[FOR NVIDIA USERS]
NVIDIA graphics card users can tweak the Power Management Mode settings to the maximum settings.
1. At first, launch the NVIDIA Control Panel app. Use the start menu to open it.
2. Now, select the “Manage 3D settings” on the left pane.
3. Go to “Global Settings” on the right-hand part of the screen.
4. Here, scroll down and select the “Power management mode” and set it to “Prefer maximum performance” from the drop-down list.
5. After that, tap “Apply” to apply this modification.
After this, close the NVIDIA Control Panel app. You have to restart your device.
Then, test if this works.
Fix 6 – Disable the HDR effects
HDR or High Dynamic Range can cause the csrss.exe and dwm.exe to eat up GPU resources in the background, even when you are not watching non-HDR content. So, try disabling this feature.
1. Click on the Windows icon to open the Start page.
2. There, tap “Settings” to open it.
3. Then, tap “System” on your left-hand pane.
4. Next, click on “Display” to access it.
5. Now, in the ‘Brightness & color’ setting, tap “HDR” settings.
6. Then, set this HDR setting to “Off“.
After that, close the Settings window. This change won’t take effect until you restart the device. Additionally, if you notice the WCG setting is enabled on your system, turn it off as well.
The problem will be resolved once you restart the device.
Fix 7 – Rollback the graphics driver
If the problem is occurring just after you have updated your graphics card, rolling back the driver update should help you resolve the problem.
1. At first, right-tap the Windows icon and tap “Device Manager” to access it.
2. When you open the Device Manager page, just expand the “Display adapter” device list.
3. Just, right-tap the display adapter you are using and tap “Properties“.
4. Now, go to the “Driver” tab when the Properties page opens up.
5. Here, just tap “Rollback driver” to roll back the previous graphics driver.
6. Next, you can choose any reasons you want from the available options. We have chosen the “Previous version of the driver performed better“.
7. After that, click “Yes“.
Allow Windows some time so that it can roll back the graphics driver from your computer. Your computer may restart automatically. Once the device restarts, open the Task Manager and check the GPU usage of csrss.exe there.
Everything should appear normal.
Fix 8 – Update the graphics driver
The old graphics card drivers may cause this problem. So, update your graphics card.
Standard Way –
If you are using an integrated graphics card (like Intel Iris), follow these steps to update the graphics card. You can do it from Settings.
1. Open the Settings page. So, press the Windows key+I keys together.
2. When you have opened the Settings page, click “System” settings.
3. After that, on the right-hand side, tap “Display” settings to access that.

4. Then, click on the “Advanced display” to access it.
5. In the Advanced display page, tap the “Display adapter properties for Display 1” option.
6. This opens up the graphics driver properties page. So, go to the “Adapter” tab.
7. After that, tap “Properties” to access that.
8. Then, visit the “Driver” tab.
9. Here, click on “Update Driver” to update the graphics driver.
10. Coming to the next page, you can see the ‘How do you want to search for drivers?’ message box has appeared.
11. So, click “Search automatically for drivers” to access that.
This way, Windows will look for the latest driver package for the display adapter. You have to wait for Windows to install the driver on your computer.
Restart your computer when the adapter driver is installed. Test if this works.
NOTE –
Sometimes you may see this message has appeared.
The best drivers for your devie are already installed
1. In that case, click “Search for updated drivers on Windows Update“.
Look at Windows Update whether any display update is already downloading or not.
2. If you can’t find it there, tap the “Advanced options“.
3. On the right-hand pane, click the “Optional updates” option to access it.
Here, when you expand the ‘Optional updates’ option to find the list of graphics drivers.
4. Check those boxes and click “Download & install” to install those updates.
Dedicated graphics card users –
If you are using a dedicated graphics card (like GeForce or AMD), follow these steps.
NVIDIA card
1. Launch the GeForce Experience app on your system.
2. Now, visit the “DRIVERS” area. Wait until GeForce Experience to identify the latest available driver.
3. Once it does, click “Download” to download the latest version of the driver.
Wait for the driver to download properly. Usually, these driver size is over 600 MB. So, let the download finish.
4. Once it is done, click on the “CUSTOM INSTALLATION” option.
5. You may tick the “Perform a clean installation” check box in the installer window.
6. Then, tap “INSTALL” on the same screen to proceed with the final installation process.
Just be patient as Windows will install the graphics card driver on your device.
After this, check whether the Desktop Window Manager and Client Server Runtime Process is eating up GPU resources or not.
Fix 9 – Uninstall and reinstall the graphics driver
If everything else fails, you can uninstall the current display adapter and reinstall the same.
1. At first, press the Windows key+X keys together.
2. Then, tap “Device Manager” to access the Device Manager.
3. When the Device Manager page opens up, click once on the “Display adapters“.
4. Then, right-tap the device and tap “Uninstall device“.
5. In the small Uninstall Device pane, check the “Attempt to remove the driver for this device” box.
6. Then, tap “Uninstall” to uninstall the driver.
After that, close the Device Manager. Then, restart your computer and Windows will automatically install it.
Test if this works.


