Runtime broker is a toll always running in the background on your machine, managing the permissions for the Store apps. Usually, it consumes a negligible amount of the resources on the system. But, sometimes you may see that this Runtime Broker is consuming a huge chunk of your CPU processing power. There can be a lot of reasons behind this unusual behavior, so follow any of these easy fixes to quickly solve the issue.
Fix 1 – End the Runtime Broker
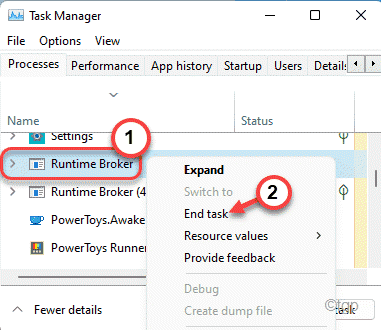
You can kill the Runtime Broker process in the Task Manager.
1. At first, right-click on the Windows key and tap on the “Task Manager“.

2. When the Task Manager opens up, click on the “Processes” tab.
3. Scroll down to find the “Runtime Broker” process and then, click on the “End task“.

After ending the Runtime Broker process, close the Task Manager. Usually, this should stop the Runtime Broker process from eating more resources.
Fix 2 – Edit the Registry
There is a simple registry hack that can solve this issue.
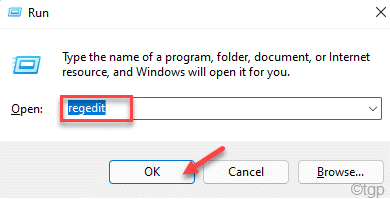
1. At first, press the Windows key along with the R key.
2. Then, write”regedit” in the Run window and click on “OK“.

Disclaimer – You are going to alter a particular registry key on your computer. This changes may cause further issues, even irreversibly brick the system. So, pay close attention to these instructions.
After opening the Registry Editor, click on “File“. Then click on “Export” to make a new backup on your computer.

3. After taking the registry backup, go to this location –
HKEY_LOCAL_MACHINE\SYSTEM\CurrentControlSet\Services\TimeBrokerSvc
4. On the right-hand side, you will see the “Start” value.
5. Just, double-click on the value to edit it.

6. Then, set the value to “4“.
7. Finally, tap on “OK” to save the changes.

Close the Registry Editor and reboot your computer. After rebooting, the Runtime Broker will not consume a high amount of CPU resources.
Fix 3 – Disallow background process of the apps
Though there is no single switch to toggle the background app processes, you can disable the unwanted ones individually.
1. At first, open the Settings.
2. Then, tap on the “Apps” from the list on the left-hand side.
3. After that, on the right-hand side, tap on “Apps & Features“.

4. Now, you will see the list of apps on the right-hand side.
5. Simply, scroll down and click on the three-dot menu of the app you want to stop at the background.
6. Then, click on the “Advanced options“.

7. Now, in the ‘Background apps permissions’ options, click on the drop-down and set it to the “Never“.

8. Coming back to the list of apps, disable the background usage of the apps you don’t want to run in the background (like Google Chrome).

This will save a lot of resources from power-hungry background processes. Runtime Blocker should behave normally and won’t consume more than 2-3% of CPU power.
Fix 4 – Disable the tips, tricks
You can disable the tips and tricks notification that can cause this issue.
1. At first, press the Windows key+I keys together.
2. Then, tap on “System” on the left-hand side.
3. Now, on the right-hand side, tap on the “Notifications“.

4. Here, on the right-hand side, scroll down and make sure that the “Get tips and suggestions when I use Windows” option is unchecked.

Then, close the Settings window.
Fix 5 – Disallow downloading updates from other computers
Windows allow their systems to download the current updates from the local computer. But, in this process, your PC also sends some of the previously downloaded update packages. This may cause the Runtime Broker to behave erratically.
1. At first, right on the Windows icon and click on “Settings“.

2. Then, click on the “Windows Update” on the left-hand side.
3. After that, tap on the “Advanced options” on the right-hand side.

4. Now, tap on the “Delivery Optimizations“.

5. Now, on the same side of the screen, toggle the “Allow downloads from other PCs” option to “Off“.

This should stop Windows from uploading or downloading updates from another machine in the background.
Check whether this works out for you.
Fix 6 – Uninstall Groove Music
According to some users, uninstalling the Groove music is the main culprit.
1. At first, click on the Start icon and start to write “powershell“.
2. Then, right-click on the “Windows PowerShell” and click on the “Run as administrator“.

3. Once the PowerShell terminal appears, type/copy-paste this command and hit Enter to uninstall the Groove Music.
Get-AppxPackage -name Microsoft.ZuneMusic | Remove-AppxPackage Get-AppxPackage -name Microsoft.Music.Preview | Remove-AppxPackage

After doing that, close the PowerShell and restart your computer. Check the status of the issue again.
Fix 7 – Remove the OneDrive
Some users have also noticed removing the OneDrive has worked for them.
1. Press the Windows key and type “cmd“.
2. Then, right-click on the “Command Prompt” and click on “Run as administrator“.

3. To kill the OneDrive process, paste this command and hit Enter.
taskkill /f /im OneDrive.exe

4. Then, input this command and press the Enter to uninstall the OneDrive app.
If you are using a 32-bit Windows –
%SystemRoot%\System32\OneDriveSetup.exe /uninstall
If you are using a 64-bit Windows –
%SystemRoot%\SysWOW64\OneDriveSetup.exe /uninstall

After that, follow the on-screen instructions to uninstall the OneDrive from your computer.
Fix 8 – Set the background to a static picture
You can try setting the background to a static picture.
1. At first, press the Windows key+I keys together.
2. Then, click on the “Personalization” on the right-hand side.
3. Next, tap on the “Lock screen“.

4. Now, on the same side, set the ‘Personalize your lock screen’.
5. Then, tap on the “Picture“.

Close the Settings. After that, restart your computer. Check whether this Runtime Blocker works or not.
Fix 9 – Check if the Runtime Broker is a virus
A virus/malware named Runtime Broker may consume a huge amount of CPU power.
1. At first, right-click on the Windows icon and tap on “Task Manager”

2. Now, again look for the “Runtime Blocker” process which is consuming a huge amount of CPU resources.
3. Then, right-click on the process and tap on “Open file location“.

This will open up the location of the Runtime Blocker.
If you see that this Runtime Blocker is placed in anything except this below-mentioned location, maybe it is malware or virus.
C:\Windows\System32\

4. If you find the file in a place other than the mentioned location, drop the file in VirusTotal and check whether it contains any malware.

If the file does contain malicious contents, remove the file immediately and run a full scan with Windows Defender (or any good third-party antivirus tool).
This should have fixed the problem you are facing with the Runtime Broker.