Struggling with the email reception issue on your Android phone? We have listed some very easy solutions addressing this email synchronization issue on your phone. Starting from the basic solutions of checking the internet connection on your phone to verifying the sync settings of the email ID, we have covered everything in this step-by-step guide.
Workarounds –
1. Check the Spam and Trash folders. Sometimes, if you have blocked a particular sender, those emails get redirected to these folders.
Fix 1 – Check the sync Gmail settings
Make sure all the emails get synced on your phone.
Step 1 – Launch the Gmail app on your phone.
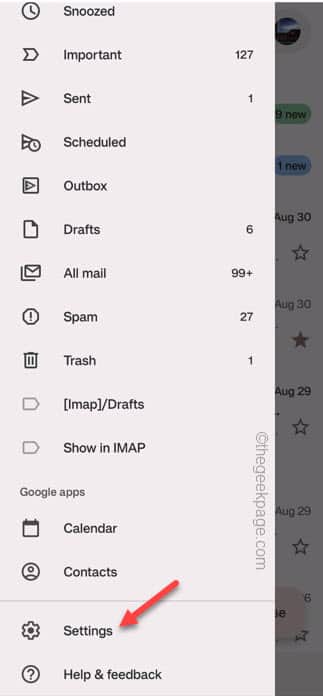
Step 2 – After this, tap the three-dot menu and scroll down to see the “Settings” option. Open that up.
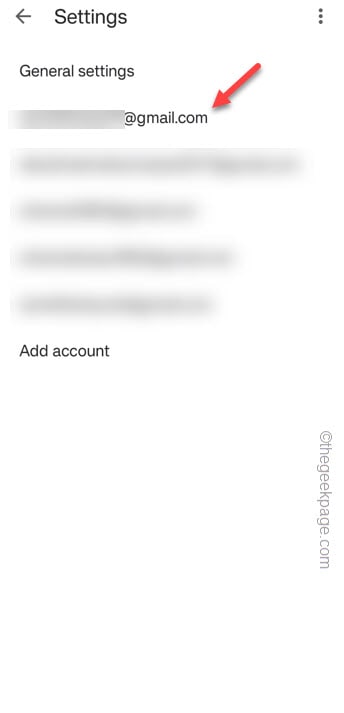
Step 3 – Going into the Gmail settings, you will see all the Gmail IDs that you use.
Step 4 – Then, tap the email ID that you are expecting the email.
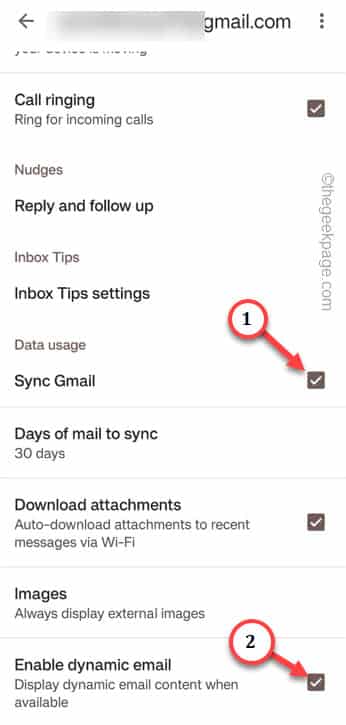
Step 5 – After opening that specific Email settings, just scroll down and check the “Sync Gmail” option under the Data usage section.
Step 6 – Go down further, you shall locate the “Enable dynamic email” option. Check that option.
After this, connect the phone to the WiFi and wait for a while. The email will arrive in the
Fix 2 – Clear stored up Gmail cache
NOTE – Clearing the Gmail cache will clear out any email drafts that you have created. But all the emails will be remain untouched.
Step 1 – Open the Google folder on your phone screen and hold the “Gmail” app.
Step 2 – You should notice a small “ⓘ” icon in the elevated context.
Step 3 – When this takes you to the Gmail information page, scroll down to open the “Storage” settings.
Step 4 – Inside there, you will find the clear the Gmail cache.
Step 5 – So, tap “Clear cache“. All the stored-up cache will be cleared from the app subsequently.
Go back to the Gmail app once more. Open the inbox and check for a new mail.
Fix 3 – Allow unrestricted battery access to Gmail
On some of the devices, Gmail can get restricted due to battery permissions. Give the Gmail unrestricted permission from Settings.
Step 1 – Quickly open the Google folder on the phone.
Step 2 – Just like the previous one, press&hold the Gmail icon on the screen and tap “ⓘ” icon.
Step 3 – Quickly, open the “Battery” permissions in the Gmail settings.
Step 4 – Now, you have to set the battery permission to the “Unrestricted” setting.
Once you have reset the battery settings for the Gmail app, your phone won’t restrict the syncing operation of the Gmail app.
Just wait and you will see notification in the Gmail app.
Fix 4 – Turn off the Power Saving mode
Power Saving mode on your phone can restrict the syncing operation of the Gmail app.
Quick Steps –
Step 1 – You have to disable the Power Saving mode. The easiest of doing that is to just use the Quick Panel. So, slide down twice to see all the icons there.
Step 2 – Then, disable the “Power Saving” mode.
Using direct settings –
If you can’t find the Power Saving mode, use the direct settings on your phone.
Step 1 – Just open the Settings on your phone.
Step 2 – Next, scroll down and open the “Battery and device care” settings.
Step 3 – You will see the various options on the page. So, open the “Battery” to access that.
Step 4 – Finally, if you look, you can see the “Power saving” feature on the screen.
Step 5 – Then, set this to Off mode.
Your email notification is just around the corner. Just wait for a while and it will appear.
Fix 5 – Don’t use the phone in low battery
Almost all the phone has this feature where the phone automatically halts background operations like syncing.
So, if the phone is showing signs of low charge, charge it up at least to 20%. This will get the device out of the low battery phase and resume the syncing process. Now, open the Gmail app while you are connected to the WiFi or using the mobile data. Hold and scroll down the app to refresh it.
Your email should appear.


