Front audio jacks on your PC are the ones where you connect your headphones or microphones. Whether it’s on your laptop or personal computer, sometimes you may find that the “headphone audio jack is not working” in your Windows 10 PC. The issue can be either due to outdated audio drivers, an issue with the connection between the audio jack and the motherboard, or if the port is enabled in the audio settings. However, there are a few possible solutions that can help you fix the “headphone audio jack is not working” issue in your Windows 10 PC. But, before you proceed with the below methods, make sure that you have plugged in the headphone or the microphone to the correct jack. For laptops you do not have a chance to make a mistake since there’s only one, but for PCs the green one is for speaker/headphone and the pink one is for the microphone. If this doesn’t
work, you can try the below methods.
Method 1: Show disabled and disconnected devices
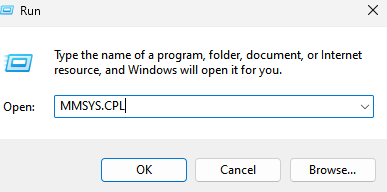
1 – Open run command box by jointly pressing Windows and R key.
2 – Type MMSYS.CPL in the text box of run command box and click OK to open sound control panel.

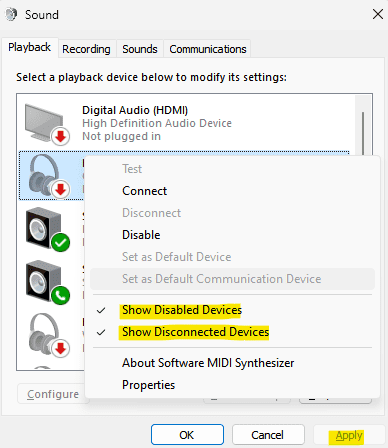
3 -Now, Right click anywhere inside on any empty area and select both Show disconnected devices and Show disabled devices (Just click on them to select them)

4 – Click Apply and OK
Also Read: Headphones Not Showing Up in Playback Devices
Method 2: Turn Off the Front Panel Jack Detection
This method is for those using a Realtek sound card. Here’s how to fix the issue by disabling the front panel jack detection:
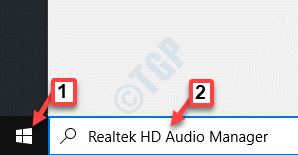
Step 1: Go to Start and type Realtek HD Audio Manager in the Windows search bar.

Step 2: Left-click on the result to open the Realtek HD Audio Manager window.
Navigate to the extreme upper right-side of the window and click on the folder icon.
Step 3: In the Connector Settings pop up, check the box next to the Disable front panel jack detection option.

Press OK to save changes.
Note: Alternatively if you can’t open Realtek HD audio manager, you have an option of disabling front panel jack detection through Registry editor also. Here is how to do so.
1. Press Windows key + R key together to open run.
2. Now, write regedit in it and click OK.

3.Now, before changing anything please click on file > export to create a Registry backup first, so that if any unwanted results appear , you can do file > import to revert the changes.
4. Now, after you have taken a backup, proceed to the following path in the registry editor. Just copy and paste the path in address bar of registry editor.
HKEY_LOCAL_MACHINE\SYSTEM\CurrentControlSet\Control\Class\{4d36e96c-e325-11ce-bfc1-08002be10318}
5. Now, expand all folders with name starting with 000.

6. Now, If there is a setting folder after expanding 000 named folders, expand those settings folder also. If after expanding those settings folder , you find a folder with name starting with Drv8186_DevType , then click on the setting folder once.
7. Once you have clicked and selected that settings folder, in the right side , right click and create a create a binary value named JackCtrl
8. Now, edit and modify its values by typing FF 82 40 00 in it.

9. Close the editor and reboot the PC
Method 3: Disable Front panel jack detection via registry
1. Press Windows key + R key together to open run.
2. Now, write regedit in it and click OK.

3.Now, before changing anything please click on file > export to create a Registry backup first, so that if any unwanted results appear , you can do file > import to revert the changes.
4. Now, after you have taken a backup, proceed to the following path in the registry editor. Just copy and paste the path in address bar of registry editor.
HKEY_LOCAL_MACHINE\SYSTEM\CurrentControlSet\Control\Class\{4D36E96C-E325-11CE-BFC1-08002BE10318}
5. Now, Just keep clicking on folder named 000* and on the right side locate DriverDesc and double click on it.
Now, if the value data is Realtek Audio, then we have to make changes in that 000* named folder.
In the screenshot below in my case , it appears in 0001

6. Now, once you are sure that it appears in which folder with names starting with 000*, expand that folder and click and select GlobalSettings.
7. Now, in the right side locate EnableDynamicDevices and set its value to 0.
simply type 00 00 00 00 from keyboard and click OK.
Note : – If EnableDynamicDevices is not present in right , just right click and create a Reg_Binary and name it as EnableDynamicDevices and then set its value to 00 00 00 00.
8. Close the editor and reboot PC.

Method 4: Set Audio Device as Default
Step 1: Go to right end of the Taskbar, right-click on the speaker icon and select Sounds.

Step 2: In the Sound dialogue box, go to the Playback tab.
Right-click on the audio device and select Set as Default Device.

Now, check your audio ports and they should be working now.
Method 5: Restore Defaults for Audio Device
Step 1: Right-click on Start and select Run.

Step 2: It opens the Run command window. Write mmsys.cpl and press OK.

Step 3: In the Sound dialogue box that opens, under the Playback tab, select the audio device and click on the Properties button at the bottom.

Step 4: In the Audio Properties dialogue box, go to the Enhancements tab and click on Restore Defaults.
Step 5: Next, go to the Advanced tab and press the Restore Defaults button at the bottom.

Step 6: Now, select the Spatial sound tab and press the Restore Defaults button at the bottom.
Press Apply and then OK to save changes and exit.

Step 7: Now, back in the Sound dialogue box, select the Recording tab.
Select Microphone and click on the Properties button below.

Step 8: In the Microphone Properties dialogue box, go to the Advanced tab and click on Restore Defaults.
Press Apply and OK to save changes and exit.

Step 9: Now, back in the Sound dialogue box, select the Communications tab and click on the radio button next to Reduce the volume of other sounds by 80%.
Press Apply and then OK to save changes and exit.

Exit the Sound dialogue box and try connecting the headphone into the ports and it should work properly now.
Method 6: Update or Reinstall Audio Drivers
Solution 1: Update Audio Driver
Step 1: Press the Win + R shortcut key on your keyboard to open the Run command box.
Step 2: Write devmgmt.msc in the Run command search field and press OK to open the Device Manager window.

Step 3: In the Device Manager window, go to the Sound, video, and game controllers section and expand it.
Right-click on the audio device and select Update driver.

Step 4: In the Update Drivers window, click on the Search automatically for updated driver software option.

Step 5: Windows will start looking for an updated driver. If any latest driver available, it will automatically download and install the the update to your PC.
Reboot your PC and check if the headphone jack is working now.
*Note – Alternatively, you can also follow the below steps:
Step 1: Follow the Step 1 to 3 as shown above and then in the Update Drivers window, select Browse my computers for drivers.

Step 2: Next, select Let me pick from a list of available drivers on my computer.

Step 3: Now, select the audio device you want to use and click Next to finish installing.
Restart your PC and the problem should be gone. You can now connect your headphone/microphone to the PC port.
Besides, you can also visit the audio driver’s manufacturer website, download the drivers and install them manually.
Solution 2: Reinstall the Driver
Step 1: Press the Win + X keys together on your keyboard and select Run to open Run command.

Step 2: It opens the Run command window. Now, type devmgmt.msc in the search box and hit Enter to open Device Manager.

Step 3: In the Device Manager window, expand the Sound, video, and game controllers section.
Right-click on the audio device and select Uninstall device.

Step 4: Click on Uninstall again in the prompt to confirm the action.
Once the device is uninstalled, restart your PC. Now, when you go back to the Device Manager and to the Sound, video, and game controllers section, you will see that the audio device is re-installed automatically.
Method 7: Run the Windows Troubleshooter
Step 1: Right-click on the speaker icon on the Taskbar and select Troubleshoot sound problems.

Step 2: The troubleshooter starts detecting problems.

Step 3: Next, it will display a list of audio devices.
You can select the one you want to troubleshoot.
Click Next.

Step 4: It will start detecting problems again and then present the possible solutions.
Follow the on-screen instructions to finish the troubleshooting process.
Once done, restart your PC and the audio jack not working issue on your Windows 10 PC should be resolved.
Now, you can try connecting the headphone/microphone to the PC jack and it should work properly.