Some folders/files are made read-only to protect file integrity. But in most cases, you can revert the read-only status of a particular folder/file very easily. Some Windows 11 & Windows 10 users are complaining about a particular issue about the read-only status of file/folder on their system. According to these users, the problematic folder keeps returning the read-only status automatically, making them non editable. If you are facing the same issue on your computer, don’t worry. Follow these easy fixes on your computer. Though mainly this is an issue of inadequacy of proper permissions, sometimes recent Windows 10 update may cause this issue.
Workarounds –
1. Log in to your system with your administrative account. Try to modify the folder/file again.
2. Disable any antivirus you are using and try it again.
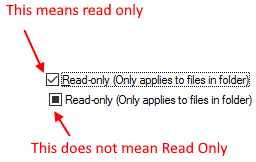
Note: – Please make sure that a tick mark is there in read only checkbox , because some users get confused with black colored read only checkbox, which is only a status indicator.

Fix 1 – Disable the Controlled access
Control access protects your files from getting modified by any third-party application.
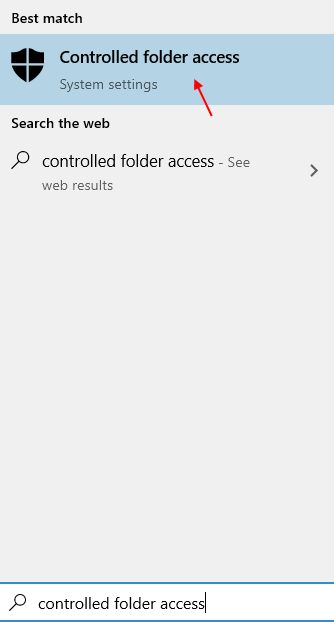
1 – Search Controlled folder access in Search box of Windows computer.

2 – Switch the ‘Controlled folder access’ to “Off“.

Close the Windows Security window and reboot your computer. Check if this has worked for you.
Fix 2 – Modify the attribute of the problematic folder
You can modify the attribute of the problematic folder.
1. At first, press the Windows key+S keys together. Then, type “cmd” in the search box.
2. Then, right-click on the “Command Prompt” and click on the “Run as administrator“.

3. Once the terminal appears on your screen, paste this code, modify it according to your requirements, and hit Enter.
attrib -r +s "path of the folder"
[NOTE– Replace ‘path of the folder‘ with the troublesome file/folder location on your system. Just click on the folder to go inside the folder and then copy the path from the address bar.
Example– We have a file named ‘Test’ in the ‘C:\Users\Sambit\Pictures\New folder’ location. So, the command will look like this –
attrib -r +s C:\Users\Sambit\Pictures\New folder\Test.txt

]
This will remove the read-only attribute from the file and attach a new default system attribute to the particular file.
Check out this fixes your problem.
NOTE–
Sometimes changing the file attribute can create problems with some folders/ files. So, to undo the changes to the file/folder attributes, follow this step-
Type and modify this command in the CMD terminal and press Enter.
attrib -r -s drive:\<path>\foldername
This should discard the system attribute assigned with the previous command.
Fix 3 – Modify the Permissions of the drive
Adjust the permission for the drive and test it out.
1. Locate the drive where the file/folder is on your computer.
2. Then, right-click on the drive and click on “Properties“.

3. Click on the “Security” tab.
4. Next, click on “Advanced“.

5. Once the Advanced Security settings appear, click on the “Change Permission“.

6. Then, select your account from the list in ‘Permission Entries:’.
7. After that, click on “Edit“.

8. After this, click on the drop-down and choose “This folder, subfolders, and files“.
9. In the ‘Basic permissions:’ tick the box of “Full control“.

10. Click on “Apply” and “OK” to save this change.

Now, if you have multiple user accounts on your system, you have some additional steps to cover-
1. Press the Windows key+R.
2. Type “C:\Users” and click on “OK“.

3. In the Users folder, right-click on the other account (the account you are not using now) and click on “Properties“.

4. In the Properties window, click on the “Security” tab.
5. Then, click on “Advanced“.

6.In the Advanced Security settings click on “Enable inheritance“.

7. You need to save this change. Click on “Apply” and “OK“.

Check out the folder/file again.
Fix 4 – Run SFC and DISM scan checks
You can utilize the system file checker to repair the corrupt files on your system.
1. Press the Windows key+R.
2. Then, type this code and hit Enter.
cmd

3. To run an SFC scan type this command and hit Enter to run a simple SFC scan.
sfc /scannow

4. Running a DISM scan is a very easy process. To do so, copy-paste these commands one-by-one and then hit Enter.
DISM.exe /Online /Cleanup-image /Scanhealth
DISM.exe /Online /Cleanup-image /Restorehealth
DISM.exe /online /cleanup-image /startcomponentcleanup

Once all these checks are complete, close the terminal and restart your device.
Your problem should be solved.