All the files that you open with MS Word, get opened in Read-only mode. But, MS Word shouldn’t start to open even the local files in read-only mode. If Microsoft Word is behaving like this on your system, it is not normal. So, we have listed out these sets of solutions that should help you fix the problem on your own.
Quick Tips –
1. Check the validity of your Microsoft 365 subscription plan. You can take a quick view of the subscription plan validity directly from here.
2. Close the current instance of Word and then relaunch the same document and test.
Fix 1 – Turn off editing restrictions of a file
Some portion of a Word file may have a layer of editing restrictons applied on itself.
Step 1 – To do this, launch the Word file on your system.
Step 2 – When the file launches in Word, get to the “Review” tab.
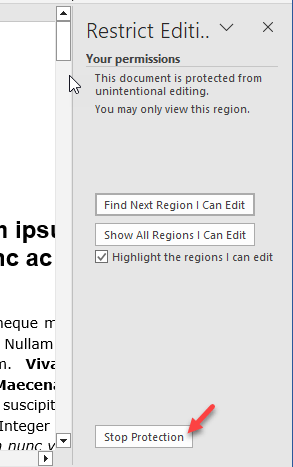
Step 3 – Go to the “Restrict Editing” menu.
Step 4 – As the review pane opens up in the right-hand ribbon, tap “Stop Protection“.
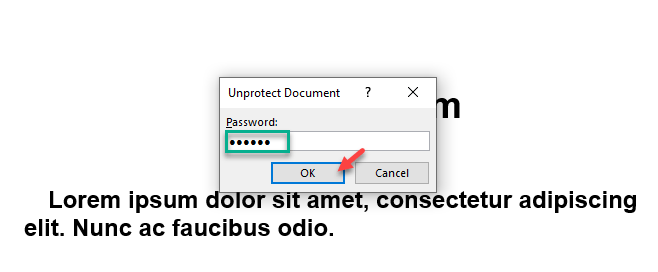
Step 5 – Usually, the document file is password protected or user authenticated.
Step 6 – So, input the password in the box and click “OK“.
After lifting the review restrictions from the file, you won’t be annoyed with the read-only message.
Fix 2 – Tweak the startup behavior
The latest version of Word 365 offers a default reading view of the documents that you get from emails. Changing this setting may help.
Step 1 – Quickly head on to the “File” tab.
Step 2 – There, use the “Options” menu.
Step 3 – In the Word Options tab, open the “General” tab.
Step 4 – On the right-hand side, look for the ‘Startup behavior‘ section. Uncheck the “Open e-mail attachments and other uneditable files in reading view” option.
Step 5 – Use the “OK” to save the settings.
Close the Word options.
After doing tis
Fix 3 – Turn off the protected view
Though the Protected View keeps the malwares separate, you can keep the files in read-only mode.
Step 1 – Open the Microsoft Word, if it isn’t opened yet.
Step 2 – Go to the “File” menu.
Step 3 – On the same side of the screen, tap “Options“.
Step 4 – Select the “Trust Center” tab from the left-hand tab.
Step 5 – Click the “Trust Center Settings” to acess the trust cente settings.
Step 6 – Go straight to the “Protected View” bar.
Step 7 – You will notice three options on the right pane. Uncheck all these three options –
Enable Protected View for files originating from the Internet
Enable Protected View for files located in potentially unsafe locations
Enable Protected View for Outlook attachments
Step 8 – To save the changes, hit “OK“.
NOTE – As the protected view is disabled, do not open document file from any unknown sender (spam). Turn this feature on once you have solved the read-only mode problem on MS Word.
Fix 4 – Launch the Word in Safe Mode
The Safe Mode operation on MS Word should help you mitigate this ‘Read-only’ problem.
Quit the document in Word before doing this.
Step 1 – At first, press the Start key+R keys together.
Step 2 – When this brings up the Run panel, paste this and click “OK“.
winword /safe
When the Word launches in the Safe Mode, you operate without the influence of any external plug-ins.
Now, load the document once more. Try editing the document or parts of it. If you can edit that, understand that an external plug in is causing this problem.
Fix 5 – Disable the preview pane
Some users have noted that disabling the preview pane in the File Explorer have fixed this problem.
Step 1 – To do this, you must open up the File Explorer.
Step 2 – Later, click the “View” button and the drop-down menu should appear.
Step 3 – Make sure that the “Preview pane” is deselected.
After disabling the preview pane, the document won’t open in read-only mode.
Fix 6 – Open the file in web
Whether you are using Microsoft 365 or the standalone Office 2016, 2021 version, you should try to use the web application of Word and test it there.
Step 1 – In your browser, go to the Microsoft Office 365 and log in using your Microsoft account.
Step 2 – Once you have logged in, tap the “Word” icon from the left navigation pane.
Step 3 – Now, this will launch MS Word in a separate tab.
Step 4 – You will see the file in the ‘Recent files’ section. Open that up*.
Check the behavior of the file once more. The file won’t be read-only anymore.
*NOTE – If you don’t see the file in there, you can upload the file into OneDrive to access that.


