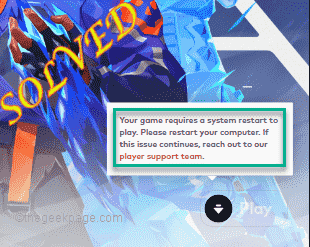
Cheating in online FPS games has always been a big issue, even when Valorant wasn’t there. It can destroy the gaming experience, and cut down the player’s interest in the game. Valorant, from its nascent stages, tried to overcome this shortfall with its own Riot Vanguard protection system. You have to perform a system restart after installing the game just once, which is completely normal, and the Vanguard system will be started automatically. But, what if you have restarted your system and still you are seeing the “Your game requires a system restart to play. Please restart your computer.” message on the front page? This problem has occurred to many users, so there is nothing to worry about. Follow these fixes to get a quick resolution.
Fix 1 – Do not Exit Vanguard
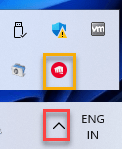
After restarting your computer, tap on the arrow-sing on the taskbar to view the hidden icons.
Here, you will notice several background icons. Now, make sure that you do not close the Riot Vanguard on your system.
Once you are sure Vanguard is running in the background, launch Valorant and test whether it works out.
Fix 2 – Launch Valorant as an administrator
Sometimes some old crash files may cause this problem.
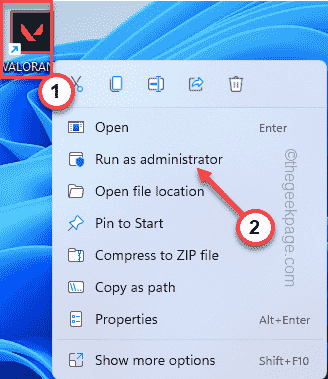
1. Just, right-click on the Valorant icon on the desktop and tap “Run as administrator” to run the game as an administrator.
Just check whether this works for you. If this successfully launches the game,
1. Look for the Valorant icon on your desktop.
2. Then, right-click on the “Valorant” app and tap “Properties“.
3. Go to the “Compatibility” tab on the Properties page.
4. Now you have to check the “Run as administrator” box.
5. Once you have done that, tap “Apply” and “OK” to apply and save the changes.
Now, launch Valorant and test if this works.
Fix 3 – Automate the Vanguard service
If the Vanguard service is not running, check if this works.
1. You have to search for “Services” from the search box.
2. Then, tap “Services” to proceed.
The Services window will open up quickly.
3. After opening the Services utility page, look for the “vgc” service.
4. Just, double-tap the service to access it.
5. When the vgc Properties open up, just click on the ‘Startup type:’ and choose “Automatic“.
6. Next, check whether the service is running or not. If it isn’t, tap “Start” to immediately start the service.
7. Finally, tap “Apply” and “OK“.
Close Services window. Then, launch the Valorant game and wait for it to load up. Test if this works out.
Fix 4 – Enable Vanguard
Vanguard anti-cheat software requires to be automatically started up at the Windows boot.
1. At first, right-tap the Windows icon and tap “Task Manager“.
2. Now head on to the “Startup” section, where you can find all the items that are meant to autostart during boot.
3. Just, right-click on the “Vanguard tray notification.” and tap “Enable” to enable the startup.
After that, close the Task Manager. Restart the system and check whether this actually helps.
Fix 5 – Turn off the Integrity check
You can try turning off the non integrity check simply by using two commands.
1. Write “cmd” in the search box.
2. Later, right-click on the “Command Prompt” search result and tap and “Run as administrator“.
3. Once the Command Prompt appears on your screen, input these codes one-by-one and hit Enter to execute both the commands.
bcdedit -set TESTSIGNING OFF
bcdedit -set NOINTEGRITYCHECKS OFF
Once you have passed both the commands, close the terminal. After that, restart your computer.
After restarting, Riot Vanguard will start up successfully. You can now easily play the game.
Fix 6 – Disable the Virtualization
If the virtualization is enabled on your device, Riot Vanguard may face difficulty starting up.
1. Pressing the Windows key+R keys together will open up the Run terminal.
2. Then, type “cmd” in the box and press Ctrl+Shift+Esc keys together to access the terminal with administrative rights.
3. Just write this code in the terminal and hit Enter.
bcdedit /set hypervisorlaunchtype off
After this, just close the Command Prompt screen. Restart the machine for this change to take effect.
Launch Valorant and test if this works.
NOTE –
If in any case, this works, you can easily set the hypervisor settings back to normal mode again.
1. Open the Command Prompt with administrative rights.
2. After that, just execute this command to set the hypervisor launch type to Off.
bcdedit /set hypervisorlaunchtype auto
Close Command Prompt and check if this works out.
Fix 7 – Re-install Valorant
If nothing is working out, you have to reinstall Valorant on your system.
1. You have to open the Settings page.
2. Tap on the “Apps” on the left-hand pane.
3. After that, click “Apps & Features“.
4. Now, just type “Valorant” on the left-hand side search box.
5. Tap on the three-dot menu and tap on “Uninstall“.
6. Next, click on “Uninstall” to confirm the action again.
This way, you have successfully uninstalled the Valorant app.
7. Next, just download the latest version of the Valorant installer.
8. Just, double-tap “Install VALORANT” to download and install Valorant on your system.
After doing this clean install, restart the computer just once. Then, you can easily enjoy Valorant just like before.


