The Recovery Environment is an integral part of Windows and usually opens up when your PC runs into some issue. Now, what if your system can’t boot into the recovery environment and shows up with the “Could not find the recovery environment” error message? This may appear as a very serious issue for you as you can’t even reset or repair the system.
Fix 1 – Force Boot the system into RE
If you can’t boot into Windows Recovery Environment, you can force-boot your system into it.
1. Shut down your computer.
2. Once you are sure that the device is switched off completely, tap on the power button once to start it up. When you reach the manufacturer’s logo screen, press-hold the power button again to switch off the device completely.
3. Repeat these steps of force-boot-shutdown 2 more times.
4. At the third time, let the system boot normally. While the system boots up, you will see the Automatic Repair screen has opened up.
5. Now, click the “Advanced options” option.

Now, you will notice all the settings and options of the Windows Recovery Environment here. You can perform a reset/repair or even start the system in safe mode if you prefer. This can be a quick and easy alternative way to access Windows RE.
Fix 2 – Create & use Windows 11 MCT
You can create and use a bootable Windows 11 bootable drive to access the Windows Recovery Environment.
You need a USB drive to create the bootable drive. In the process, the USB drive will be formatted and any data stored in the drive will be erased. So, create a local backup of the data stored in the USB device, keep the USB device plugged in and start creating the MCT.
Step 1 – Download and create Windows 11 MCT
Download and make a Windows 11 bootable USB drive.
1. At first, go to the Microsoft Software Download section.
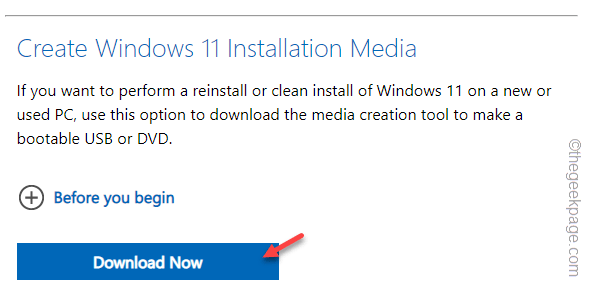
2. Now, scroll down to the ‘Create Windows 11 Installation Media’ section.
3. To download the tool, click on “Download Now“.
4. Now, choose a location to store the MCT creation tool.
5. Then, tap on “Save” to save the MCT file.
Once the downloading process is complete, close the browser.
Now, the process of creating the bootable drive begins.
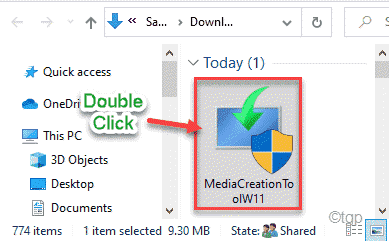
1. Open the File Explorer and navigate to the directory housing the MCT creation tool.
2. Once you are in that directory, just double-tap the “MediaCreationToolW11” file.

3. You have to assert the terms and conditions. Tap “Accept“.
4. In the following step, you can select your OS language and Windows Edition.
5. To do that, you have to uncheck the “Use the recommended options for this PC” option.
6. Tap “Next” to proceed.
7. Now, this step is very crucial. Choose “USB Flash Drive“.
8. Then, tap “Next“.
9. In the next step, you will be shown all the drivers on your system.
10. Select the USB drive you want to use and tap “Next” to proceed.
This will now download and create the Windows 11 media into the USB drive.
All you have to do is to wait for the whole process to be complete.
11. Once it is done, tap “Finish” to complete the process.
Step 2 – Use it to access Windows RE
Once it is complete, close everything and restart the computer.
1. While your system is restarting, keep pressing the associated boot key so that you can access the boot menu.
Manufacturer to manufacturer this actual key to open the Boot settings varies. So, carefully notice which key is allotted to your system. It can be any one of these keys –
F2, Del, F12, F1, F9, F2, Esc

2. Once Booting Menu opens up, go to the “Boot” tab.
3. You will see the list of booting options and their precedence. Select the USB drive using arrow keys and hit Enter to boot using the drive.
This will restart the system using the USB drive.
5. Once the computer boots up from the USB drive, click on “Repair your computer“.
This will open the Recovery Environment.
Fix 3 – Enable the Recovery Agent
You can’t access Windows RE if the Recovery Agent is disabled on your system.
1. Just click on the Windows icon on the middle taskbar. A search box will appear.
2. Type “cmd” there. Once you see “Command Prompt” in the search results, right-tap it and click “Run as administrator“.
This way, you can open the Command Prompt with administrative rights.
3. Now, in the CMD screen, paste this command to know the current status of the Recovery Agent.
reagentc /info
4. If you notice the Recovery Agent is disabled, you can easily enable it using a command.
reagentc /enable
Once you have enabled the Recovery Agent, close the Command Prompt window.
Restart the system and then try to open the Recovery Environment once more. Test if this works.
Fix 4 – Use the Diskpart
If nothing else works out, you can remove the partition using the diskpart.
1. Go to the bottom side of the screen and right-click on the Windows icon and tap “Run“.
2. Here, type “diskpart” there and tap “OK” to open the Diskpart
3. When the diskpart opens up, type these words and hit Enter to view the list of all disks.
list disk
4. There can be quite a number of disks. Carefully chose the disk where the recovery partition is on your system.
[
If you don’t know where is the recovery partition on your drive, you can use Disk Management.
a. You just have to press the Windows key+X keys together.
b. Then, tap “Disk Management” to access it.
c. Here, carefully notice which disk has the “Recovery drive“.
It is usually the Drive 0.
]
5. Now, run this code to select the particular disk.
select disk drive number
Replace the “drive number” with the number that you have noted before. It is “0” in our case.
select disk 0
6. Once you have selected the disk, you can view the list of partitions. Execute this command.
list partition
7. Now, look carefully, particularly which partition is showing “Recovery Partition“.
8. You have to select the partition. Paste the command and modify it with the partition number.
select partition your partition number
Replace the “your partition number” with the partition number for your system. It is “4” in our case.
select partition 4
9. Finally, you can remove this corrupted partition from your system. To do that, just input these words and press the Enter key.
delete partition override
This way, you can delete the corrupted partition and fix the issue.
Restart your computer once you have done this. Recovery Enviroment should be working again.
