Just like many other bugs in Windows 11 and Windows 10, this error “Windows cannot start this hardware device because its configuration information (in the registry) is incomplete or damaged. (Code 19)” also shows up after upgrading to Windows 10. This error is related to your computer’s DVD/CD-ROM. When this error shows up, the device stops working and your computer won’t recognize any CD/DVD you insert in the drive.
This error is affecting a lot of Windows 10 users. If you are one of them, there’s nothing to worry. We will help you fix this error using our methods.
How to Fix Windows cannot start this hardware device because its configuration information (in the registry) is incomplete or damaged. (Code 19) Error
If your DVD/CD-ROM suddenly stops working after the upgrade, you can check if the reason behind this problem is this error or not. Simply open Device Manager and go to Properties of your DVD/CD-ROM. If you find the error Code 19 followed by the message “Windows cannot start this hardware device because its configuration information (in the registry) is incomplete or damaged” under Device status, then you are on the right page. We will help you fix this problem using our methods. Simply follow and perform the methods mentioned below, until the issue is fixed.
This method should fix the issue. If you are still facing the problem, follow the methods mentioned below.
Fix 1 – Uninstall Elan keyboard filter device
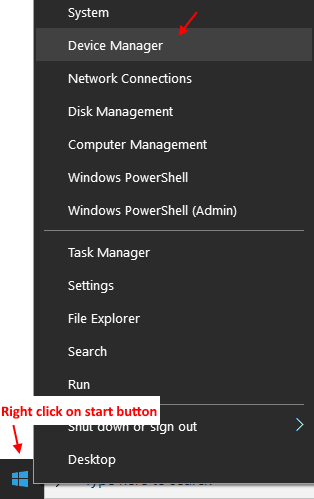
1. Right click on start button and then click on device manager to open device manager.

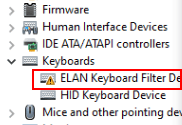
2. Using Double click on keyboards to expand it.
3. Now, right click on Elan keyboard filter device and choose uninstall.

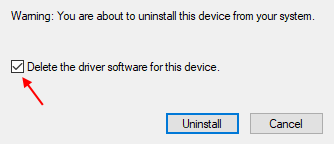
4. In next screen just check the option Delete the driver software for this device.

5. Now, Click on Action.
6. Then click on Scan for hardware changes.

Fix 1 – Edit Registry
Note: – If you can not use the keyboard due to this, just using your mouse click on Mouse button and then scroll down the start menu and find Windows Ease of access. Click on Windows Ease of Access to expand it and then click on On-screen keyboard to open on screen keyboard.

Step 1. Press Windows key + R key together to open run.
Step 2. Type regedit and click on OK. Click on YES when asked for confirmation.

Step 3. In Registry Editor, follow this path on the left side of the window.
HKEY_LOCAL_MACHINE\SYSTEM\CurrentControlSet\Control\Class\{4D36E965-E325-11CE-BFC1-08002BE10318}
Now, in the right side , double click on Default and change the value data to Keyboard

Step 4 – Now, double click on UpperFilters and if it does not exist, right click and create a New > Multi-string value and name it UpperFilters.

Now, double click on it and put value data as kbdclass.

Step 5 – Click on OK and close the registry editor.
Fix 3 – Try to Update Keyboard in device manager
Step 1: Press the Windows key + X together on your keyboard and select Device Manager from the context menu.

Step 2: In the Device Manager window, scroll down and expand Keyboards. Under this, right click on the Standard PS/2 Keyboard and click on Update driver.

Step 3: Now, click on Browse my computer for driver software.

Step 4: Next, click on Let me pick from a list of available drivers on my computer.

Step 5 – Select Standard PS2 driver from the list and update it.
Fix 4 – Delete Problematic Registry Files
The error message itself says that the device’s configuration information in the registry is incomplete or damaged. So, in this method, we will delete those incomplete or damaged registries of the device. Follow the steps to perform this method.
Step 1. Press Windows key + R to open run.
Step 2. Type regedit and click on OK. Click on YES when asked for confirmation.

Step 3. In Registry Editor, follow this path on the left side of the window.
HKEY_LOCAL_MACHINE/SYSTEM/CurrentControlSet/Control/Class/{4D36E965-E325-11CE-BFC1-08002BE10318}

Step 4. Now, on right side of the window, look for LowerFilters and UpperFilters. One by one, right-click on both of them and select Delete. When asked for confirmation, click YES.
Step 5. If your computer doesn’t have LowerFilters and UpperFilters, then select all the files. Right-click on them and select Delete.
Step 6. Restart your computer.
This method should solve the problem. Check if your computer is recognizing the DVD/CD-ROM drive, or not. If the issue is still not fixed, perform the next method.
Fix 5 – Disable Toshiba Optical Disk Drive Service
This method has worked for many users, but this method is specifically for users who have a Toshiba DVD/CD-ROM drive in their computer. If your computer has some other manufacturer’s DVD/CD-ROM drive, you can skip this method.
To perform this method, follow the steps.
Step 1. Press Windows key + R to open run.
Step 2. Type services.msc and click OK.

Step 3. In Services window, look for TOSHIBA Optical Disk Drive Service on the right side of the window. Right-click on it and select Properties.
Step 4. Under the General tab, select Startup type as Disabled and click on Stop. After that, click on OK.

Step 5. Now, restart your computer.
Step 6. Right-click on the Start menu button and select Device Manager.

Step 7. Expand DVD/CD-ROM drives and right-click on your DVD/CD-ROM drive. Select Uninstall device.

Step 8. Now, click on Scan for hardware changes. Wait for your computer to scan and install the device.

This should fix the problem for you. Insert a DVD/CD-ROM in the drive and check if your computer reads it, or not. If the problem still persists, perform the next method.
Fix 6- Update Driver
As none of the above-mentioned methods worked for you, updating the drivers might. In this method, we will update the DVD/CD-ROM drive’s drivers. Follow the steps to perform this method.
Step 1. Right-click on the Start menu button and select Device Manager.

Step 2. Expand DVD/CD-ROM Drives. Here, right-click on your DVD/CD-ROM Drive and select Update driver.

Step 3. Now click on Search automatically for updated driver software. This will download and install the updated drivers for the DVD/CD-ROM drive on your computer.

Step 4. When the updating process is complete, restart your computer.
This should fix the issue. If the problem still persists, try the next method.
Fix 7 – Troubleshoot the issue
In this method, we will try to fix the issue using troubleshoot. Here, Windows will try to solve the problem automatically by itself. Follow the steps to perform this method.
Step 1. Go to Cortana and type Troubleshoot. Select Troubleshoot from results.

Step 2. Click on Hardware and Devices.

Step 3. The Windows will check for issues. When it’s done, click on Apply this Fix or Apply Repair Automatically, whichever appears.
Step 4. Restart your computer.
Fix 8 – Uninstall DVD/CD-ROM
In the first method, we will uninstall the problematic device. Follow the steps to perform this method.
Step 1. Right-click on the Start menu button and select Device Manager.

Step 2. Expand DVD/CD-ROM drives and right-click on your DVD/CD-ROM Drive. Select Uninstall device.

When the device is uninstalled, restart your computer. After your computer restarts, Windows will recognize the DVD/CD-ROM drive as a new device and will automatically install its drivers. Check if this has solved the issue. If it didn’t, follow the next method.
This should fix the problem. If none of the methods worked for you, then you need to replace your DVD/CD-ROM drive. Take your computer to an authorized service centre and ask them to replace the drive.
We hope we were able to help you fix this problem using out methods. If you were able to solve the issue using some other method, or if you have any questions regarding this issue, please mention them below in comments.