Windows update v1803 (April update) was a crucial cumulative update that brought along a lot of changes. Microsoft fixed a lot of bugs with this update and changed many settings in Windows 10. However, this update created a surplus recovery partition for many users, which is visible in File explorer >> This PC.
The problem with this partition is that while it is of no use, it occupies space in the Hard drive, even if virtually. This strains the RAM and slows down the system. To check this, press CTRL+ALT+DEL and open the Task Manager. If the Disk utilization is at 100%, we know it will lag or freeze the system soon.
We cannot delete this partition directly of it would impact the whole operating system. Do not even try to do that.
The following solutions could be tried to mitigate the problem:
Solution 1] Hide the drive
Since we cannot delete the drive, we could hide it so it doesn’t stress the RAM further.
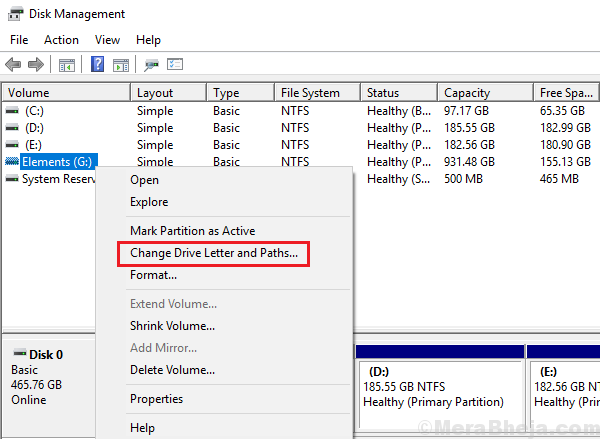
1] Press Win + R to open the Run window. Type the command diskmgmt.msc and press Enter to open the Disk Management window.
2] Right-click on troublesome drive’s drive letter and and select Change Drive letter and paths.
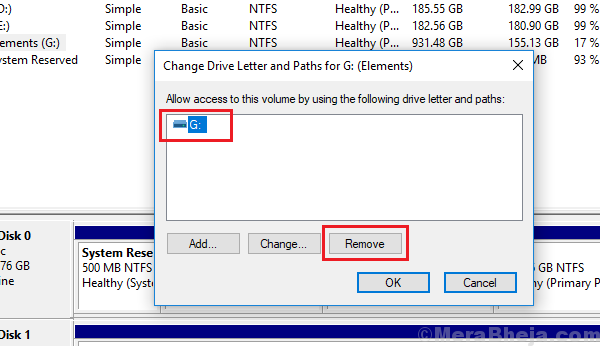
3] Click on remove. It’s won’t delete the drive but hide the driver letter. Click on OK to save the settings.
4] Restart the system.
Solution 2] Using Command Prompt
We can also remove the drive letter using the Diskpart command in Command Prompt.
1] Type Command Prompt in the Windows search bar. Right-click on the icon and select Run as administrator.
2] Type the command
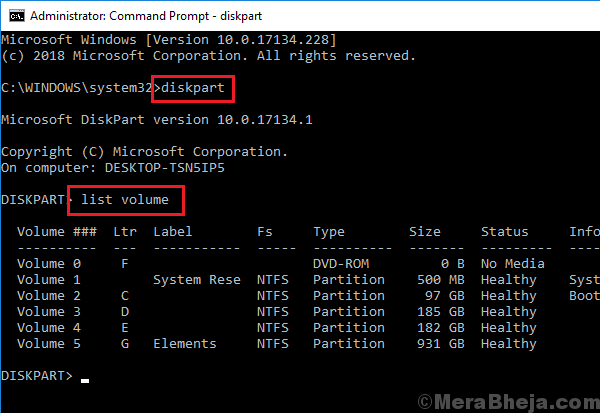
DISKPART
Now, press Enter. Wait for a few seconds and it will create a new line which starts with DISKPART>
3] Type the command
list volume
Now, press Enter. It will list all the partitions along with their Volume number and drive letters.
4] Type the following command and press Enter:
select volume <the volume in the drive>
Where <the volume in the drive> is the Volume number corresponding to the Drive letter of the recovery partition that needs to be removed.
5] Type the following command and press Enter:
remove letter=X:
Where X: is the drive letter of the recovery partition.
6] Once the command has executed, type the command Exit and press Enter to exit COmmand Prompt.
7] Restart the system.
Solution 3] Use a third-party software to delete the partition
The reason we cannot delete the recovery partition is because the Disk Management won’t allow us to do so. Try the many third-party software available online to help you with the same.
Solution 4] Remove the MountPoint
1] Type Command Prompt in the Windows search bar. Right-click on the icon and select Run as administrator.
2] Type the following command and press Enter:
mountvol X: /D
Where X: is the drive letter of the recovery partition.
3] Restart the system
Hope it helps!


