Some Windows 10 users are complaining about a problem regarding the sudden disappearance of WiFi from their system just after their computer received a Windows Update. According to them, when they are trying to find the cause of the problem, they are discovering that ‘Intel Wireless Ac-9560‘ driver is showing ‘Error code-10‘ in Device Manager. If you are facing something similar, no need to worry. In this article, we are going to discuss some solutions to this problem. Just follow them and the problem will be fixed in no time. But, before going ahead for the bigger solutions, you should attempt these initial workarounds first on your computer to try out some simpler solutions for the problem.
Workarounds-
1. If this is the first time you are facing the problem on your computer, reboot your computer. After rebooting your computer check if you are still facing the problem or not.
2. Try a ‘hard shutdown‘-Follow these steps to do a hard shutdown of your system-
Press the ‘Power key‘ of your laptop/desktop until your computer shuts down completely. Now, remove ac power adapter and battery from laptop / PC.
After few minutes, connect the power supply, insert battery again and turn on the PC.
If any of these workarounds didn’t work out for you, go for these fixes on your computer-
Fix-1 Uninstall and reinstall Intel AC-9560 driver-
Uninstalling and reinstalling Intel AC-9560 drivers on your computer may solve this issue on your computer.
1. At first, press ‘Windows key+X‘.
2. Then, from the list of utilities, click on the “Device Manager“.

3.Once the Device Manager window opens up, expand “Network adapters“.
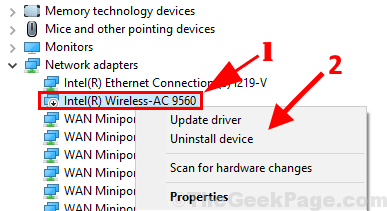
4. Simply, right-click on your WIFI adapter and click on “Uninstall device“.

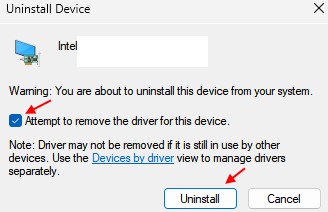
5. Just check the options Delete the driver software for this device

6. Now, open the Device Manager window again.
7. In Device Manager window, on the menu bar, click on “Action” and then click on “Scan for hardware changes“.
Device Manager will reinstall the driver on your computer.

Fix-2 Disable and enable WiFi adapter in Device manager
1. At first, press ‘Windows key+X‘.
2. Then, from the list of utilities, click on the “Device Manager“.

3.Once the Device Manager window opens up, expand “Network adapters“.
4. Simply, right-click on your Wi-Fi adapter
5. Now, click on disable device.

6. Now, restart your PC.
7. Open device manager again and and reach your Wi-Fi adapter and enable it again.
Fix-3 Using an ethernet connection for one time
1. At first, press ‘Windows key+X‘.
2. Then, from the list of utilities, click on the “Device Manager“.

3.Once the Device Manager window opens up, expand “Network adapters“.
4. Simply, right-click on your Wi-Fi adapter and click on Uninstall device
5. Connect your computer to your router via an Ethernet cable.

6. Now, click on Action and then click on scan for hardware changes.

7. Now, Unplug the Ethernet and start using your Wi-Fi.
Fix-4 Reinstall Bluetooth Driver
Some users found out that this issue arises due to crashing of Bluetooth driver. Due to Bluetooth driver, Intel AC 9560 also stopped working. So, to fix this issue, just reinstall Bluetooth driver.
1. At first, press ‘Windows key+X‘.
2. Then, from the list of utilities, click on the “Device Manager“.

3. Once the Device Manager window opens up, expand “Bluetooth“.
4. Now, right click and uninstall your Bluetooth driver.
Normally your Bluetooth driver is that whose name is same as your WIFI adapter.

5. After uninstalling the bluetooth driver , click on Action and then click on Scan for hardware changes.

Now, try again.
Fix 5 – Start WLAN AutoConfig service
1 – Search Services in windows search box of taskbar and then click on Services Icon to open the service manager window.

2 – Now, in the service manager window, Locate WLAN AutoConfig from the list of services.
3 – Double click on WLAN AutoConfig to open its properties window.
4 – Now, make sure the startup type is automatic. If its not, then change it to automatic from the dropdown.
5 – Also, click on start to start the service.

Fix 6 – Perform a cold reboot
To do a cold reboot on your windows PC, just press and hold down the power button.
After you continue to hold the power button , the computer will eventually turns off after a few seconds.
Once you have made sure that it is fully turned OFF, wait for a few seconds and then turn on your computer again.
Fix-7 Reset to factory defaults
Resetting your computer to factory defaults will help you out for sure.
1. Reboot your computer. Upon reboot, continuously press the “F2” key to enter the BIOS settings.

2. Now, go to wireless and set the values to factory defaults
3. Now press “Esc” to exit the BIOS settings on your computer.
4. Your computer will be rebooted automatically. Check if you can discover WiFi on your computer or not.
5. If rebooting didn’t solve the problem on your computer, shut down the computer completely. Wait for a minute. Then, reboot your computer again and upon rebooting, you should be able to discover WiFi again.
Your problem should be solved.