A few Windows users are facing the problem “The Intel(R) WiFi 6 AX201 160 MHz adapter is experiencing driver- or hardware-related problems” when they try to connect to WiFi. This might be because of network issues, connectivity issues, outdated drivers or corrupted drivers, etc. In this article, we will see the different methods to solve this issue. Try the one that suits your situation. Let us start.
Method 1: Update The Intel Driver
Step 1: Open the Run prompt using Windows + R keys together. Type devmgmt.msc and hit enter
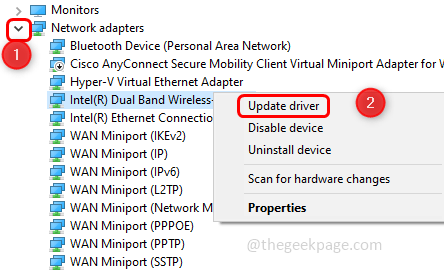
Step 2: The Device Manager window is opened. Click on the Network adapters dropdown to expand it.
Step 3: From the expanded list right click on your Intel wireless WiFi 6 adapter and click on Update driver
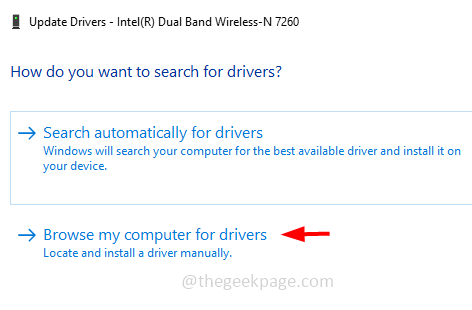
Step 4: Click on Browse my computer for drivers
Step 5: In the appeared window click on Let me pick from a list of available drivers on my computer
Step 6: From the model section select the compatible Intel hardware and click on Next
Step 7: It will take a few minutes to finish the driver update process. Once done, restart your system and check if the problem is solved
Method 2: Download And Install The Intel Driver
Step 1: Go to the Microsoft support link scroll down and choose your surface device model. If you don’t know which surface model is applicable to your system then go through the same link and find which is compatible with your device.
Step 2: Once you know it, to choose the surface model click on the choose your surface device model dropdown and select from the list. Here I will select Surface 3
Step 3: There opens a list of Surface 3 models select the suitable one and click on that particular link. I will select Surface 3 [Wi-Fi] as an example.
Step 4: It will take you to a new window. Click on Download
Step 5: Wait for it to download completely. Double click on the downloaded setup.exe file and follow the onscreen instructions to install and update it.
Step 6: Restart your system and check if the issue is resolved.
Method 3: Use The Network Troubleshooter
Step 1: Open the Windows Settings using Windows + I keys together and click on Network & Internet
Step 2: By default, it will open the Status window, click on Network troubleshooter which is on the right.
Step 3: It detects the problem and suggests the fixes. Apply those fixes and check the results
Method 4: Reset The Network Connection
Step 1: Open the Windows Settings using Windows + I keys together and click on Network & Internet
Step 2: By default, it will open the Status window, at the right click on Network reset
Step 3: The Network reset window will appear to click on Reset now
Step 4: Restart your system
Method 5: Change The Wireless Settings
Step 1: Open the Run prompt using Windows + R keys together. Type devmgmt.msc and hit enter
Step 2: The Device Manager window is opened. Click on the Network adapters dropdown to expand it.
Step 3: From the expanded list right click on your Intel wireless WiFi 6 adapter and click on properties
Step 4: In the properties window, select the Advanced tab and change the value to 1. 5Ghz 802.11a. Click on OK
Step 5: Restart your system and check if the issue is solved.
Method 6: Reset Network Protocols
Step 1: Open the command prompt as an administrator. To do this type cmd in the Windows search bar, hold Ctrl and Shift keys together, and hit enter
Step 2: A user account control window will appear, click on yes
Step 3: Execute the below commands one by one. To execute, copy the command and paste it into the command prompt then hit enter.
netsh int ip reset
netsh advfirewall reset
netsh winsock reset
ipconfig /flushdns
ipconfig /release
ipconfig /renew
Step 4: Restart the system and check the issue to be solved.
That’s it! I hope this article is helpful. Let us know which of the above methods worked for you. Thank you!!


