If you have a laptop, then chances are that you are running it on a WiFi connection. The WiFi icon sits on the right side of the Taskbar (next to the notifications area) of your Windows 10 laptop under normal circumstances. However, sometimes you may find that the WiFi icon is missing from the Taskbar.
This can be frustrating because if your WiFi device is not set to connect automatically, you won’t be able to connect to your WiFi device manually. So, how to get back the missing WiFi icon in your Windows 10 laptop Taskbar? Let’s see how.
Method 1: Restart File explorer
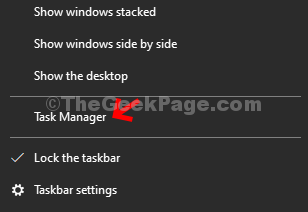
Step 1: Right-click on the Taskbar on your Windows 10 laptop and select Task Manager from the context menu.

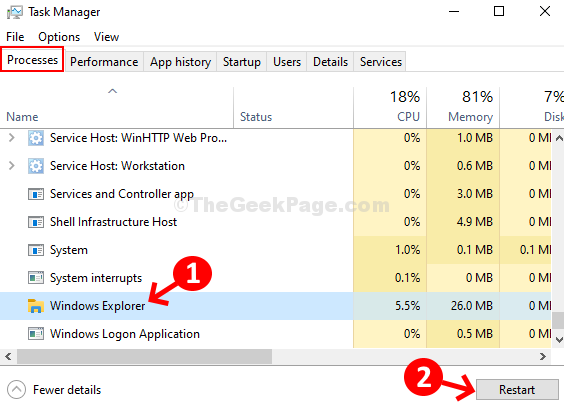
Step 2: In the Task Manager window, under the Processes tab > scroll down and find Windows Explorer. Select Windows Explorer and click on the Restart button on the bottom right of the window.

The WiFi icon should now appear on your Windows 10 laptop Taskbar. If it doesn’t, you can try the second method as below.
Method 2: Using the Settings App
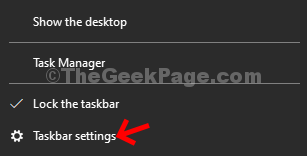
Step 1: Right-click on Taskbar and select Taskbar Settings from the context menu.

Step 2: In the Taskbar Settings window, scroll down and click on Select which icons appear on the taskbar link in blue under the Notifications area category.

Step 3: In the next window, move the slider to the right to turn on Network.

Now, right-click on the desktop to Refresh, and your WiFi icon should be back on your laptop Taskbar.
Method 3: Disable and Enable Wireless adapter
1 – Search Device manager and click on Device manager icon to open it

2 – Locate and Double click on Network adapters to expand it
3 – Now, right click on your wireless driver adapter and click on disable device.

4 – After waiting for few seonds, again right click on your wireless driver adapter and this time click on enable device.

Method 4: Network reset
1 – Open command prompt in administrative mode
2 -Now, run the command given below one by one and hit enter each time
netsh int ip reset
netsh advfirewall reset
ipconfig /flushdns
ipconfig /release
ipconfig /renew
netsh winsock reset
3 -Close command prompt window and check again
Method 5 – Start network services
1 – Press Windows key + R key together to open run.
2 – Now, type services.msc in it and click OK.

3 – Now, locate Network List Service in it.
4 – Make sure service is running. Just double click on it and change startup type to automatic.
If it is not running, click on start to start the service.

Similarly ensure that the following services also running. If not right click and click on start to start the services.
- Windows Connection Manager
- Windows Connect Now – Config Registrar
- WLAN AutoConfig
- Remote procedure call
- Network Connections
- Plug and Play
- Remote Access Connection Manager
- Telephony
Now, restart explorer as described in method 1 to see if it is fixed or not.
Method 6 – Change display scaling
1 – Right click on an empty area on desktop and choose display settings.

2 – Now, try to change scaling one by one and see if it fixes your issue.

Method 7 – Check networking icon setting in gpedit
1 – Search gpedit.msc in search box of windows taskbar and click on it to open group policy editor

2 – Now, go to User Configuration > Administrative templates > Start menu and Taskbar from left menu
3 – In the right side , Just double click on Remove the networking icon

4 – Just choose disabled and click on apply and OK

Method 8: Delete config key from registry editor
1 – Search regedit in windows search box and click on Registry editor to open registry
2 – Now, go to the path given below by copying and pasting it in the address bar of registry editor
HKEY_LOCAL_MACHINE\SYSTEM\CurrentControlSet\Control\Network
3 – Now, if you can locate a Config key to the right side, just delete it

Method 9: Enable your WiFi Adapter
1. Press Windows key + R from your keyboard to open run.
2. Type ncpa.cpl in it and click OK.

3. Right click on your Wi-Fi adapter and click on enable

If it still does not work just right click and disable on your Ethernet adapter.
Note: – If you are unable to find your wifi adapter here, may be you have to buy an external USB wifi adapter for your laptop.
Method 10: Enable your WiFi Adapter in Device manager
1. Press Windows key + R together to open RUN.
2. write devmgmt.msc in it and click OK.

3. Now, expand network adapters
4. Locate your WiFi adapter and make sure it is not disabled. If it is disabled, just right click on it and click enable.

*Note – Either of the above methods should get back your missing WiFi icon your Windows 10 laptop Taskbar. But, if the methods still don’t work, you can try updating the Network Adapter driver, or check if your laptop keyboard has the option to turn on WiFi (some keyboard come with this option.