If a user wants to back up their entire disc drive or a specific drive, they strive to build an image duplicate of it that contains all of the data, and this image file is known as an ISO file or image.
Most Windows users when trying to mount these types of files on their system, threw an error window saying ‘Sorry, there was a problem mounting the file’ and does not allow them to mount the image file for extracting its data.
There could be many possibilities for such an error to occur on the windows system and a few of them are listed below.
- The ISO file might have been already mounted on the system.
- The ISO file must have been sparsed.
- It might be blocked.
- ISO file Read-only option is unchecked.
- MicroSD cards inserted might be interfering with the system while mounting.
After considering all the factors given above, we have compiled a set of fixes that will solve the problem you have encountered recently while mounting the ISO file.
Fix 1 – Check if the ISO file is blocked and not set to Read-only mode
When the ISO file that has been downloaded from the internet, gets blocked by the security tool on the windows system. If it gets blocked it usually throws such an error message. Also, it is a good idea to check if the file is set to the read-only mode or not. If not, please set it to read-only mode.
Let us see below some simple steps on how to do it.
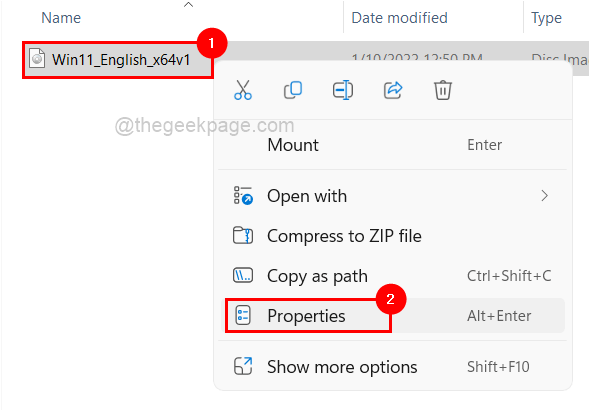
Step 1: Right-click on the ISO file by browsing the folder which contains it.
Step 2: Tap on the Properties option from the context menu as shown below.

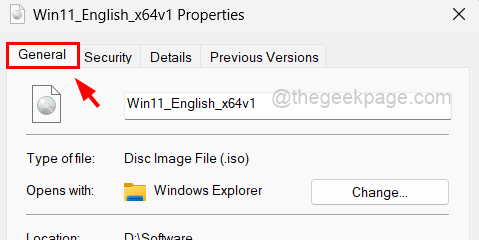
Step 3: Please make sure the General tab is selected.

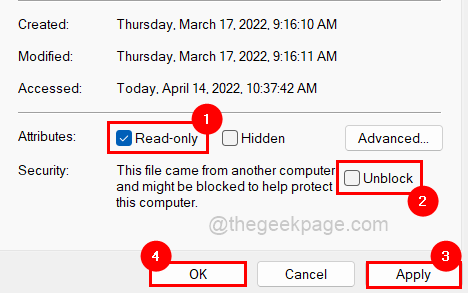
Step 4: Then at the bottom, verify if the Read-only checkbox is checked. If not, please click on the checkbox to check it.
Step 5: After that, also make sure Unblock option is unchecked.
Step 6: Once done, click Apply and then OK to make changes and close the properties window.

Now check if you are able to mount the ISO file or not.
Fix 2 – Remove the Sparse Attribute from the ISO file
Some files contain holes in them, which means some parts of the data are missing or empty and do not occupy the physical space on the disk. Therefore, this type of file gets sparsed and when users try to mount or use this file, it creates problems.
Please follow the steps given below in order to see how it can be removed from your PC using Command Prompt.
Step 1: To open a run command box, press the Win + R keys together on the keyboard.
Step 2: Type cmd and hit CTRL + SHIFT + ENTER keys altogether.
Step 3: Click Yes on the UAC prompt to allow admin privileges for the command prompt.

Step 4: This will open the command prompt window as admin.
Step 5: Type the below command and press Enter key to execute it.
fsutil sparse queryflag D:\Software\Win11_English_x64v1.iso
NOTE: Replace D:\Software\Win11_English_x64v1.iso with the path of the ISO file on your system.
This will allow the users to know if the file is sparsed.

Step 6: After you get to know whether the file is sparsed or not, execute the below command to remove sparse from the file.
fsutil sparse setflag D:\Software\Win11_English_x64v1.iso 0
NOTE: Replace D:\Software\Win11_English_x64v1.iso with the path of the ISO file on your system.
This will remove the sparse attribute from the ISO file.

Step 7: If these above commands are quite tough to execute for you, please make a copy of the ISO file in another folder by copying and pasting it.
Step 8: Then, try to mount the copied ISO file and see if it is fine now.
Fix 3 – Restart the Windows Explorer on the system
Sometimes the frozen windows explorer might create issues as mentioned above. So restarting the windows explorer might fix the problem on the system. We are showing you how you can restart the windows explorer using the steps given below.
Step 1: Press CTRL + SHIFT + ESC keys simultaneously to open the Task Manager on the system.
Step 2: Then click the Processes tab and right-click on the Windows Explorer app.
Step 3: Click Restart from the options shown in the context menu.

Step 4: This will restart the Windows Explorer and then close the Task Manager.
Now verify if the ISO file can be mounted or not.
Fix 4 – Check if any microSD cards are inserted
It is reported by some Windows users that the actively present microSD cards on the system interfere with the mounting procedure. When they removed the microSD cards from their system, they were able to mount the ISO file on the system to extract its data.
Therefore, we highly recommend our users that remove the microSD cards from their system and then check if the ISO file can be mounted successfully now.
Fix 5 – Make sure the ISO file is not mounted already
Often we tend to repeat things because we forget if it’s already done or not. So there are high chances that the user might have already mounted the ISO file and are unaware or forgotten about it. So once make sure the ISO file is not mounted on the system. If it is done, instead of trying to mount the file, you can directly open it from This PC.
Fix 6 – Repair the Disk Image Driver using Registry Editor
Warning – Try exporting the registry file of the system by referring to this article before continuing. Because you can revert back to the registry file if any damage is done to the system due to changes made in the file.
Step 1: Right-click on the blue coloured Start button at the center of the Taskbar.
Step 2: Select Run by clicking on it from the list as shown in the below image.

Step 3: Type regedit in the run command box and press Enter key to open Registry Editor.
NOTE: Accept any UAC prompt if any, by clicking on Yes.

Step 4: Once it opens up, browse to the path given below by copy-pasting it on the address bar and hitting Enter key.
HKEY_LOCAL_MACHINE\SYSTEM\CurrentControlSet\Control\Class\{4D36E965-E325-11CE-BFC1-08002BE10318}
Step 5: On the right side of the editor, select the UpperFilters and LowerFilters by clicking on them while pressing and holding the CTRL key.

Step 6: Then, press the DELETE key together and then click Yes on the confirmation window to delete these string values.

Step 7: Once they are deleted, close the registry editor and restart the system.
If you find any of the solutions listed above useful, please let us know in the comments section below.