You will see “Shell cannot be started. A failure occurred during initialization:” message in PowerShell window if it throws up an exception when Windows try to open it. If you are seeing this type of error message on the PowerShell window, follow these easy fixes to solve the problem. Also if you are facing errors like running scripts is disabled in powershell, the methods will solve the problem.
Fix-1 Modify registry-
You simply need to create a key and three sub-keys to solve the problem.
IMPORTANT–
Perhaps you know Registry Editor is not a place where you can change anything and get away with it. A single mistake, a small wrong value of a registry key can brick your system. So, before going ahead, make and store a backup of this registry on your computer. Click on the “File” and then on “Export“. Name it as you wish and save it in a secure location of your choice.
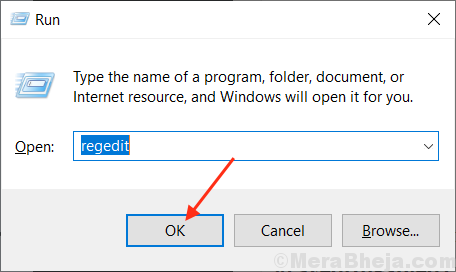
1. Simply by pressing the Windows key along with the ‘R‘ key you can access the ‘Run‘ window.
2. In that window, type “regedit“. Click on “OK” to access the Registry Editor.

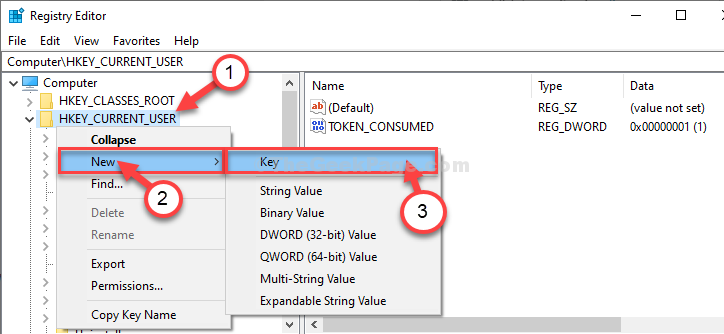
3. In Registry Editor window, on the left-hand side, right-click on the “HKEY_CURRENT_USER” key and then click on “New>” and then click on “Key“.
4. Name the new key as “Environment“.

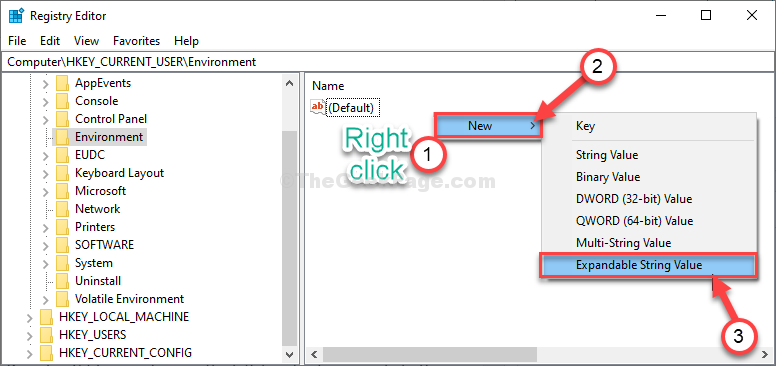
5. On the left-hand side, select “Environment“.
6. Now, on the right-hand side, right-click anywhere on the space and select “New>” and then click on “Expandable String Value“.
7. Set the name of this value to “TEMP“.

8. Double click on “Temp” to modify it.

9. Now, copy the below-mentioned address and paste it in ‘Value data:‘ option.
%USERPROFILE%\AppData\Local\Temp
10. Now, click on “OK” to save this change.

11. Now, on the right-hand side, right-click anywhere on the space and select “New>” and then click on “Expandable String Value“.
12. Set the name of this value to “TMP“.

8. Double click on “TMP” to modify it.

9. Now, copy-paste the below-mentioned address and paste it in ‘Value data:’ option.
%USERPROFILE%\AppData\Local\Temp
10. Now, click on “OK” to save this change.

11. For the final key, right-click anywhere on the space and select “New>” and then click on “Expandable String Value“.
7. Set the name of this value to “Path“.

8. Double click on “Path” to modify it.

9. Now, copy-paste the below-mentioned address and paste it in ‘Value data:‘ option.
%USERPROFILE%\AppData\Local\Microsoft\WindowsApps;
10. Now, click on “OK” to save this change.

Close Registry Editor window.
Reboot your computer to let these changes show effect. After rebooting your computer, open PowerShell and check if this fix works.
Fix-2 Open PowerShell(x86)-
This problem happens only for PowerShell(x64) or 64-bit users. 32-bit users or PowerShell(x86) users don’t experience this issue.
1. Click on the Search box beside the Windows icon and write “powershell(x86)“.
2. Now, click on “PowerShell(x86)“.

This way, you can open a 32-bit PowerShell panel and work.
Fix-3 Assign ExecutionPolicy to RemoteSigned-
You can change the execution policy on your computer either to ‘Unrestricted‘ (which is unsafe) or ‘RemoteSigned‘ status to solve this issue.
1. Press Windows key+R to open Run window.
2.Type “Powershell” and then press Ctrl+Shift+Enter together.

Powershell window will be opened.
2. Copy–paste this command in the PowerShell window. After that, hit Enter from your keyboard to execute it on your computer.
Set-ExecutionPolicy RemoteSigned

After executing the command, close the PowerShell window.
Check the error is still there or not.
Fix-4 Use .NET Framework Repair Tool-
1. Download the .NET Framework Repair Tool on your computer.
2. Then, double click on “netfxrepairtool” and accept the agreement.

3. It will detect any kind of issues with .NET Framework.

4. Now, click on “Next” to make the changes on your computer.

Reboot your computer.
The problem with .NET Framework installation.