While opening an application downloaded from Microsoft Store, you may see “This App Has Been Blocked Due to Company Policy” error message. This problem is actually associated with the Microsoft Store itself. So, follow these easy fixes to solve this issue.
Fix-1 Re-register Microsoft Store-
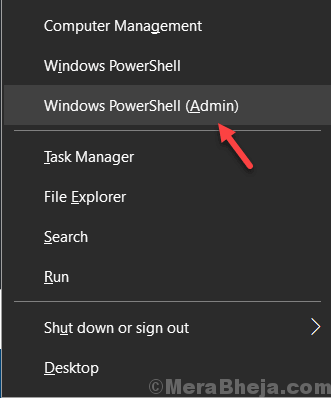
1. At first, right-click on the Windows icon and then click on the “PowerShell (Admin)” to access it.

2. When the PowerShell window opens up, write or copy-paste this piece of code in it and hit Enter.
Get-AppXPackage -AllUsers | Foreach {Add-AppxPackage -DisableDevelopmentMode -Register "$($_.InstallLocation)\AppXManifest.xml"}

Reboot your computer to save the changes in your system.
Try to open Microsoft Store on your computer.
Fix-2 Reset Store cache-
Resetting Store cache will give you Microsoft Store a fresh start. Follow these easy steps to do so-
1. Press Windows key+R together to launch Run
2. Type “cmd” in it and press Ctrl+Shift+Enter . This will open up a Command Prompt window with administrative rights.

2. Write this command in the CMD window and hit Enter. Store will be reset on your computer.
WSreset.exe

Close Command Prompt window.
Restart your computer.
After rebooting your computer, try to open Microsoft Store. Check if it is working or not.
Fix-3 Rename cache folder-
Renaming the cache folder may solve this issue.
1. Type “%appdata%” in the search bar.
2. Then, you need to click on “%appdata%” in the elevated search result.

3. On the address bar, click on “AppData“.

4. Now, double click on the “Local” folder to acess it.

5. After that, double click on the “Packages” folder.

6. Now, you need to double click on the “Microsoft.WindowsStore_8wekyb3d8bbwe” folder to open it.

7. Then, double click on the “LocalState” folder.

8. If you see the ‘cache‘ folder is in there, right-click on it and then click on “Rename“.
Name the folder as “cache.old“.

9. Once you have done so, again right-click in the blank space, and then click on “New” and then click on “Folder” to create a new folder.

10. After that, you need to name the folder as “cache“.

11. If you don’t see any ‘cache‘ folder, simply right-click in the blank space, and then click on “New” and then click on “Folder” to create a new folder.
12. Name the new folder as “cache“.

Close File Explorer window on your computer.
Reboot your computer.