Restore Point is the last resort to get back your computer data if your computer faces any fatal problem, at the cost of losing some recent changes. In this article, we will show how to create a simple restore point on your Windows 11. Just follow the steps mentioned in this article, and you will be able to create a new restore point in no time at all.
How to create a restore point on Windows 11
You can easily create a restore point on Windows 11. There are two ways you can create a new restore point.
A. Let Windows create a new restore point for your system
B. Manually create a restore point for your system
We will explain both of these processes.
A. Let Windows create a new restore point
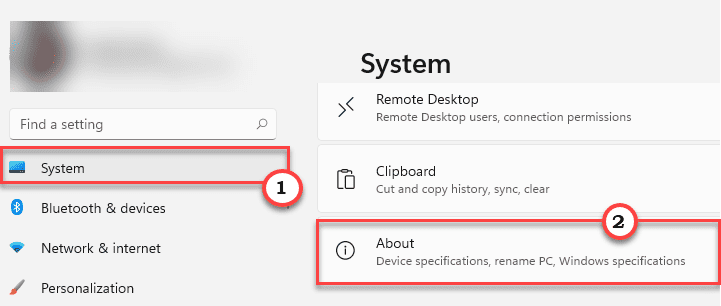
1. At first, press the Windows key+I keys together.
2. Then, click on the “System” on the left-hand side.
3. After that, tap on “About” at the bottom.

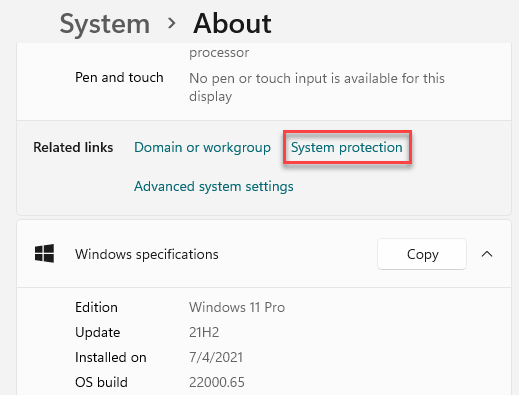
4. You will find the ‘Related links’ list.
5. Here, click on the “System Protection“.

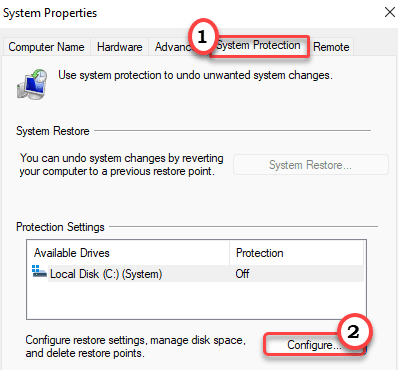
The System Properties window will open up.
6. When the System Properties opens up, go to the “System Protection” tab.
7. Then, you will notice the ‘Protection Settings’.
8. Just tap on the “Configure…” to configure the system protection.

8. After that, check the “Turn on system protection” option.
9. Then, click on “Apply” and “OK” to save this modification.

Once you are done, Windows will automatically start to create a system restore point for the drives on your system.
B. Manually creating a restore point
You can take the control of this process and create a restore point for the drive you want.
1. At first, press the Windows key+R keys together.
2. Then, type this and then hit Enter.
sysdm.cpl

3. Now, tap on the “System Protection” tab.
4. Then, select the drive where you want to create the restore point. (Example – We have selected the ‘Local Disk (C:)’ to create the restore point.)
5. After that, click on “Create…” to create a new restore point.

6. Name the restore point as you wish.
7. Next, click on “Create” to create the restore point.

Now, just wait for a while as Windows creates a restore point for your system.
8. Once the process completes, you will see the “The restore point was created successfully.” message. Click on “Close“.

That’s it! This way, you can easily create a system restore point.