If you are trying to print something from your device but it is returning an error message saying “Printer driver is unavailable” and you are desperately in a need of solution for your problem, you are in the right place. This problem usually happens when the printer driver installed in your device is old or incompatible. Don’t worry, there are easy fixes available to solve your problem. Follow these fixes and you will be able to print again. But, before going ahead, attempt these workarounds which will be to test a few things on your device.
Initial Workarounds–
1. Check the printer for any kind of problems (like hardware faults, connection issues,cartridge dislocation, etc ). Disconnect your printer and reconnect it with the computer and try to print something again.
2. Reboot your computer, and after rebooting connect it with the printer and try to print something.
3. Make sure that you are using an administrative account when you are printing. If you are not using one, log in with your administrative account and try to print again.
If any of these workarounds didn’t do the trick for you, attempt these fixes-
Fix-1 Uninstall Printer drivers
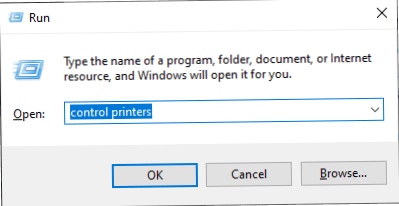
1. Press Windows key+R to launch Run, and type “control printers” and hit Enter.
Device and Printers window will be opened.

2. Now, in the list of the printers, right-click on the problematic printer, click on “Remove Device“.
3. This will remove the device from your computer.

4. Now, click on “Yes” to confirm the removal of the device.

5. Pressing Windows key+R should open the Run window. Type “devmgmt.msc” and click on “OK“.

6. In the Device Manager window, right-click on the printer and click on “Uninstall device“.
Click on “Uninstall” to confirm the initialization of the uninstallation process.

NOTE–
If you don’t find the printer device, don’t worry. It is possible that as you disabled it in the former step, so it is already uninstalled from your device.
Reboot your computer. Start the printer and connect it to the computer using WiFi or Ethernet.
Again wait for a while. Now, try to print anything and check if you are facing the error again.
Fix-2 Install the Printer driver in Compatibility mode-
1. Press Windows key+S and then type “Control Panel“.
2. Now, click on the “Device Manager” in the search result.

2. In the Device Manager window, expand “Print queues” from the list of the devices.
3. Right-click on the problematic driver and click on “Uninstall device“.
4. Click on “Uninstall” to confirm the initialization of the uninstallation process.

5. Now, download the latest driver for your printer device from the Printer manufacturer’s website.
6. Go to the downloaded driver location.
7. Now, right-click on the driver package and click on “Properties“.

8. In the Properties window, go to the “Compatibility” tab and then check the “Run this program in compatibility mode for:”
9. Then, choose the “Windows 8” in the drop-down menu.
10. Now, check “Run this program as an administrator“.
11. Click on “Apply” and “OK” to save the changes on your computer.

12. At the last step, double click on the driver package to start the installation process.
After the installation process is over, reboot your computer.
After rebooting, try to print something and you should be able to print it. If the issue continues to bother you, go for our next solution.
Fix-3 Install the printer drivers again-
1. Press Windows key once and type “Control Panel“.
2. Now, on the right-hand side of the search window, click on “Devices and Printers“.

3. Now, in the list of the printers, right-click on the problematic printer.
4. Then click on the “Remove Device“.
This will remove the device from your computer.

5. Now, click on “Yes” to confirm the removal of the device.

Close the Devices and Printers window.
Reboot your computer.
Open Devices and Printers again.
6. Now, in the Devices and Printers window, click on “Add a printer“.

7- Now, Click on The printer I want is not listed

8 – Select My printer is a little older. Help me find it and click on Next.

Windows should automatically detect the printer. Click on “Next“.
8. Now, check the “Set as the default printer” and then click on “Finish“.
Try to print a page. Now, check if you are facing the same printer driver issue on your computer. Your problem should be solved.
Fix-4 Reset Firewall to default
If you have any third party anti virus also , try to disable them temporarily also.
1 – Now, search Windows defender firewall in Search box.

2 – Now, click on Restore defaults in the left menu.

3 -Click on Restore defaults to restore firewall to default.
Fix-5 Update your Printer driver-
The problem you are facing with your printer is maybe happening because your printer driver is outdated. You can update your printer driver by following these steps-
1. Press the Windows key. Now, type “devmgmt“.
2. Then, click on the “Device Manager” in the search result.

3. In the Device Manager window, expand “Print queues“.
4. Now, Right-click on it and click on “Update driver“.

3. Simply click on the “Search automatically for updated driver software“.

Then, reboot your computer.
Check if your problem has solved. If the problem still persists then go for the next fix.