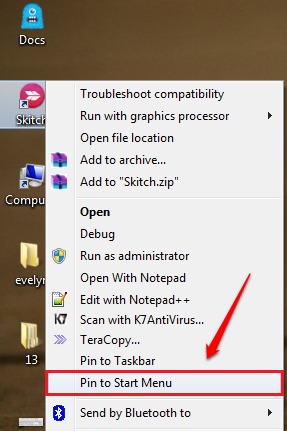
How To Fix “Pin To Start Menu” Not Working Issue In Windows 10:- Pin To Start Menu is an option available in the right click context menu of files. This is a very useful option for quick access. But sometimes, you might face the issue of Pin To Start Menu not working or the Pin To Start Menu option currently being unavailable or greyed out. In such cases, you could try out the two methods explained below:
Method 1 – By Making Changes In Registry Editor
This method involves changing the registry entries. It is thus highly recommended to create a system restore point before you proceed with the following steps just to be on the safer side. You can refer to our article on the topic How to create Restore Point in Windows 10 a Step by step guide for the same.
STEP 1
- Press WIN+R keys together to open the Run dialog box. When it opens up, type in regedit and hit Enter key.
STEP 2
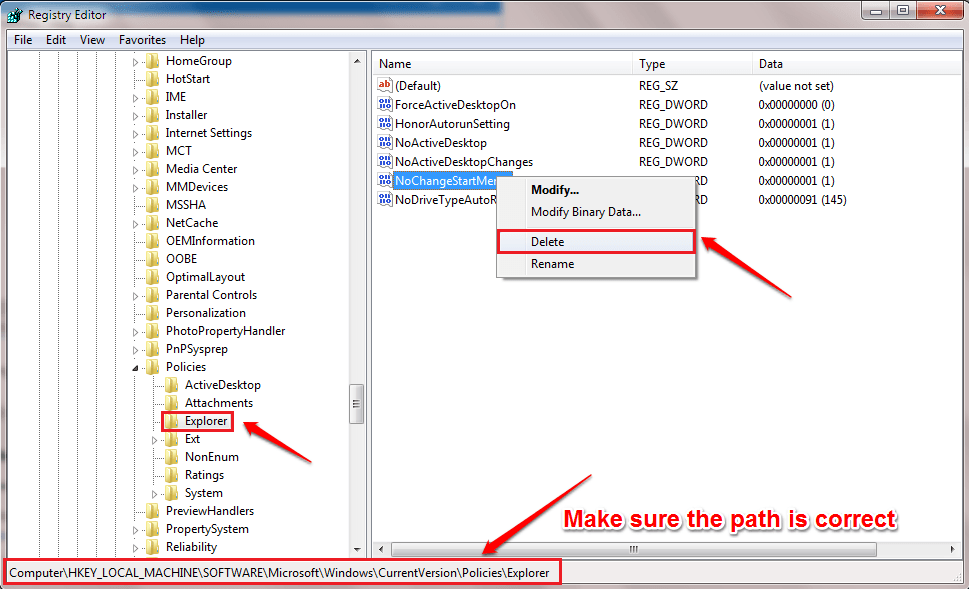
- The Registry Editor window opens up. As next, you need to navigate to the following path:
HKEY_LOCAL_MACHINE\SOFTWARE\Microsoft\Windows\CurrentVersion\Policies\Explorer
- Once you are at the specified path, make sure that the path is correct as shown in the screenshot given below. Highlight the Explorer key by single clicking on it. Now look for a DWORD value by the name NoChangeStartMenu in the right window pane. If you can’t find it, you can skip STEP 3 and goto STEP 4. Else if there is a DWORD by the name NoChangeStartMenu, then you either need to delete it or modify its Value data. To delete the DWORD, right click on it and hit the Delete option.
STEP 3
- If you prefer to modify its Value data, then double click on NoChangeStartMenu. Enter 0 as the value in the Value data field. Hit Ok button.
STEP 4
- As next, navigate to the path given below:
HKEY_LOCAL_MACHINE\SOFTWARE\Policies\Microsoft\Windows\Explorer
- Make sure the path is correct. Highlight the Explorer key by clicking on it. In the right window pane of the Explorer key, look for a DWORD by the name LockedStartLayout. If there is no such DWORD, then nothing is to be done. Else if there exists the DWORD LockedStartLayout, then just like before, you either need to delete it or modify its Value data. To delete it, right click on the DWORD LockedStartLayout and hit the Delete option. Or if you prefer modifying the Value data over deleting, then double click on the DWORD LockedStartLayout and enter 0 as the value in the Value data field.
 That’s it. Restart the system for the changes to take over. See if the Pin To Start Menu is now working/ available in the right-click context menu options.
 Method 2 – Through Command Prompt
If the first method doesn’t solve the issue for you, let’s get to the second one. The following steps will re-register the shell32.dll file, which is expected to solve the issue.
STEP 1 - First of all, open the Command Prompt in the administrator mode. For that, start typing in cmd to the windows search and when Command Prompt appears in the search results, right click on it and choose Run as Administrator option.

STEP 2
- In the elevated Command Prompt, type in or copy paste the following command and hit enter key.
-
regsvr32 /i shell32.dll
STEP 3
- You will then get a success message like the one shown in the following screenshot. That’s it. Try whether the Pin To Start Menu option is working for you now. If it’s not, restart the system and check again.

Hope one of the above methods resolved your issue. If your problem is still not resolved, please leave comments, we would be happy to help. Stay tuned for more tricks, tips, and hacks.


