Windows 10 is known to have many bugs and errors since the day it was released. With time, Microsoft has worked to fix many of them, but they just keep appearing.
The latest error which is irritating many Windows 10 users is error code 0x00000709. In this error, the computer is unable to set the default printer. If you have connected and have used just one printer on your computer, you may not face this error. Windows 10 users who use more than one printer on their computer are facing this issue.
If you are facing this problem, don’t worry. We will help you fix this error using our methods. Simply follow the methods mentioned below, one by one, until the issue is fixed.
How to Fix Error 0x00000709 Unable to Set Default Printer
If your computer has just one printer installed on it, then that printer is automatically set to default. But, if there is more than one printer installed, then the user has to set or change the default printer. And this is where the error 0x00000709 occurs.
Method 1 – Set Permissions
In most of the cases, this error is caused due to registry error. So, in this method, we will try to edit and fix the registry.
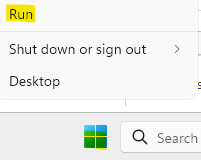
Step 1. Right click on start button on taskbar and select Run.

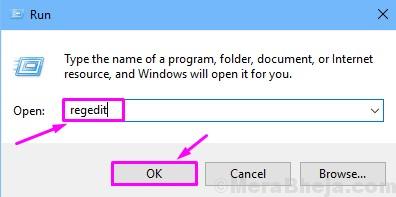
Step 2. Type regedit in Run window and click on OK. Click on Yes when asked for confirmation.

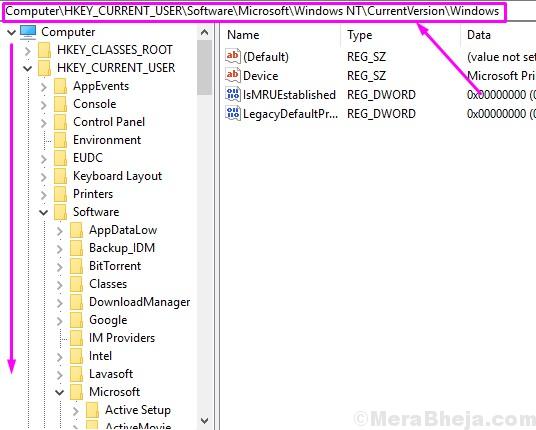
Step 3. Now, on the left side of the registry window, follow the following path.
HKEY_CURRENT_USER > Software > Microsoft > Windows NT > CurrentVersion > Windows

Step 4. Right-click on the Windows folder and select Permissions.

Step 5. Select the Administrators account under Group or user names, and then make sure that the Full Control is marked at Allow. Click OK after that.
Also do the same procedure for your username also.

Step 6 – Click on Add

Step 7 – Click Everyone and click OK.

Step 8 – Select Everyone and then select Full control and select Read permission.
Step 9 – Click Apply

Step 8. Restart your computer after completing the last step.
Now, try again. This method must have fixed the issue. If you are still facing the problem, follow the next method.
Method 3 – Stop Windows from Managing the Default Printer
The Windows has a feature which allows it to manage the default printer according to the one last used at a particular location. This doesn’t always works perfectly and is known to create the error 0x00000709. So, we will disable this feature in this method. Follow the steps to perform this method.
Step 1. Right-click on the Start menu button and select Settings.

Step 2. Go to Devices.
![Fix Error 0x00000709 Unable to Set Default Printer in Windows 10 / 11 (Solved) 10 Devices ]](https://thegeekpage.com/wp-content/plugins/wp-fastest-cache-premium/pro/images/blank.gif)
Step 3. Select Printers & scanners from the left menu.
Step 4. Here, disable Let Windows manage my default printer by unmarking the box beside it.

Step 5. Restart your computer.
This should fix the issue. If the error is still not solved, follow the next method.
Method 4 – Set Default Printer Manually
After disabling the feature to manage default printer, let’s select the default printer manually. Follow the steps to perform this method.
Step 1. Go to Cortana and type Control Panel. Select the same from results.

Step 2. Select Hardware and Sound.

Step 3. Go to Devices and Printers.

Step 4. Right-click on your printer and select Set as default printer.

Step 5. Restart your computer.
Check if this method has fixed your problem, or not. If it didn’t, try the next method.
Method 5 – Repair Corrupt System Files
Many errors simply occur due to corrupt system files. In this method, we will repair the corrupt system files using SFC scan and DISM tool. Follow the steps to perform this method.
Run SFC scan
Step 1. Go to Cortana and type Command prompt. Right-click on Command prompt from results and select Run as administrator.

Step 2. Enter the following command in Command prompt window and press Enter.
sfc /scannow
Step 3. Wait for the scanning and fixing process to finish. This could take up to 15 minutes.
Step 4. When the process is done, restart your computer.
Run DISM tool
Step 1. Go to Cortana and type Command prompt. Right-click on Command prompt from results and select Run as administrator.

Step 2. Enter the following command in Command prompt window and press Enter.
DISM /Online /Cleanup-Image /RestoreHealth
Step 3. Wait for DISM tool to finish the scanning and fixing process. It will take at least 20 minutes, so be patient.
Step 4. When the DISM tool is done repairing the files, restart your computer.
This should fix the issue. If you are still facing the problem, perform the next method.
Method 6 – Create a New User Account
If nothing has worked for you so far, then you should create a new user account. Follow the steps to create a new user account to fix the issue.
Step 1. Right-click on the Start menu button and select Run.

Step 2. Type netplwiz in Run and click OK.

Step 3. Under the Users tab, select Add to create a new user account.

Step 4. The last step will open How will this person sign in? screen. Here, click on Sign in without a Microsoft account (not recommended).

Step 5. On the Add a user screen, select Local account.

Step 6. In this step, fill the User name, Password and Reenter password of your choice for the new user account. Don’t enter anything in Password hint. Now, click on Next and follow the on-screen instructions to create the new user account.

When you are done creating a new user account, sign in in the new user account. You won’t face any error anymore.
We hope we were able to help you fix this error. If you were able to solve this problem using some other method, or if you have any questions regarding this issue, please mention them below in comments.