A lot of users reported about not being able to create new folder in Windows 10 & 11 PC. If you are also facing this Problem, you can easily follow these steps given to fix this issue.
Fix 1 – Use Keyboard shortcut CTRL + SHIFT + N to create new folder
You can also press CTRL + SHIFT + N together from your keyboard to create new folder. Just go to the location where you want to create a new folder and press CTRL + SHIFT + N keys together form the keyboard.
Fix 2 – Using Registry Editor
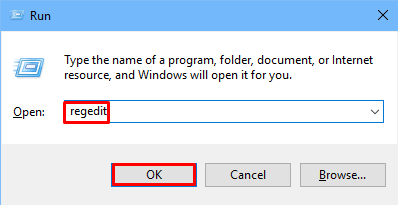
1. Press Windows key + R together to open run.
2. Write regedit in it and click OK.

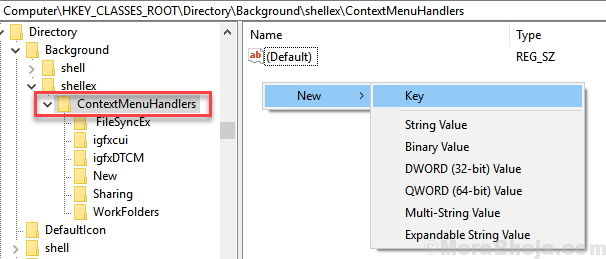
3. Now, In registry editor Browse to the following location given below.
HKEY_CLASSES_ROOT\Directory\Background\shellex\ContextMenuHandlers
4. Click on ContextMenuHandlers on the left to select it.
5. Now, Right click on ContextMenuHandlers and create a New > key .

6. Name this Key New key.

7. Select the new Key and then right click on Default on the right side and Choose Modify.

8. Now, Copy and paste {D969A300-E7FF-11d0-A93B-00A0C90F2719} in the Value Data Box and Click OK.

9. Close the Registry Editor and Restart Your computer.
Try again, your problem will be fixed.
Fix 2 – Using Windows defender
1 – Search Controlled Folder Access in Windows search box and then click on it

2 – Turn Controlled folder access Off.

Now, try to create New folder again
Fix 4 – Use Command prompt to create new folder / directory
1 – Search cmd in windows taskbar search and then right click on the command prompt icon which appears and then click on run as administrator

2 – Now, write the following code given below in it. (Just replace path_of_folder with the location where you want to create new folder)
cd path_of_folder
For exapmple if we want to create a new folder in D drive, then we wrill run
cd D:\
4. Now, write the command given below in powershell to create a new folder.
mkdir folder_name
Just replace folder_name with the name of the folder you want to create.
Fix 5 – Restart File explorer
1 – Open Task manager by hitting CTRL + SHIFT + Esc keys together.
2 -Now, Locate Windows explorer in it, Just do a right click on windows explorer and choose restart.

Now, try to create new folder again
Fix 6 – Uninstall Troublesome Application
Try to uninstall some useless and Troublesome application from your computer. They may be the real culprit behind this issue. For example many users claimed that when they uninstalled BootDeleter or Memeo , the bug got fixed. The laptop manufacturers these days have started selling laptops loaded with crapwares and you should try to get rid of them if you can.
Also Read:
- Cannot create new folder from right click menu in Windows 10 Fix
- Fix Right Click Not Working in Windows 10
Fix 7 – Just download and Install this Reg file
1. Copy and paste the code Given below in a Notepad.
Windows Registry Editor Version 5.00

[HKEY_CLASSES_ROOT\CLSID\{11dbb47c-a525-400b-9e80-a54615a090c0}]
@="CLSID_ExecuteFolder"

[HKEY_CLASSES_ROOT\CLSID\{11dbb47c-a525-400b-9e80-a54615a090c0}\InProcServer32]
@="ExplorerFrame.dll"
"ThreadingModel"="Apartment"

[HKEY_CLASSES_ROOT\Directory\Background\shellex\ContextMenuHandlers\New]
@="{D969A300-E7FF-11d0-A93B-00A0C90F2719}"

[HKEY_CLASSES_ROOT\Folder]
@="Folder"
"EditFlags"=hex:d2,03,00,00
"FullDetails"="prop:System.PropGroup.Description;System.ItemNameDisplay;System.ItemType;System.Size"
"ThumbnailCutoff"=dword:00000000
"TileInfo"="prop:System.Title;System.PropGroup.Description;System.ItemType"

[HKEY_CLASSES_ROOT\Folder\DefaultIcon]
@=hex(2):25,00,53,00,79,00,73,00,74,00,65,00,6d,00,52,00,6f,00,6f,00,74,00,25,\
00,5c,00,53,00,79,00,73,00,74,00,65,00,6d,00,33,00,32,00,5c,00,73,00,68,00,\
65,00,6c,00,6c,00,33,00,32,00,2e,00,64,00,6c,00,6c,00,2c,00,33,00,00,00

[HKEY_CLASSES_ROOT\Folder\shell]

[HKEY_CLASSES_ROOT\Folder\shell\explore]
"MultiSelectModel"="Document"
"BrowserFlags"=dword:00000022
"ExplorerFlags"=dword:00000021

[HKEY_CLASSES_ROOT\Folder\shell\explore\command]
@=hex(2):25,00,53,00,79,00,73,00,74,00,65,00,6d,00,52,00,6f,00,6f,00,74,00,25,\
00,5c,00,45,00,78,00,70,00,6c,00,6f,00,72,00,65,00,72,00,2e,00,65,00,78,00,\
65,00,20,00,2f,00,73,00,65,00,70,00,61,00,72,00,61,00,74,00,65,00,2c,00,2f,\
00,65,00,2c,00,2f,00,69,00,64,00,6c,00,69,00,73,00,74,00,2c,00,25,00,49,00,\
2c,00,25,00,4c,00,00,00
"DelegateExecute"="{11dbb47c-a525-400b-9e80-a54615a090c0}"

[HKEY_CLASSES_ROOT\Folder\shell\open]
"MultiSelectModel"="Document"
"BrowserFlags"=dword:00000010
"ExplorerFlags"=dword:00000012

[HKEY_CLASSES_ROOT\Folder\shell\open\command]
@=hex(2):25,00,53,00,79,00,73,00,74,00,65,00,6d,00,52,00,6f,00,6f,00,74,00,25,\
00,5c,00,45,00,78,00,70,00,6c,00,6f,00,72,00,65,00,72,00,2e,00,65,00,78,00,\
65,00,20,00,2f,00,73,00,65,00,70,00,61,00,72,00,61,00,74,00,65,00,2c,00,2f,\
00,69,00,64,00,6c,00,69,00,73,00,74,00,2c,00,25,00,49,00,2c,00,25,00,4c,00,\
00,00
"DelegateExecute"="{11dbb47c-a525-400b-9e80-a54615a090c0}"

[HKEY_CLASSES_ROOT\Folder\shellex]

[HKEY_CLASSES_ROOT\Folder\shellex\ColumnHandlers]

[HKEY_CLASSES_ROOT\Folder\shellex\ColumnHandlers\{F9DB5320-233E-11D1-9F84-707F02C10627}]
@="PDF Column Info"

[HKEY_CLASSES_ROOT\Folder\shellex\ContextMenuHandlers]

[HKEY_CLASSES_ROOT\Folder\shellex\ContextMenuHandlers\BriefcaseMenu]
@="{85BBD920-42A0-1069-A2E4-08002B30309D}"

[HKEY_CLASSES_ROOT\Folder\shellex\ContextMenuHandlers\Offline Files]
@="{474C98EE-CF3D-41f5-80E3-4AAB0AB04301}"

[HKEY_CLASSES_ROOT\Folder\shellex\ContextMenuHandlers\{a2a9545d-a0c2-42b4-9708-a0b2badd77c8}]

[HKEY_CLASSES_ROOT\Folder\shellex\DragDropHandlers]

[HKEY_CLASSES_ROOT\Folder\shellex\DragDropHandlers\{BD472F60-27FA-11cf-B8B4-444553540000}]
@=""

[HKEY_CLASSES_ROOT\Folder\shellex\PropertySheetHandlers]

[HKEY_CLASSES_ROOT\Folder\shellex\PropertySheetHandlers\BriefcasePage]
@="{85BBD920-42A0-1069-A2E4-08002B30309D}"

[HKEY_CLASSES_ROOT\Folder\shellex\PropertySheetHandlers\Offline Files]
@="{7EFA68C6-086B-43e1-A2D2-55A113531240}"

[HKEY_CLASSES_ROOT\Folder\ShellNew]
"Directory"=""
"IconPath"=hex(2):25,00,53,00,79,00,73,00,74,00,65,00,6d,00,52,00,6f,00,6f,00,\
74,00,25,00,5c,00,73,00,79,00,73,00,74,00,65,00,6d,00,33,00,32,00,5c,00,73,\
00,68,00,65,00,6c,00,6c,00,33,00,32,00,2e,00,64,00,6c,00,6c,00,2c,00,33,00,\
00,00
"ItemName"="@shell32.dll,-30396"
"MenuText"="@shell32.dll,-30317"
"NonLFNFileSpec"="@shell32.dll,-30319"

[HKEY_CLASSES_ROOT\Folder\ShellNew\Config]
"AllDrives"=""
"IsFolder"=""
"NoExtension"=""
2. Now, Click on File > Save as

3. Choose All files in Save as Type Option from the drop-down.

4. Click on Save .
5. Now, Double Click on this saved file to run it.