You try to open a shared folder on another PC. Windows blocks you. The full message? “You can’t access this shared folder because your organization’s security policies block unauthenticated guest access.” Error code 0x800704F8.
If this is happening on your personal system, which is not a part of any organization, you should try these fixes to fix this issue. There’s no IT admin. It’s just your home network. And Windows won’t budge.
Why This Happens
Basically? Microsoft changed the default behavior. A few years back, they disabled unauthenticated guest access to SMB shares by default. Security reasons. Fair enough. But it broke a ton of home file sharing setups overnight.
SMB is the protocol Windows uses for shared folders. When your PC can’t authenticate against the other PC — because there’s no password, or the account doesn’t exist there — Windows used to just let you in as a guest. Not anymore.
There’s also the digital signing thing. Modern Windows requires that SMB traffic be signed. But a lot of NAS devices, older Windows machines, and even some routers don’t sign properly. So Windows throws 0x800704F8 and blocks the whole connection.
And on top of that — Password protected sharing on the source PC. If it’s on, the target PC has to know credentials. If it’s off, guest access needs to be explicitly allowed. Miss either side and you get this error.
Fixes below handle all the above. Start with Fix 1 — it’s the quickest.
Fix 1 – Enable Insecure Guest Logons via PowerShell
Fastest path. Three commands. Done in a minute. Works on Home, Pro, Enterprise — all editions.
⚠️ This lowers SMB security on your PC. Fine for home networks. Not recommended on anything public or shared with strangers.
1 – Press Windows + X. Click Terminal (Admin).
2 – Tap Yes to confirm the execution.
3 – Now just make sure that you’re in the PowerShell mode. Otherwise, you can open it up from the terminal.
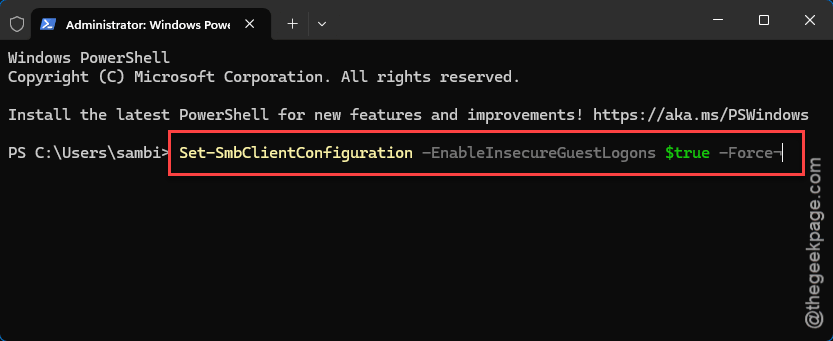
4 – Paste these three commands. Press Enter after each:
Set-SmbClientConfiguration -EnableInsecureGuestLogons $true -Force
Set-SmbClientConfiguration -RequireSecuritySignature $false -Force
Set-SmbServerConfiguration -RequireSecuritySignature $false -Force
5 – Close the terminal.
6 – Try accessing the shared folder again.
Works for most people immediately. No restart needed. If it still blocks you, move to Fix 2.
Fix 2 – Use Group Policy Editor (Windows Pro/Enterprise)
More thorough. Requires Windows Pro or Enterprise. If you’re on Home, skip to Fix 3 (Registry). Same end result.
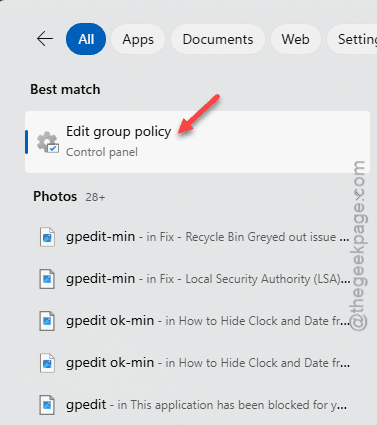
1 – Click the Start button. Type gpedit.
2 – Click Edit group policy.
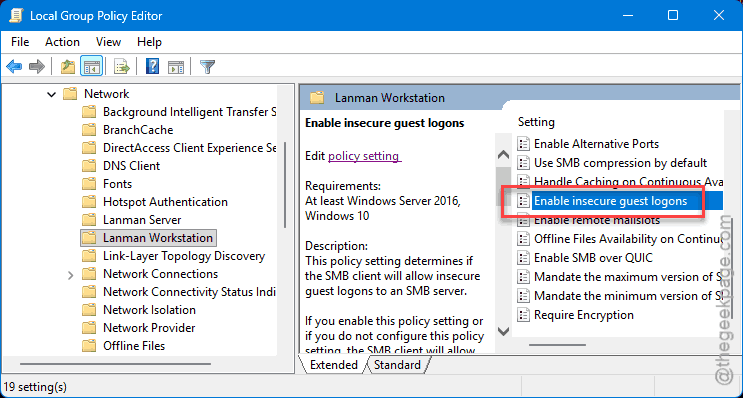
3 – In the left pane, expand this path:
Computer Configuration → Administrative Templates → Network → Lanman Workstation
4 – In the right pane, double-click Enable insecure guest logons.
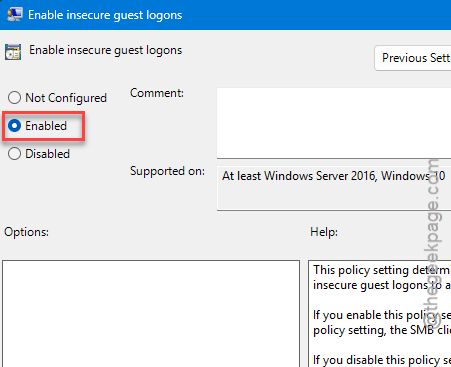
5 – Select Enabled.
6 – Click Apply, then OK.
Now disable SMB signing requirements:
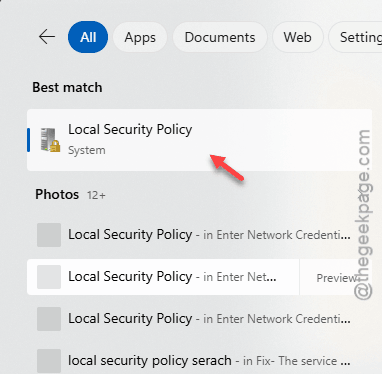
7 – Click Start. Type Local Security Policy. Open it.
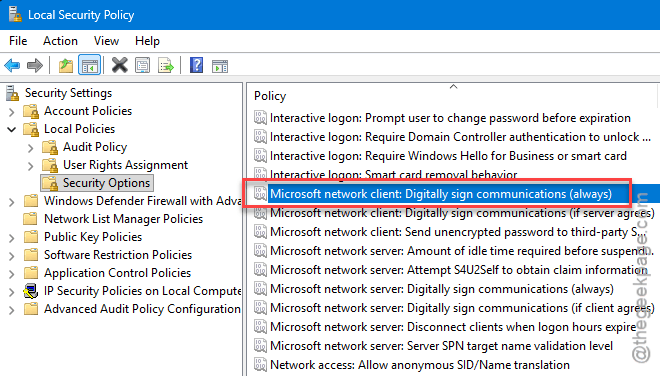
8 – Expand Local Policies → Security Options in the left pane.
9 – In the right pane, double-click Microsoft network client: Digitally sign communications (always).
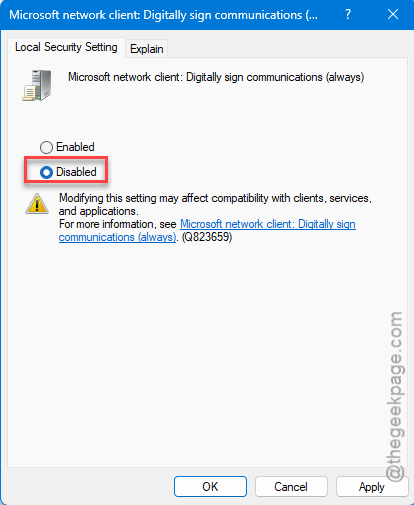
10 – Set to Disabled. Click Apply and OK.
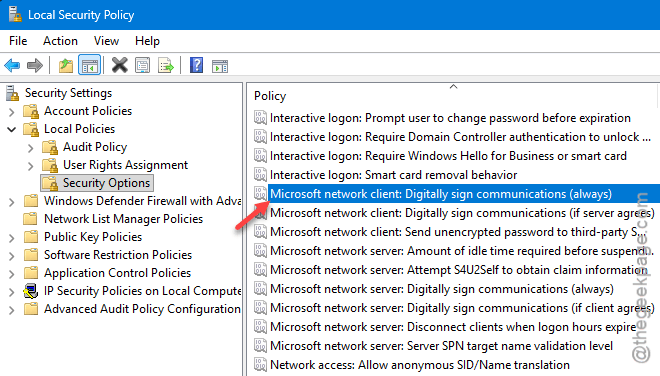
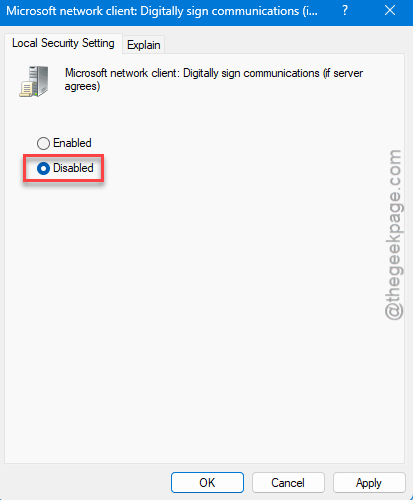
10 – Double-click theMicrosoft network client: Digitally sign communications (if server agrees) policy.
11 – Set to Disabled. Click Apply and OK.
11 – Close everything.
Restart your PC.
Fix 3 – Registry Edit (Windows Home Edition)
Home edition doesn’t have Group Policy Editor. But the registry can do the same thing.
⚠️ Back up the registry first. File > Export in the Registry Editor. Wrong edits can break Windows.
1 – Press Windows + R. Type regedit. Press Enter.
2 – Click Yes on the UAC prompt.
3 – In the address bar at the top, paste this path and press Enter:
HKEY_LOCAL_MACHINE\SOFTWARE\Policies\Microsoft\Windows
4 – Look for a LanmanWorkstation key inside Windows.
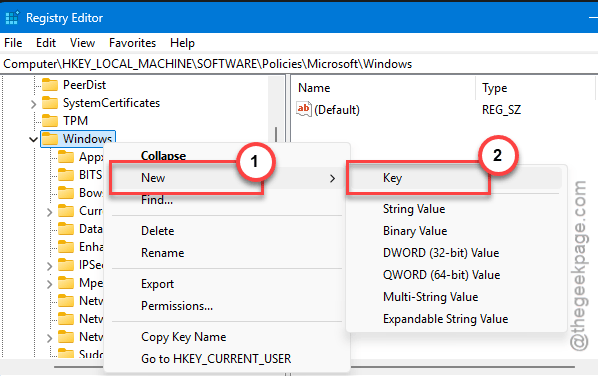
5 – Don’t see it? Right-click the Windows key in the left tree. Click New → Key. Name it exactly:
LanmanWorkstation
6 – Click the LanmanWorkstation key.
7 – Right-click in the empty right pane. Click New → DWORD (32-bit) Value.
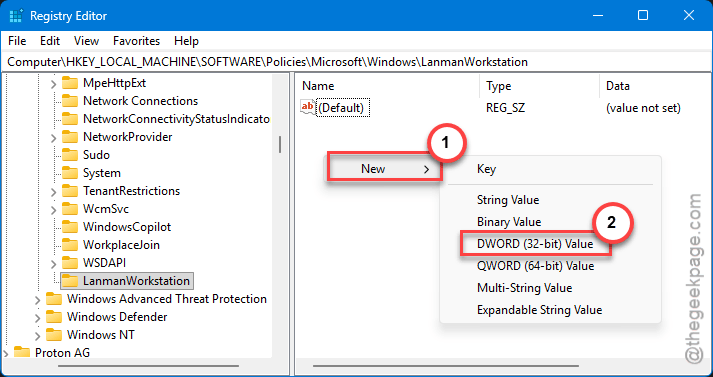
8 – Name it exactly:
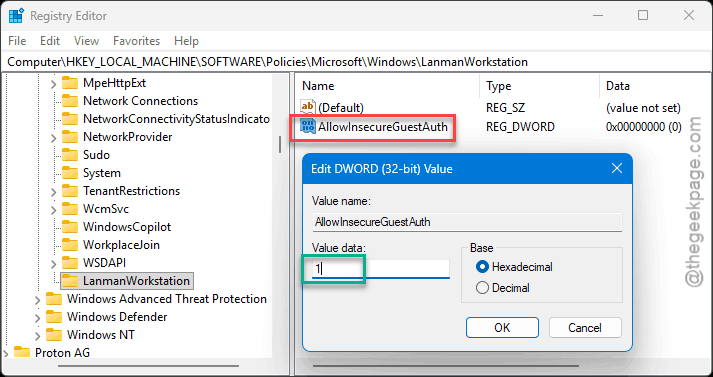
AllowInsecureGuestAuth
9 – Double-click the value. Set Value data to 1. Click OK.
10 – Close Registry Editor. Restart your PC.
Try the shared folder. Should work.
Fix 4 – Turn Off Password Protected Sharing
This one’s on the sharing PC — the one hosting the folder. If password-protected sharing is on, the accessing PC has to provide credentials. Turning it off lets any device on the network connect.
1 – On the PC hosting the shared folder, press Windows + R.
2 – Paste this and press Enter:
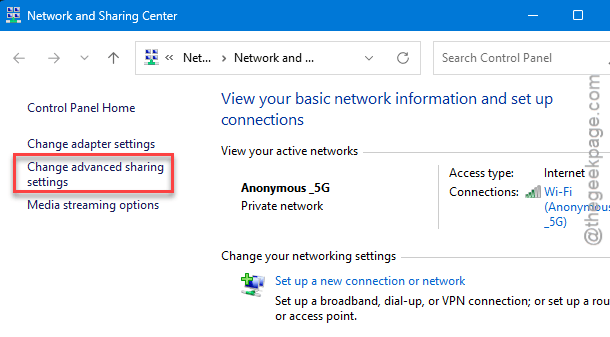
control /name Microsoft.NetworkAndSharingCenter
3 – Click Change advanced sharing settings in the left sidebar.
4 – Expand the All Networks section.
5 – Under Password protected sharing, select Turn off password protected sharing.
6 – Click Save changes, if available.
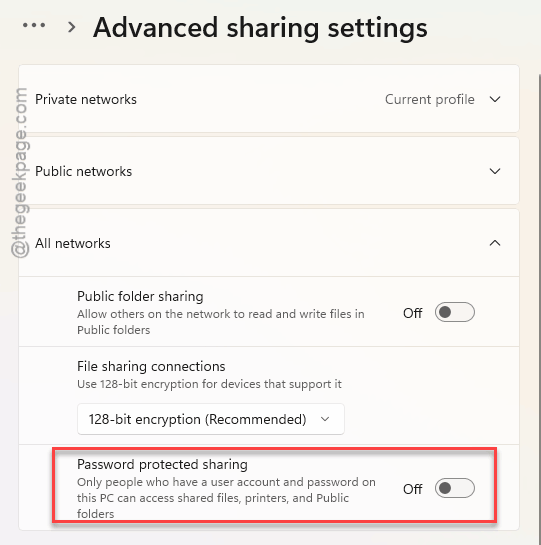
For home networks, this is fine. Don’t do it on a work laptop though.
Fix 5 – Make Sure File and Printer Sharing Is On
Basic check. Easy to forget. File sharing needs to be explicitly enabled on both PCs.
1 – Press Windows + R. Run:
control /name Microsoft.NetworkAndSharingCenter
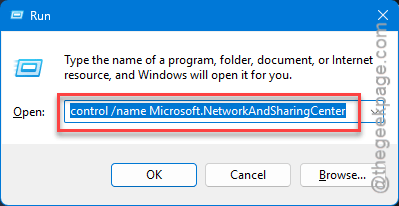
2 – Click Change advanced sharing settings.
3 – Expand your current profile (Private or Public).
4 – Under File and printer sharing, select Turn on file and printer sharing.
5 – Click Save changes.
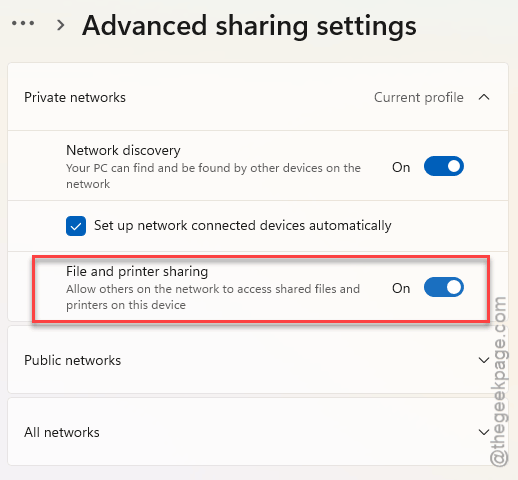
Do this on both PCs. The source and the destination.
Fix 6 – Change Sharing and Security Model
If your network has local user accounts on both PCs, this one helps. Changes how Windows validates local account credentials over the network.
1 – Press Windows + R. Type secpol.msc. Press Enter.
2 – Expand Local Policies → Security Options.
3 – Find Network access: Sharing and security model for local accounts.
4 – Double-click it.
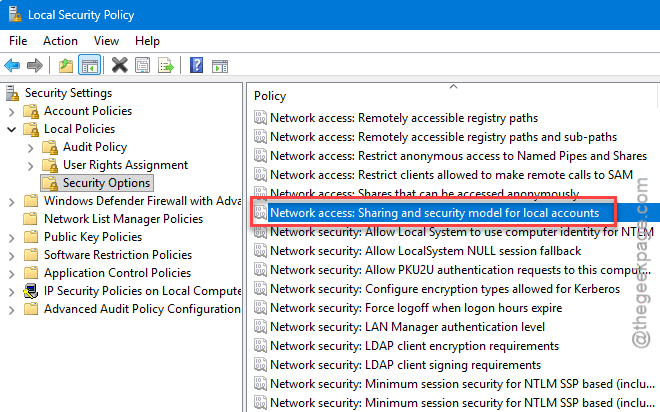
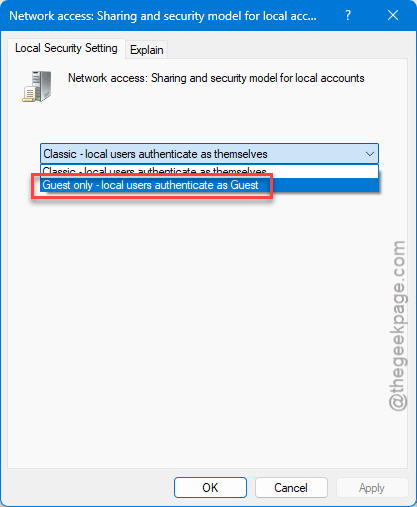
5 – Set it to Guest only (loose) or Classic (strict). Guest only is easier for home networks.
6 – Click Apply, then OK.
Restart your PC.
Fix 7 – Check Firewall and Credentials
Last sanity checks. Sometimes it’s not Windows security policies. Sometimes the firewall is being too aggressive. Or your credentials really are wrong.
Quick firewall test:
1 – Press Windows + I. Click Privacy & security → Windows Security → Firewall & network protection.
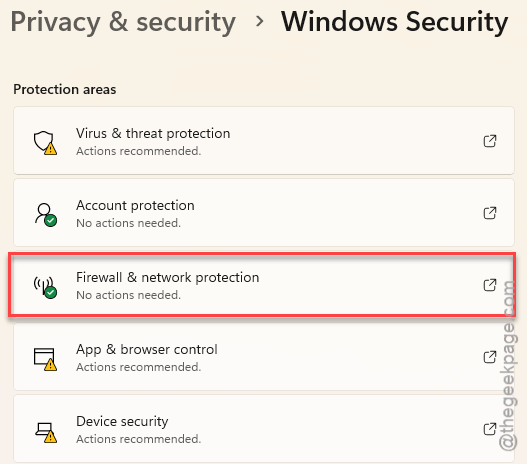
2 – Click your active network profile (usually Private network).
3 – Temporarily toggle Microsoft Defender Firewall off.
4 – Test the shared folder.
If it works? Firewall was blocking. Turn it back on and add a rule for File and Printer Sharing instead of leaving it off. Never leave the firewall off permanently.
Also — if the host PC has a user account, try connecting with that account’s username and password. Not your current PC’s login. The target PC’s.
How to Prevent This
- On home networks, leave File and Printer Sharing on for Private profile. Don’t turn it on for Public — cafe WiFi, airports, hotels.
- If you add a new PC to the network, set the SMB guest access policies the same way as your existing machines. Mixed settings cause mysterious access errors.
- For NAS devices, use proper user accounts rather than guest access. Cleaner long-term. Less likely to break on Windows updates.
- Note down your sharing PC’s local account name and password. When you need it, you need it. Trying to guess is painful.
People Also Ask
How to fix error code 0x800704f8?
Thje Quickest fix for this issue is to use the shell terminal to fix it. In a PowerShell terminal, run Set-SmbClientConfiguration -EnableInsecureGuestLogons $true -Force command to fix this issue. There are other ways to fix this issue as well, like to enable the Insecure guest logons policy in Group Policy Editor. You can find it in the Computer Configuration > Admin Templates > Network > Lanman Workstation.
How to fix cannot access shared folder error?
Depends on the exact error, but 80% of shared folder errors come from the same thing — Windows blocking guest access. Enable insecure guest logons via PowerShell or Group Policy. Also check that File and Printer Sharing is on for your network profile and that the host PC’s Password protected sharing is off.
How do I fix error code 0x800704cf?
Different error — usually “network path not found.” Different cause. See whether that the both PCs are on the same network. Then, enable the Network Discovery in Advanced sharing settings to fix this issue. Change the host PC’s IP address instead of its name. Next, reset TCP/IP with netsh winsock reset and netsh int ip reset in an admin Command Prompt.