Whether a crash sound or an important notification from a client, sound plays a very vital role in Windows 11/10. Windows has an inbuilt sound troubleshooter just to identify and fix the sound-related issues directly from the system. But, what if the troubleshooter fails to solve your issue and throws up this message – “Audio device is disabled” in diagnostics of the issue? Well, there is nothing to worry about. You can manually enable the correct audio device on your system and solve the issue on your own.
Fix 1 – Enable your audio device
You can enable your disabled audio device from the Sound panel.
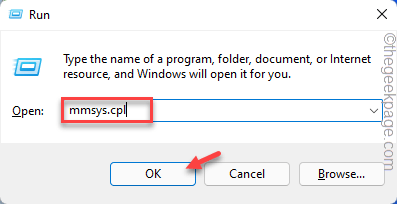
1. At first, press the Windows key+R keys together.
2. Then, type “mmsys.cpl” and click on “OK“.
This will open up the Sound panel.
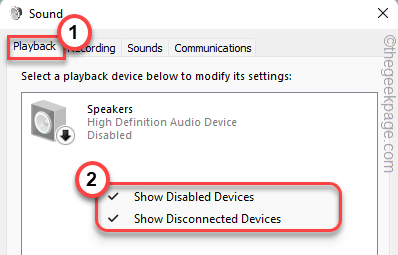
3. When the Sound opens up, go to the “Playback” tab.
4. Here, you should see the list of audio devices.
5. But, right-click on any empty space and make sure to tick mark the “Show Disabled Devices” option and the “Show Disconnected Devices“.
This will show all the available sound devices.
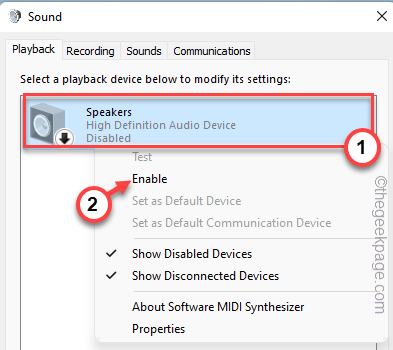
6. Now, just right-click on your disabled audio device (it will be greyed out) and tap on “Enable“.
7. Now, to successfully apply the change, tap on “Apply” and “OK“.
Now, try to play a simple sound on your system or run the audio troubleshooter once more. Your problem should be solved.
Fix 2 – Enable using the Device Manager
Alternatively, you can enable the sound device using the Device Manager.
1. At first, press the Windows key+X keys together.
2. Then, tap on the “Device Manager” to access it.
3. When the Device Manager opens up, expand the “Sound, video, and game controllers” section.
4. Here you will see your disabled audio device (it will carry a black downward arrow ↓) among other devices.
5. Just, right-click on the disabled device and tap on “Enable device” to enable it.
After that, close the Device Manager.
Now, perform a simple audio check and test whether your audio device is working or not.
Fix 3 – Reinstall the sound drivers
Just uninstall the conflicting sound driver and restart the system.
1. At first, press the Windows key+R keys together.
2. Then, type “devmgmt.msc” and hit Enter.
3. Once the Device Manager opens up, toggle the “Sound, video, and game controllers” section.
4. Here, right-click on the problematic driver and tap on “Uninstall device“.
5. Just, tap on “Uninstall” again to confirm your step.
This will uninstall the problematic audio driver from your system.
Once you are done, close the Device Manager window and restart your machine just once.
While rebooting, Windows will replace the conflicting audio driver with the default driver. Play a test song to check once the system has restarted.
If Windows doesn’t show up on the audio device, try these steps –
1. At first, open the Device Manager.
2. Then, tap on the “Action” from the menu bar and then, tap on “Scan for hardware changes“.
This will show the uninstalled driver.
3. Now, expand the “Sound, video, and game controllers” drop-down.
4. Then, right-click on the audio driver and tap on “Update driver“.
5. After that, click on the “Browse my computer for drivers“.
6. Then, tap on the “Let me pick from a list of available drivers on my computer“.
7. Then, tap on the audio driver to select it.
8. After that, click on “Next” to proceed with the installation.
Once you are done, the audio device will be working normally.
Fix 4 – Add a network device
Some users have solved the issue simply by adding a network service to their systems.
1. At first, write “cmd” in the search box.
2. After that, right-tap on the “Command Prompt” and then, click on “Run as administrator“.
3. After the Command Prompt opens up as an administrator, copy-paste these codes one by one and hit Enter.
net localgroup Administrators /add networkservice

net localgroup Administrators /add localservice
After executing both of these commands, close the terminal. Then, restart your machine.
Check whether the audio devices are working or not.
Fix 5 – Change the permissions
You can alter the permission of a particular key in the registry.
1. At first, press the Windows key+R keys together.
2. Then, type “regedit” and click on “OK“.
3. When the Registry Editor opens up, go to this location –
HKEY_LOCAL_MACHINE\SOFTWARE\Microsoft\Windows\CurrentVersion\MMDevices\Audio\Render
4. Then, right-click on the “Render” key and tap on “Permissions“.
5. When the Permissions window appears, select the “ALL APPLICATION PACKAGES” group.
6. After that, tap on check the “Allow” in the “Full Control“.
7. Then, tap on “Apply” and “OK“.
8. Coming back to the same page, you will see sub-keys under the ‘Render’ key.
9. Now, redo all the steps to give permissions for the sub-keys as well.
After doing that, close the Registry Editor.
Now, try to run the audio troubleshooter once again. This time, it will work just fine.
Fix 6 – Update the existing sound drivers
If uninstalling the sound drivers doesn’t work out, you have to update the existing one.
1. At first, right-click on the Windows icon and click on the “Device Manager“.
2. When the Device Manager opens up, again, expand the “Sound, video, and game controllers” section.
3. After that, right-click on the audio device and tap on “Update driver“.
4. Now, tap on “Search automatically for drivers“.
Now, allow Windows a while to search and download the latest audio driver and install it on your system.
Additional Tips –
1. There are third-party apps, like Audio Switcher. You can use it to switch between devices using predefined hotkeys directly from your keyboard.
2. If nothing so far has worked out for you, try the system restore option to restore your system to the point when the audio device was working perfectly.


