When it comes to mixing or cutting your favorite tracks or recording something, Audacity always comes at the top of your list of choices. This free audio editor usually works quite well, but sometimes while trying to record something or editing an existing track, Audacity may not work or show an error message “Error opening sound device. Try changing the audio host, recording device, and the project sampling rate” on the screen. You won’t be able to record (and, or play) anything further unless you solve this issue manually.
Workarounds –
1. Just close Audacity and relaunch it. Usually, it should solve the issue.
2. If this is the first time the problem has occurred, restart the system and then test Audacity.
3. Make sure that the audio device or the microphone is plugged in properly to the system. Unplug it from the machine and replug it.
Solutions for Audio device errors in Audacity
Fix 1 – Enable the audio device
You have to enable the audio device on your system.
1. At first, press the Windows key+R keys together.
2. Then, type “mmsys.cpl” and hit the Enter key.
This will open up the Sound panel.
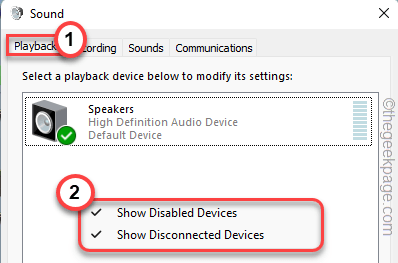
3. When the Sound opens up, head on to the “Playback” tab.
4. Here, you will find the list of audio devices on your system.
5. Just, right-click on any empty space and make sure to tick mark both the “Show Disabled Devices” box and the “Show Disconnected Devices” options.
This will show you a list of hidden devices.
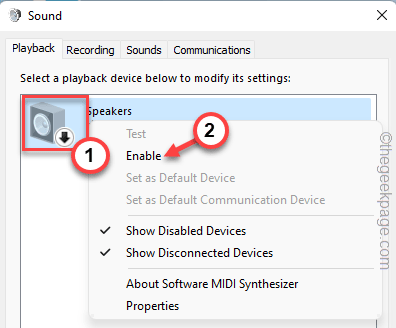
6. If you see your audio device is greyed out and borrows a black arrow (⬇), it is disabled.
7. Now, just right-tap on the disabled audio device and tap on “Enable“.
8. Now, to successfully apply the change, tap on “OK“.
Once you have done this, close and relaunch the Audacity app on your system.
Check whether you can use the audio device in Audacity.
Fix 2 – Set the device as default
If enabling the device doesn’t work out, try setting the device as default.
1. Make sure that the Audacity app is closed.
2. At first, press the Windows key+R keys together.
3. Then, type “mmsys.cpl” and click on “OK“.
This will open up the Sound panel.
4. You should be already at the “Playback” tab.
5. In here, right-click on the audio device that you are using currently and tap on “Set as default device“.
6. Then, tap on “OK” to save the settings.
7. Open the Audacity app and check if it works. If it doesn’t work just tap on “Edit” on the menu bar.
8. Then tap on the “Preferences…“.
9. Next, tap on the “Devices“.
10. In the Playback settings, check whether if the ‘Device:’ is set to the audio device that you have set to the default settings.
11. Once you are done, tap on “OK“.
Just relaunch the Audacity app. Check if this works.
Solution for Microphone errors in Audacity
If you are facing the issue while trying to record a track in the Audacity app, follow these fixes.
Fix 1 – Enable the mic and set it as default
1. Make sure that the Audacity app is closed completely before you try this solution.
2. At first, right-click on the Windows icon and tap on the “Run“.
3. Then, type “mmsys.cpl” and hit Enter.
4. Now, go to the “Recordings” tab.
5. Then, right-click on the recording device and tap on “Enable” to enable the device on your system.
6. After enabling the microphone, right-tap on it and tap on “Set as Default Device“.
7. Once you have enabled the device, tap on “OK“.
7. Now, open the Audacity app.
8. Then, check whether you can record any audio using the Audacity app.
9. If this doesn’t work out, tap on “Edit” on the menu bar, and further, click on the “Preferences…“.
10. When the Preferences: Devices window appears, go to the “Devices” on the left pane.
11. After that, on the right-hand side, make sure that the ‘Microphone’ is set to the device that you have set to default.
12. Once you are done, tap on “OK“.
Now, close and restart the Audacity app. Check if this works out for you.
Fix 2 – Match the audio capture format
If there is an audio capture dispute between the microphone and the Audacity app may cause this issue.
Step 1
1. At first, open the Run window by pressing the Windows key+R keys together.
2. Then, again type “mmsys.cpl” and click on “OK“.
3. When the Sound panel opens up, navigate to the “Recording” section.
4. Then, right-click on the Microphone app and tap on “Properties“.
5. Now, go to the ‘Default format’ section.
6. Then, note down the “Default Format“. Especially, notice the sample rate.
[
In our case, it is this –
2 channel, 16 bit 48000 Hz (DVD Quality)
So, the sample rate is 48000 Hz.
]
Once you are done, you may close this Sound window.
Step 2
1. Now, open the Audacity app.
2. Then, tap on the “Edit” on the menu bar.
3. After that, click on “Preferences…“.
4. Now, tap on “Quality” on the left-hand side.
5. After that, in the ‘Sampling’ section, tap on the “Default Sample Rate:” and set it to the sample rate you have noticed before.
For example, we have set it to “48000 Hz” as we have noted before.
6. Next, tap on “OK” to save the settings.
Once you are done, try to record something. You should be able to use the microphone to capture sound again.
Common solutions
These solutions will work for both audio and microphone-related issues.
Fix 1 – Set the Host settings to Windows WASAPI
There is another setting you can toggle to fix this issue.
1. At first, open the Audacity.
2. Then, press the Ctlr+P keys together to open the Preferences panel.
3. Now, tap on the “Devices” settings on the left pane.
4. Then, click on “Host:” and choose the “Windows WASAPI” from the drop-down.
You will see the ‘Playback’ and ‘Recording’ settings have altered automatically.
5. Next, tap on “OK” to save the settings.
Try to record something or edit a track. Check if this works out for you.
Fix 2 – Enable the devices from Device Manager
If the devices are disabled from the Device Manager itself, you can’t use Audacity properly.
1. Before you do anything, make sure that you have closed the Audacity app.
2. Then press the Windows key+X keys together.
3. Next, tap on the “Device Manager“.
4. In the Device Manager window, expand the “Sound, video, and game controllers” part to view all the audio devices.
5. The disabled audio device carries a small black arrow with its name.
6. Just, right-click on the device and tap on “Enable device“.
The device should be enabled within a few seconds.
7. Now, following the same way, check whether there is a disabled mic or not. If there are any, enable it.
After doing all these steps, open the Audacity app.
Now, check whether you can record or play a track in it. This should solve the issue.
Fix 3 – Restart Audio Endpoint Builder service
Restarting the Windows Audio Endpoint Builder service usually resets all the Windows Audio-related services.
1. At first, press the Windows key+R keys together.
2. Then, type “services.msc” and hit Enter to open the Services.
3. When the Services window appears, go all the way down to the “Windows Audio Endpoint Builder” service.
4. Then, tap right-click on the service and tap on “Restart” to restart the service.
[If you notice that the ‘Restart’ option is greyed out, just right-click on the service and tap on “Start” to start the service. ]
Once you have restarted the service, close the Services window. Open the Audacity app and check if this works out.
Fix 4 – Uninstall and reinstall the problematic device
If nothing is working out for you, try uninstalling and reinstalling the audio/mic driver.
1. At first, type “Device Manager” in the search box.
2. Then, tap on the “Device Manager” to access it.
3. In the Device Manager window, expand the “Sound, video, and game controllers” section.
4. Here, right-tap on the problematic driver and click on “Uninstall device“.
5. Just, tap on “Uninstall” again to confirm your step.
This will uninstall the problematic audio driver from your system.
Once you are done, close the Device Manager window and restart your machine just once.
While rebooting, Windows will reinstall the sound driver on your system. Once you are on your desktop, open the Audacity app and test.
In case, if you don’t see the audio device on your system, just follow these steps –
1. At first, launch the Device Manager.
2. Then, click on the “Action” in the menu bar and then, tap on “Scan for hardware changes“.
Now, you will see the audio driver that you have uninstalled.
3. Now, expand the “Sound, video, and game controllers” drop-down.
4. Then, right-click on the audio driver and tap on “Update driver“.
5. After that, click on the “Browse my computer for drivers“.
6. Then, click on the “Let me pick from a list of available drivers on my computer“.
7. Then, tap on the audio driver to select it.
8. After that, click on “Next” to proceed with the installation.
Finally, when you are done, close the Device Manager.
Test the Audacity app once again. Your problem should be solved.


