You can connect multiple output devices to your computer. So based on your requirement, you might want to switch between these output devices frequently. Though this can be done very easily, you might be wondering which way would be the easiest and the quickest. Well, to figure out which one is the easiest and the most suited for you, first you need to know which all are your options available.
In this article, we detail 4 different ways using which you can easily switch between the output devices in your Windows 11.
Method 1: Through Quick Settings Panel
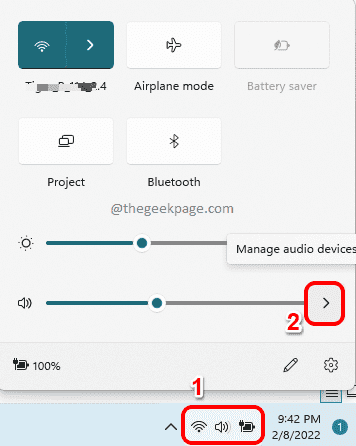
Step 1: Click on the quick settings panel icon comprising of the Wi-Fi icon, the Speaker icon and the Battery icon.
From the quick settings panel, click on the right arrow icon associated with the volume slider.
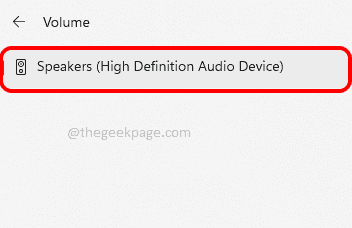
Step 2: Now in the window that pops open, you will be able to see all the output devices that are connected to your computer. Simply click on the one that you prefer as your output device. That’s it.
Method 2: Through System Sound Settings
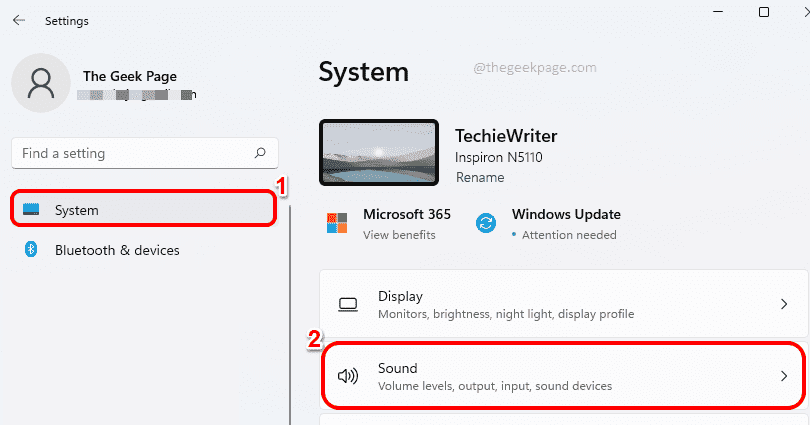
Step 1: Press the Win + I keys together to launch the Settings application. On the left window pane, click on the System tab and on the right window pane, click on the Sound tab.
Step 2: In the Sound settings window, expand the section Choose where to play sound by clicking on the arrow associated with it.
Under this section, you can see all the output devices that are connected to your computer. If there are multiple output devices, you can choose the output device that you prefer, by just clicking on the radio button corresponding to it. That’s it.
Note: In the screenshot below, there is no radio button because only one output device is connected to my computer.
Or if you would like to make one particular device your default output device, then click on the right arrow icon associated with that output device to expand its properties.
Step 3: In the Properties window that follows, under the General section, choose Is default for Audio option for the dropdown Set as default sound device. That’s it.
Method 3: Through Volume Mixer Settings
Step 1: Right click on the Speaker icon on the right corner of your Taskbar. From the menu that expands out, click on the Open volume mixer option.
Step 2: Now in the Volume mixer window, you will have the option to choose your preferred output device from the dropdown associated with Output device option.
Method 4: Through Game Bar Settings
Press the Win + G keys together to bring up the Game bar configurations. Now in the Audio window, click on the MIX tab.
Under the MIX tab, against the WINDOWS DEFAULT OUTPUT dropdown, you can set your preferred output device with a simple click.
That’s it. Hope you found the article useful.


