When the user tries to play audio or video on a monitor or projector, he might get an error saying “The device is being used by another application” and no sound is played. This happens even when all the devices have been closed and no other device is being played. This issue might be related to HDMI or corrupted audio drivers, if you are not using the latest driver this might be the problem. In this article, we will see the different methods of how to solve the device being used by another application issue on Windows 10.
Method 1: Restart The Audio Service
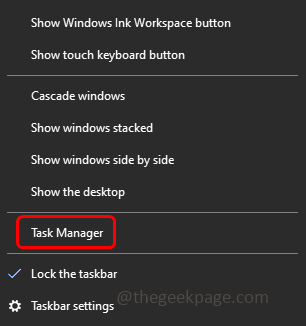
Step 1: Right-click on the taskbar and then from the appeared list click on Task Manager
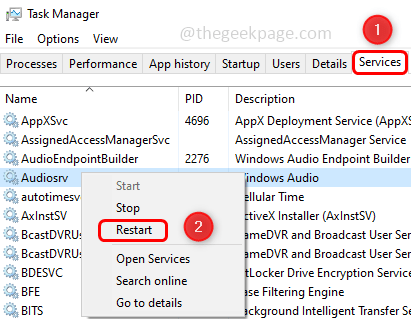
Step 2: Go to the Services tab
Step 3: Right-click on the Audiosrv and click on Restart
Now check if the issue is solved.
Method 2: Disable Allow Applications To Take Control Of The Device
Step 1: Open the run prompt using Windows + R keys together
Step 2: Type mmsys.cpl in the run prompt and hit enter. This will open the Sound options window
Step 3: Right-click on your sound device and click on Properties
Step 4: Go to the Advanced tab
Step 5: In the exclusive mode section uncheck Allow applications to take exclusive control of this device option by clicking on the checkbox beside it
Step 6: To save the changes click on Apply and OK.
Step 7: Restart your computer and then check if the issue is no more.
Method 3: Re-enable Or Uninstall The Driver
Step 1: Open the run prompt using Windows + R keys together
Step 2: Type devmgmt.msc in the run prompt and hit enter. This will open the Device Manager window
Step 3: Expand Sound, video and game controllers by clicking on the arrow beside it
Step 4: Right-click on your sound device then click on disable device
Step 5: Now again right click on the same sound device and then click on enable device.
Now check if it resolves the issue.
Method 4: Roll Back To Previously Installed Driver
Step 1: Open the run prompt using Windows + R keys together
Step 2: Type mmsys.cpl in the run prompt and hit enter. This will open the Sound options window
Step 3: Right-click on your sound device and click on Properties
Step 4: In the controller information section click on Properties
Step 5: Go to the Driver tab and click on Roll back driver. If the roll back driver button is not enabled for you then you do not have any previous versions available to roll back. So skip this method and continue with the other below solution
Note: Here in the below image the roll back driver option is not enabled. If you have it enabled go ahead and click on it.
Step 6: Wait for the driver to roll back to finish and click on OK
Method 5: Update The Driver
Step 1: Open the run prompt using Windows + R keys together
Step 2: Type mmsys.cpl in the run prompt and hit enter. This will open the Sound options window
Step 3: Right-click on your sound device and click on Properties
Step 4: In the controller information section click on Properties
Step 5: Go to the Driver tab and click on Update driver. If the update driver button is not enabled for you, you are on the latest version of the driver. So skip this method and continue with the other below solution
Note: Here in the below image the update driver option is not enabled. If you have it enabled go ahead and click on it.
Step 6: Select the latest driver and click on Next.
Step 7: Wait for the driver to get updated and click on OK
Method 6: Scan For Hardware Changes
Step 1: Open the run prompt using Windows + R keys together
Step 2: Type devmgmt.msc in the run prompt and hit enter. This will open the Device Manager window
Step 3: At the top, right-click on your computer name and then click on scan for hardware changes
Step 4: Wait until the process is finished. Now check if the issue is solved.
That’s it! I hope this article is helpful and let us know which method was effective for solving your problem. Thank you!!


