In Windows 10 sometimes app might be appearing blurry on the user screen. It will be very difficult for the user to distinguish the application from the background in the desktop. The main reason behind this problem is incorrect DPI settings of the application in Windows. If you are facing the same issue at your end, no need to worry. You can solve this problem just by tweaking some particular settings on your computer. Follow these easy fixes to solve this problem on your computer. But before moving ahead for the fixes, you should try these workouts initially to try out some simpler solutions for this problem.
Also Read: How to Fix blurry font issue on Windows computer
Method 1: Change Win8DpiScaling in Registry Editor
When none of the above method works, you can try editing the Registry Editor to possibly fix the blurry font issue. However, before you proceed to make any changes to the Registry, make sure you create a backup of the registry settings, so that, in case, you lose any data, it can be recovered easily. Follow the below instructions to make the changes:
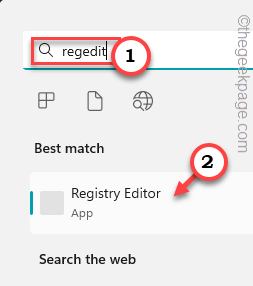
Step 1: Search Regedit in windows search box
Step 2: Click on Registry editor to open it

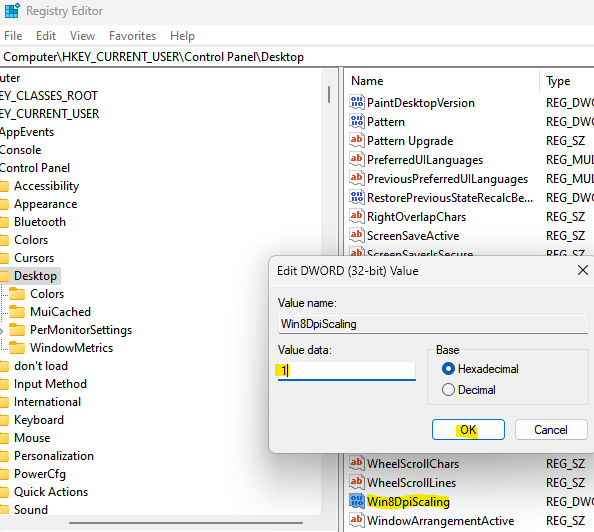
Step 3: In the Registry Editor window, browse to the following path:
HKEY_CURRENT_USER\Control Panel\Desktop
Now, in the right side, locate Win8DpiScaling and double-click on it.
Step 4: Set the Value data field to 1.

Press OK to save the changes and return to the Registry Editor window.
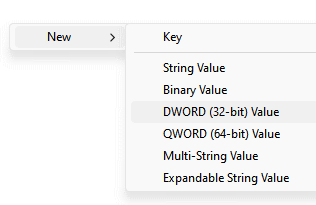
Step 5: Now, on the right-side, in an empty area, right-click, select New and then select DWORD (32-bit) Value.

Rename this new value as LogPixels.
Step 6: Now, double-click on LogPixels and set it to 78.
Also make sure the base to hexadecimal.
Press OK to save the changes and exit.

Now, Restart computer
Method 2 – disable Antialiasing – FXAA in Nvidia
If you are using Nvidia Graphic card, then try disabling Antialiasing – FXAA in Nvidia control panel.
1 – Right click anywhere on Desktop and click on Nvidia Control panel. You can also search Nvidia Control panel in Search box and click on search result to open Nvidia control panel.

2 – Click on Manage 3d settings in left menu
3 -Now, Click on Program Settings
4 – Select the app which seems to be blurry
5 – Select Aliasing – FXAA and choose Off.

Fix-3 Change Advanced Scaling option-
Changing the advanced scaling option in Settings can solve this problem. Follow these steps-
1. Press Windows key+I to open Settings. Now, click on “System” in the Settings window.

2. In Settings window, on the left pane click on “Display“, and then click on “Advanced scaling settings” on the right pane under Scale and layout.

3. Now, under Fix scaling for apps option, toggle the ‘Let Windows try to fix apps so they’re not blurry‘ option to “ON“.

4. Close Settings window.
Reboot your computer to save the changes. The issue with the applications appearing blurry should be solved. Otherwise, go for the next solution.
Fix-4 Change the size of the text
1. Press Windows key+I to open Settings. Now, click on “System” in the Settings window.

2. In Settings window, on the left pane click on “Display“, and now click on drop-down “Change the size of the text, apps and other items” on the right pane under Scale and layout settings, and choose a suitable size of the texts, apps and other items.

3. Reboot your computer to save the changes.
Check if the problem is still there or not.
Fix-5 Change the DPI settings of the problematic application-
You might be facing this issue with a specific application, not with every applications on your computer. Follow this steps to change the DPI settings of that problematic application-
1. Go to desktop and right click on the icon of the problematic application and click on “Properties“.

2. In the Properties window, go to the “Compatibility” tab and then click on “Change high DPI settings“.

3. Now, check the “Use this settings to fix the scaling problems for this program instead of the one in Settings” option. In the same window, under ‘High DPI scaling override’ option, check the option “Override high DPI scaling behavior“. Now, in the “Scaling performed by:” option, choose “Application” from the drop-down. Finally, click on “OK” to save the changes on your computer.

4. Now, coming back to the Properties window, click on “Apply” and “OK” to save the changes.

Reboot your computer to save the changes. After rebooting check if you are still facing the issue with the blurry applications on your computer. If you are still facing the issue, go for the next solution.
Fix-6 Change Custom scaling on your computer-
Changing custom scaling in Windows 10 can fix this problem, as this may be a bug which is causing the applications and fonts on your computer looking a bit blurry.
1. Click on Search box beside the Windows icon, and type “advanced scaling” and then click on “Fix apps that are blurry” in the elevated search result window.

2. In Settings window, under Custom scaling, click on the option saying “Enter a custom scaling size between 100-500% (not recommended)” , click on the box and enter a value between “100-500” and click on “Apply“.

Close the Settings window. You need to reboot your computer to save the changes on your device. After rebooting, issues with blurry application should be solved.
Fix- 7 Adjust Clear Type for blurry fonts-
If you are experiencing blurry fonts on your device, enabling Clear Type may solve your issue. Follow these steps to enable it-
1. Click on Search box beside the Windows icon, and type “Clear type” and click on the “Adjust Clear Type text” in the elevated search result.

2. In Clear Type Text Tuner window, check the box “Turn on Clear Type” option and then click on “Next“.

3. In the next step, the default resolution of the screen you are using will be checked (if it was not set at the default resolution, it will be set to default) and after that click on “Next” to save the changes.

4. Now, in the next window you will be shown some text samples to detect and understand which is looking best on your computer. Now, click on “Next“.

5. Go through these process of selecting the best texts on the screen (You have to do this for 5 times). Click on “Next” to complete the text tuning process.

6. Now, when you see “You have finished the text on your monitor“, click on “Finish” to finalize the process on your computer.
![Fix: Apps seems to be blurry problem in Windows 10 / 11 23 Finish Clear Type]](https://thegeekpage.com/wp-content/plugins/wp-fastest-cache-premium/pro/images/blank.gif)
7. Close the Clear Type Text Tuner window to finish the process.
Reboot your computer to save the changes. After rebooting, check if you are still facing the issue of blurry fonts on your computer or not. If you are still having the blurred fonts you may go through this article- How to fix blurry fonts in Windows 10.
Fix- 8 Update the display drivers on your computer-
If this issue is happening because of any display driver bugs, updating the display driver will solve it.
1. Press Windows key+R to launch Run. Now, type or paste “devmgmt.msc” and hit Enter to open Device Manager window.

2. Now, in the In the Device Manager window, scroll down to find “Display adapters” from the list of the available devices and drivers, click on it to expand it. Now, from the drop-down right click on the graphics driver you are using. Finally, then click on “Update driver“.

3. Now, in the next window, you will be asked “How do you want search for the drivers?“. Click on “Search automatically for updated driver software” option.

Wait till Windows searches for latest version of compatible driver for your graphics driver. Then, Windows will download it and install it in your computer.
Now, if you see a window saying “The best driver for your device is already installed.“. Then, click on “Search for updated drivers on Windows Update“. You will have your driver installed along with Windows Update.

5. Close the Device Manager window.
Reboot your computer to complete the process and save the changes on your computer. After rebooting, check if you are still seeing the blurry applications on your computer.
If this process didn’t work out for you, manual installation of the latest driver of the driver may solve the problem for you.
Install the graphics driver manually-
1. Press Windows key+R to launch Run window. Now, type “dxdiag” in the Run window and hit Enter. DirectX Diagnostic Tool window will be opened.

2. In DirectX Diagnostic Tool window, go to the “Display” tab. Now, in the “Name:” tab, check the name of the driver.

Close DirectX Diagnostic Tool window.
Now, according to the driver name you see, you have to search the latest driver for the display. You have to download it and install it on your computer.
We have discussed the process of installing of NVIDIA drivers-
3. Search “Nvidia drivers” from your browser window and click on “Download Drivers|NVIDIA“. You will be directed to the download page of the display driver.

4. Now, in this window, under ‘NVIDIA Driver downloads‘ section choose “Product type“, “Product series“, “Product“, “Operating System“, “Windows Driver Type“, “Download Type” according to your graphics driver specifications. Now, click on the “Search” to search for the latest driver.

5. Now, click on “Download” to download the driver. Also check the “Release date” to make sure that it is the latest driver.

6. Locate the downloaded setup of the driver installer in the File Explorer. Now, double click on it to start the installation process of the driver. Click on “Yes” when you are prompted by User Account Control.
![]()
7. Now, in NVIDIA Installer window, click on “NVIDIA Graphics Driver and GeForce Experience” and click on “Agree and continue” .

8. Under Installation Options, choose “Express (Recommended)” and click on “Next” to start the installation process of the display driver.

9. After installation is done, click on “Close” to close the NVIDIA Installer window.

Restart your computer to finish the installation process.
After rebooting, your issue should be fixed.
Fix-9 Lower the resolution on your computer-
Lowering the resolution on your computer can solve the issue on your computer.
1. Press Windows key+I to open Settings. Now, click on “System” in the Settings window.

2. Now, click on the “Display” on the left hand side of the Settings window, and in the right pane in the Scale and layout, click on “Display resolution” and set a lower resolution for your display.

Reboot your computer to save the changes on your computer.
After rebooting your issue should be solved.
Additional Workarounds
1. If this is the first time you are experiencing this problem, a simple reboot of your system may work out for you.
2. Check if your Windows is updated or not. If your Windows is not updated, wait for Windows to download and install the updates on your computer. After updating, reboot your computer and check if you are still facing the blurry application problem.
3. If Windows detects the blurriness, there will be a prompt in the Action Center. Just click on “Yes,fix apps” in that prompt to fix the problem.
If any of these workarounds didn’t work out for you, go for these main solutions.