At the time when Windows 10 has introduced some additional features, Windows 11 also offers some great features, especially changes in the display settings. This is more beneficial for those more than one monitors. However, the feature updates also come with technical issues. While it’s a much advanced OS version of Windows and goes well with all applications, sometimes, you may come across display issues, like blurry fonts and icons. One of the possible reasons behind this could be the all-new high-resolution display.
While there could be other reasons also behind the issue, fortunately, there are a few possible solutions that may help you fix the blurry font problem on your Windows 11 PC. Let’s see how:
Method 1: Using cleartype
This method includes using the built-in Cleartype tool that allows you to adjust the text clarity. Lets see how to use it:
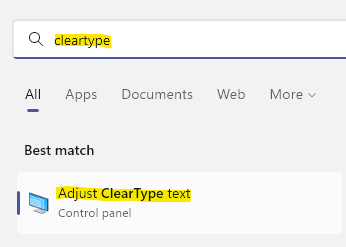
Step 1: Go to Start and type ClearType in the Windows search bar.
Step 2: Next, under the Best match section, click on the result – Adjust ClearType text.

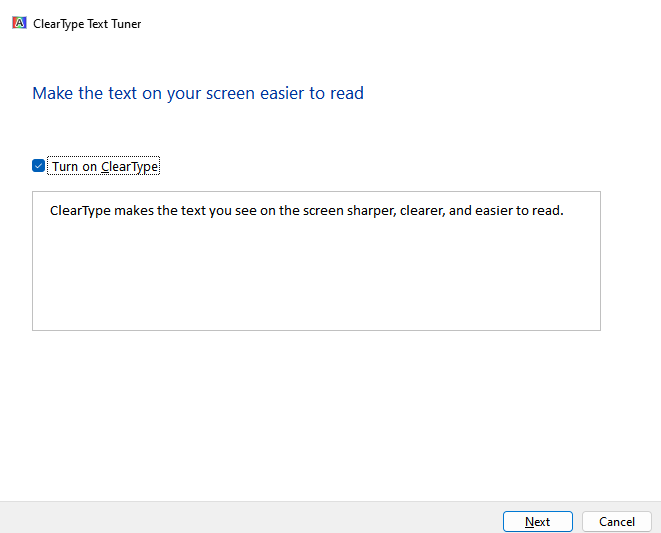
Step 3: In the ClearType Text Tuner window, check the box next to Turn on ClearType if it’s not already.
Press Next.

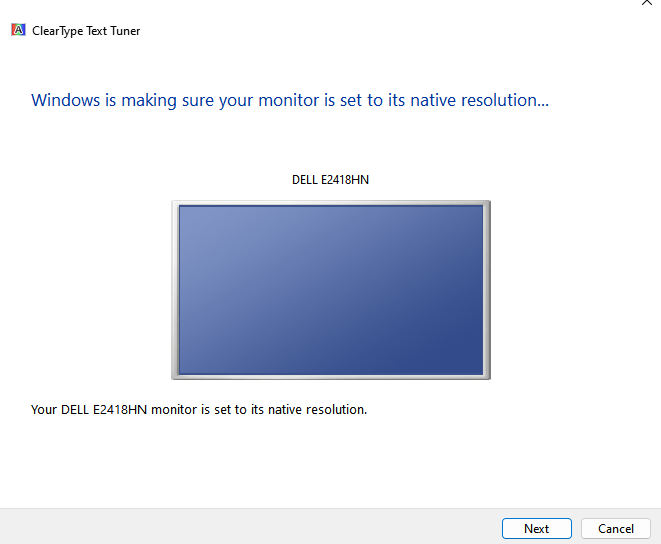
Step 4: In the next window, you will see a message “Windows is making sure your monitor is set to its native resolution“.
Click Next to proceed.

Step 5: Now, from the two text samples, select the text that appears more clear to you and then press Next.
Step 6: Now, keep selecting the text which looks more clear to you and keep pressing Next, till Windows finalizes the best text setting for you.
Step 7: Keep following the instructions on the screens to identify and set the best font setting for you.

Once done, you will now get rid of the blurry font problem on your Windows 11 PC.
Method 2: Through Registry Editor
When none of the above method works, you can try editing the Registry Editor to possibly fix the blurry font issue. However, before you proceed to make any changes to the Registry, make sure you create a backup of the registry settings, so that, in case, you lose any data, it can be recovered easily. Follow the below instructions to make the changes:
Step 1: Press the Windows + R keys together on your keyboard to open the Run command window.
Step 2: In the Run command search bar, type regedit and hit Enter to open the Registry Editor window.

Step 3: In the Registry Editor window, navigate to the below path:
HKEY_CURRENT_USER\Control Panel\Desktop
Now, go to the right side of the window, locate the DWORD value – Win8DpiScaling and double-click on it.
Note: – If it does not exist, then right click on any empty space on the right side and choose Dword 32 bit value. Name it Win8DpiScaling
Step 4: In the Edit DWORD (32-bit) Value dialogue box, go to the Value data field and set it to 1.

Press OK to save the changes and return to the Registry Editor window.
Step 5: Now, on the right-side, look for an empty area, right-click, select New and then select DWORD (32-bit) Value.

Rename this new value as LogPixels.
*Note – Make sure that the L and P letters are in capital.
Step 6: Now, double-click on the new value – LogPixels and in the Edit DWORD (32-bit) Value dialogue box that opens, navigate to the Value data field and set it to 78.
Also change the base to hexadecimal.
Press OK to save the changes and exit.

Now, close the Registry Editor window and check if the blurry font problem on your Windows 11 PC is resolved.
Method 3 – disable Antialiasing – FXAA in Nvidia
If you are using Nvidia Graphic card, then try disabling Antialiasing – FXAA in Nvidia control panel.
1 – Right click anywhere on Desktop and click on Nvidia Control panel. You can also search Nvidia Control panel in Search box and click on search result to open Nvidia control panel.

2 – Click on Manage 3d settings in left menu
3 -Now, Click on Program Settings
4 – Select the app which seems to be blurry
5 – Select Aliasing – FXAA and choose Off.

Method 4: Adjust Performance Settings Using Control panel
You can also try changing the performance settings and check if this helps fix the issue. Here’s how to adjust the performance settings:
Step 1: Press the Win + R hotkeys on your keyboard to launch the Run command window.
Step 2: In the Run command search bar, type sysdm.cpl and hit Enter to open the System Properties window.

Step 3: In the System Properties dialogue box, select the Advanced tab.
Now, go to the Performance field and click on the Settings button.

Step 4: Now, in the Performance Options window that opens, under the Visual Effects tab, select Adjust for best appearance.
Press Apply and then OK to save the changes.

Now, exit the System Properties window and now, the blurry font issue on your Windows 11 PC should be resolved.
Method 5: Change display settings for a particular app
If the blurry font problem occurs for a specific app, you can try changing the display settings for the same and that should fix the issue. Follow the below instructions to change the display settings for a specific app:
Step 1: Go to the desktop, right-click on the app that’s having the blurry font problem and select Open file location.

Step 2: In the folder location that opens in the File Explorer window, Locate the app executable and right-click on the app.
Step 3: Next, select Properties from the sub-context menu.

Step 4: Now, in the Properties dialogue box, click on the Compatibility tab.
Here, go towards the bottom and click on Change high DPI settings.

Step 5: In the High DPI settings window, go to Program DPI and check the box next to Use this setting to fix scaling problems for this program.
Step 6: Next, navigate to the High DPI scaling override section and check the box next to Override High Dpi scaling behaviour.
Press OK to save the changes and exit.

Now, the blurry font problem on your Windows 11 system should be fixed.
Method 6: Changing the scaling settings manually
You can try changing the scaling settings on your own to recommended levels and check if that helps fix the issue. Let’s see how:
Step 1: Press the Win + I keys simultaneously on your keyboard to launch the Settings app.
Step 2: In the Settings window, click on the System option on the left side of the pane.
Step 3: Now, go to the right side and click on Display.

Step 4: In the next window, on the right side, go to Scale & layout and click on Scale.

Now, in the next window – Customised scaling, go to the Custom scaling field and enter the current scaling factor based on what you are using currently.
For instance, if you are using 100% already, then type 100. But, if you are using 125%, then type 125.
Press the Tick symbol next to it.

Now, you have successfully changed the scaling settings and the fonts should not appear blurry now.
Method 7: Adjust Graphics Settings for Individual Apps
The Graphics settings was introduced lately in Windows 10, while it comes by-default in the Windows 11. This is helpful in cases where you want to fix the blurry font or blurry icon problem for a specific app. Let’s see how:
Step 1: Go to Start, right-click on it and select Settings.
Step 2: In the Settings window that opens, click on System on the left side of the pane.
Step 3: Next, navigate to the right side of the window and click on Display.

Step 4: In the Display settings window, on the right side, scroll down and under the Related settings section, click on Graphics.

Step 5: Now, in the Graphics settings window, on the right side, go to the list of apps.
Here, click on the the app you are having the blurry font problem with and select Options from the expanded section which appears.

Step 6: This will open the Graphics preference prompt.
Here, try selecting each of the options one by one – Let Windows decide (Power saving), Power Saving or High Performance and see which option improves the blurry font problem.
Once you identify tyhe best settings , click on Save to save the changes.

Close the Settings app and now, your blurry font or icon issue should be resolved.
Method 8: Update Graphics Drivers
Possibilities are, that the display drivers are outdated and hence, causing the blurry font issue. In such a case, try updating the drivers to the latest version and see if it helps fix the issue:
Step 1: Press the Win + R shortcut keys on your keyboard to open Run command.
Step 2: In the Run command search window, type devmgmt.msc and press OK to open the Device Manager window.

Step 3: In the Device Manager window, go to the Display adapters section and expand it.
Here, look for the graphics card. right-click on it and select Update driver.

Step 4: In the Update Driver window, click on Search automatically for drivers.

Now, wait till Windows looks up for any latest drivers and if available, it will automatically install the latest version of the driver.
Once done, close the Device Manager window, restart your PC and the blurry font issue should be fixed now.
Method 9: Check for Windows Update
Needless to mention, how important is updating your Windows OS or checking for updates at regular intervals. Installing the updates regularly not just helps keep your PC safe and secure with security patches, but it helps your PC to function smoothly, overall. Hence, make sure that you install the latest Windows updates as soon as it’s released. Here’s how:
Step 1: Press the Win + I Keys together on your PC to launch the Settings app.
Step 2: In the Settings window, click on the Windows Update option on the left side of the pane.
Step 3: Now, navigate to the right side and click on Check for updates.

If any updates available, it will display the result/s below and download it automatically.
Step 4: Once downloaded, it will prompt you to Install the update.
Step 5: Click on the Install button to finish installing the update.
Once done, you will be asked to restart your PC immediately or you can choose to restart it a later time and date.
As you restart your PC with the Update, Windows will finish installing the update.