Battle.Net is the famous launcher of Blizzard Entertainment that accumulates all your favorite COD games in one place. Whether you want to play WoW or the brand new COD Vanguard, you will need the Battle.Net launcher up and running on your system. So, what if this Battle.Net launcher is not opening on your system? Don’t worry. If the existing cache is too big, this problem may occur. There are some quick resolutions that you can use to fix this issue.
Workarounds –
1. You can use the ethernet cable to plug your system directly into the modem. Then try to open the Battle.Net app.
2. Uninstall any third-party antivirus you are using.
Fix 1 – Delete the Battle.net files
As we have mentioned, the cache file size may be the root cause of this issue.
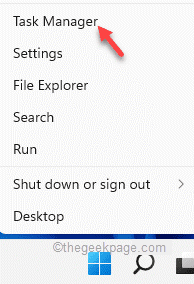
1. At first, press the Windows key+X keys together.
2. Then, tap on the “Task Manager“.
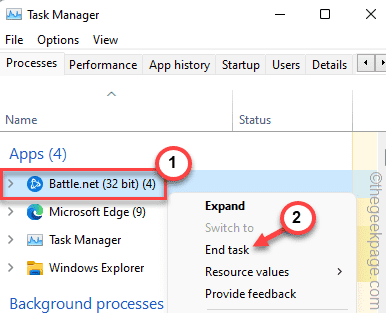
3. Once the Task Manager opens up, look for the “Battle.Net” process.
4. Just right-click on that process and tap on “End task” to kill the process on your system.
5. After that, scroll down and look for any other Battle.Net process.
6. If you see one, right-click on it and tap on “End task” to kill it.
This way, make sure all the Battle.Net processes are ended.
7. After this, press the Windows key+E keys together to open the File Explorer.
8. Once it opens up, go here –
C:\ProgramData
[
If you can’t see the ‘ProgramData’ folder, follow these steps.
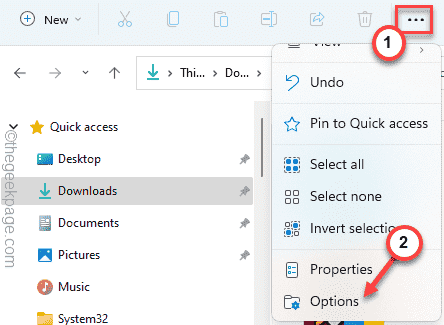
1. Once the File Explorer opens up, tap on the three-dot menu.
2. Then, click on the “Options“.
3. Now, in the ‘Folder Options’ window, click on the “View” section.
4. After that, toggle the radio button beside the option “Show hidden files, folders, and drives“.

5. Finally, click on “Apply” and “OK“.

]
9. In the ProgramData folder, select the “Battle.net” folder.
10. Then, tap on the bin icon on the menu bar to delete the folder from your system.
After deleting the app, close the File Explorer.
Then, open the Batlle.Net app. It may run an update check and if it works.
Fix 2 – Delete the Battle.net cache folder
If deleting the Battle.net files doesn’t work out, try removing the Blizzard Entertainment folder.
1. Make sure that the Battle.net app is not running on your system.
2. At first, press the Ctrl+Shift+Esc keys together.
3. When the Task Manager, right-click on any Battle.net process and tap on “End task” to kill it.
4. After that, press the Windows key+R keys together.
5. Then, type “%programdata%” and click on “OK“.
6. Next, choose “Blizzard Entertainment” in the list of apps.
7. After that, tap on the “Delete” icon to remove the folder.
Finally, close the File Explorer. Start the Battle.Net launcher on your system. It will download essential data files. It should work.
Fix 3 – Set the app to run in compatibility mode
You can set this app to run in compatibility mode.
1. At first, right-click on the “Battle.net” app and tap on “Properties” to open it.
2. Then, go to the “Compatibility” tab.
3. After that, check the “Run this program in compatibility mode for:” option.
4. Then, choose the “Windows 8” from the drop-down list.
5. Next, check the “Run this program as an administrator” box.
6. Finally, click on “Apply” and “OK” to save the settings.
Then, launch the Battle.Net app and then update the game if it needs. If this doesn’t work out, check if this works out.
Fix 4 – Switch On the Secondary Logon Service
This service is quite crucial for Battle.net to operate smoothly.
1. Press the Windows key and type “services“.
2. Then, tap on the “Services” to access it.
3. When the Services opens up, scroll down to find the “Secondary Logon” service.
4. Then, double-click on it to access it.
5. After that, click on the ‘Startup type:’ to “Automatic“.
6. Then, click on “Start” to start the service.
7. Finally, tap on “Apply” and “OK“.
Then, close the Services window. Reboot your system. You should be able to use Battle.net normally.
Fix 5 – Run Battle.net as admin
1 – Right click on Battle.net shortcut and click Run as adminsitrator

Fix 6 – Run Network commands
1 – Open search box and type cmd in it.
2 -Do a right click on command prompt icon and click run as administrator.

3 – Now, run the codes give below One by one
netsh int ip reset c:\resetlog.txt
netsh winsock reset
ipconfig /flushdns
4 -Now, close the cmd window.
Fix 7 -Turn Off Proxy server
1 – Open RUN by pressing Windows key and R.
2 – Now, type INETCPL.CPL in it and click OK button.

3 – Click on Connections Tab.
4 – Now, click on Lan settings

5 – Now, select Automatically detect settings
6 – Next , Uncheck Use a proxy service for your LAN.
7- Click Ok

Now, try again
Fix 8 – Uninstall and reinstall Battle.net client
If nothing is working out for you, uninstall the existing Battle.Net client and download-install the latest one.
Step 1 – Uninstall
1. At first, press the Windows key+R keys together.
2. Then, type “appwiz.cpl” and hit Enter.
3. When the Programs & Features window appears, right-click on the “Battle.net” and tap on “Uninstall” to uninstall it from your system.
4. Then, tap on “Yes, uninstall” to confirm your action.
5. After that, open the File Explorer.
6. Then, go this way –
C:\ProgramData
7. In the ProgramData folder, select the “Battle.net” folder.
8. Then, tap on the bin icon on the menu bar to delete the folder from your system.
After that, close the File Explorer.
Step 2 Download & Install
1. At first, open this link.
2. Then, tap on “Download for Windows” to download the Battle.net app on your system.
3. After downloading the setup, double click on the “Battle.net-Setup“.
Follow these on-screen instructions to install the latest version of the client.
This time it will work just fine.
Fix 9 – Use the Clean boot mode
Another preferable approach to this issue, you can use the Clean boot mode.
1. At first, press the Windows key and type “msconfig“.
2. Then, click on the “System Configuration” to access it.
3. Now, go to the “General” tab.
4. After that, choose the “Selective startup” option.
5. Then, check the “Load system services” and the “Load startup items” options.
5. After that, go to the “Services“.
6. Here, you have to check the “Hide all Microsoft services” box.
7. Next, click on the “Disable all“.
This way, you have configured your system to start without any third-party apps.
8. Finally, click on “Apply” and then on “OK“.

You will see a prompt has appeared to restart your machine.
9. Just, click on “Restart” to reboot your system immediately.

After the system restarts, open the Battle.net launcher and check whether this works.
Your problem should be solved.


