Does the fingerprint option not showing in the phone settings? Fingerprint is one of the most secure ways to encrypt your phone. So, not being able to find that on the phone should be on your ‘Never to happen’ list. But, if you ever found yourself in such situation where you are unable to locate the Fingerprint settings, this guide should help you fix that.
Workaround –
Restart the phone. This is usually just a bug and restarting the phone should get back the Fingerprint on your phone.
For MIUI, POCO users –
The majority of complaints are coming from the MIUI or POCO users. These are the solutions to fix the fingerprint test.
Fix 1 – Run the Fingerprint test in CIT mode
Run the Fingerprint test in the CIT mode on your phone.
NOTE – Before running these, make sure to remove the phone lock. Just set the phone lock to None and proceed.
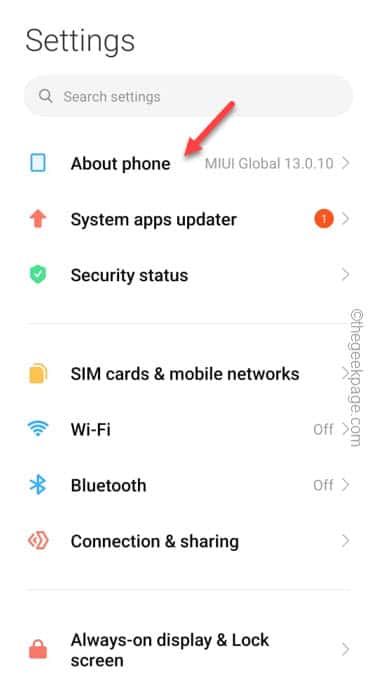
Step 1 – To enable the CIT mode, you have to open the Settings on your phone.
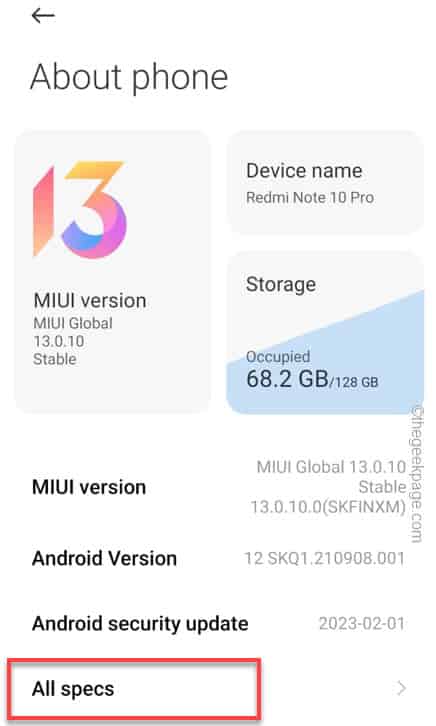
Step 2 – Later, open the “About phone” to open the Settings.
Step 3 – After opening the Settings, scroll down to see the “All specs” to open the complete list of specifications.
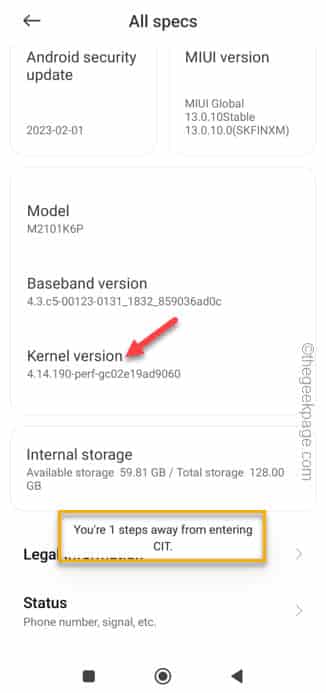
Step 4 – On the following page, you will notice the “Kernel version“. Open that up and you see you will see this message –
You're one step away from entering CIT
Step 5 – Keep tapping that until the CIT window opens up.
Step 6 – On the CIT window, you can find several tests designed for various phone components. So, scroll down to the end to the list and open the “Fingerprint input test” to run that.
Step 7 – On the main Fingerprint input test page, keep registering the fingerprint using the fingerprint sensor.
As you do that, you will see the enroll count go up as you keep registering the fingerprint. If the match is good, you will see this message –
Match please click pass.
Otherwise, if it fails, there is a hardware issue and you have to consult an authorized service center.
Fix 2 – Clear data of Fingerprint test app
There is a system app on your phone called Fingerprint test on your phone. The accumulated app data of the Fingerprint test can cause this issue.
Step 1 – Open the Settings.
Step 2 – After this, go to the “Apps” settings.
Step 3 – Next, the three dot menu on the top corner and tap “Show all apps” to see all the apps.
Step 4 – Now, search for the “fingerprint” using the search icon and open the “Fingerprint Test” app.
Step 5 – Just tap “Clear data” once to clear the data.
After clearing the Fingerprint test data, close the Settings app.
Restart your phone once.
After this, open the Fingerprint settings to adjust the settings. Delete the older fingerprints and register new ones.
For other users –
If you are not using a MIUI user, these are the solutions you have to use to fix the fingerprint bug.
Fix 1 – Run the Phone in Safe Mode
Boot the mobile device in the Safe Mode and re-enable the Fingerprint settings on you phone.
Safe Mode disables all the externally loaded third-party apps.
Step 1 – Quickly, press and hold the Power Button to see the Power console.
Step 2 – Next, tap and hold the Power Off button for at least 5 seconds.
Step 3 – When you see this message, tap the “Safe mode” to boot the phone in Safe mode.
Tap again to restart your phone in Safe mode.
Your phone will reboot normally.
But when the phone does reboot, you will see the “Safe Mode” written on the corner of the screen.
Open the Settings and try to access the fingerprint settings.
Fix 2 – Clear the Settings data
Corruption in the Settings data can create this mess. So, clear the Settings app on your phone.
Step 1 – Just open the Settings utility.
Step 2 – Scroll down until you see the “Apps” option. Open that up.
Step 3 – Slide down through the list of apps or just search to find the “Settings“. You need to open this utility.
Step 4 – Further, open the “Storage” option to open that.
Step 5 – You can see what amount of cache data have Finally, going forward, tap “Clear cache” to clear the Settings cache.
After clearing the Settings cache, close the Settings utility once. Try to use the fingerprint once more.
Fix 2 – Update the phone
If this is just a bug causing this issue, check whether any updates are pending on the phone. Install that immediately if that’s the case.
Step 1 – Open the Settings utility on the phone.
Step 2 – Scroll down and go straight to find and open the “Software Update“.
Step 3 – Wait for the phone to check for an impending update. If it can detect one, tap the “Download and install” option.
This way, you can directly download and install the update on your phone.
Update process usually takes longer than usual. So, try to enable the fingerprint after the phone does restart.
Fix 4 – Clear the partition cache
The final option in our repertoire is an advanced one. So, carefully execute the steps we have detailed.
Step 1 – These steps can be executed only in the Recovery Mode.
Step 2 – Close all the apps running on the device.
Step 3 – Use an USB cable and plug your phone into any of the following devices –
PC/Laptop
Set Top Box
TV
Type C earphones
Bluetooth Speaker
Step 3 – Once you are plugged in, simply press&hold the Power button for a few seconds.
Step 4 – Just touch the “Power off” to shut down the computer.
Just wait as the phone screen turns black and sign of charging appears on the black screen.
Step 5 – Now, use the “Power off” button and the “Volume UP button” both together to start the phone in the Recovery Mode.
The touch screen panel is disabled on the phone screen.
Step 6 – So go to the “Wipe cache partition” using the Volume down button.
Step 7 – Use the Power button to access that.
Step 8 – On the following page, choose the “Yes” option again using the volume button.
Step 9 – Use the Power button to wipe the cache partition on the phone.
Wiping the cache partition will clear the phone cache.
Step 10 – Just a few seconds later, you shall come back to the main Android Recovery page.
Step 11 – Finally, choose the “Reboot system now” and use that using the Power button to restart the phone.
This will restart your phone.
Once that does boot up, try to enact the fingerprints. Hope these have worked out for you!


