While viewing your vacation pics on your new Windows 11 machine, you may stuck at an annoying error message – “File System Error (-2147219195)“. This issue occurs due to corruption in the Microsoft Photos app, the default built-in image processor for every Windows 11/10 device. Follow these easy workarounds to quickly fix this problem and take a look at your favorite pics again!
Fix 1 – Update the Photos
This error message can show up on your screen if you are not using the latest version of the Photos app.
1. Launch the Microsoft Store.
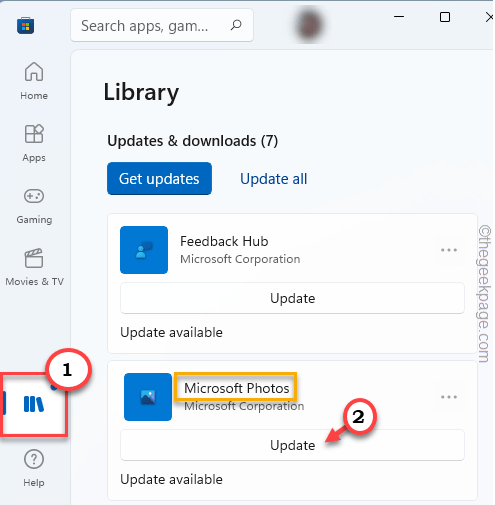
2. Then, on the left-hand pane, tap on the “Library“.
3. Now, you will see the list of apps that you can update on the right-hand pane.
4. Here, scroll down to find the “Microsoft Photos” app. Just, tap on “Update” to update.

Let Windows download and install the pending update for Microsoft Photos. After that, open the image file you were facing this trouble. You won’t see the error message again.
Fix 2 – Automate the License Manager service
You have to automate the License Manager service.
1. At first, type “services” in the search box.
2. Then, tap on the “Services” to access it.

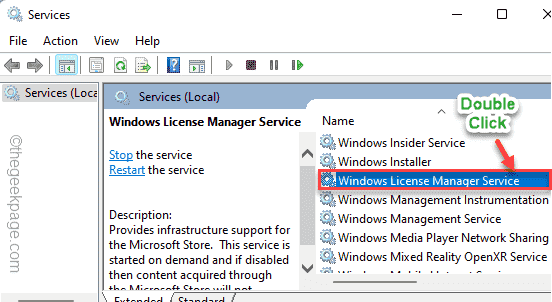
3. When the Services appears, double click on the “Windows License Manager Service“.

4. Set the ‘Startup type:’ to “Automatic“.

5. To start the service, tap on “Start“.
6. Then, tap on “Apply” and “OK” to save these changes.

After that, close the Services window. Open the image file and check whether the error is still there or not.
Fix 3 – Uninstall and reinstall Photos
As this problem is directly associated with the Photos app, uninstalling and reinstalling the app should help.
1. At first, press the Windows icon and type “powershell“.
2. Then right-click on the “Windows PowerShell” and then, tap on “Run as administrator“.

3. You have to uninstall the Photos app from the terminal. So, write down this code and hit Enter.
Get-AppxPackage *photo* | Remove-AppxPackage

Once you are done, close the PowerShell window.
You have to restart your computer once.
1. Open the Store on your computer.
2. Then, you have to search for “Microsoft Photos“.
3. After that, tap on “Microsoft Photos“.

3. Now in the Settings window, click on “Get” to install Photos on your computer.

4. You will see the Photos app is installed.

Once you have reinstalled the app, close the Store window. Try to view that problematic image using this new Photos app. If this solution fails, go for the next one.
Fix 4 – Run Windows Store Apps troubleshooter
You can run the Windows Store Apps troubleshooter to fix the Photos app.
1. At first, press the Windows key+I keys together.
2. Then, select the “System” tab from the left-hand side.
3. After that, scroll down and tap on the “Troubleshoot” settings.

3. Now, click on the “Other troubleshooters“.

4. Then, scroll down to find the “Windows Store Apps” troubleshooter.
5. Tap on “Run” beside it to run this particular troubleshooter on your system.

It will detect and apply the solution for the Photos app. After doing this, close the Settings window.
Now, again try to access that particular image file.
Fix 5 – Make sure the system is updated
A small system bug may cause this issue. So, updating the system may solve this problem.
1. At first, press the Windows key+I keys together to open Settings.
2. Now, select the last option on the left pane, “Windows Update“.
3. On the right-hand pane, click on “Check for updates” to look for any pending updates.

Allow Windows a while to download and install the update on your system.
Restart your computer when you are prompted to do so to complete the update process. Again open the image file. This time it will open up without any error codes.