How to fix the error saying ” Importing FFmpeg Library missing”
Installing the optional FFmpeg Library will allow Audacity to import and export a far wider range of audio formats, including M4A (AAC), AC3, AMR (narrowband), and WMA as well as audio from most video files can also be imported. Let us see how we can do this.
Step 1: When you open an audio file in the Audacity software, a pop-up window appears showing the error message as shown below

Close the Error Importing message by clicking on OK.
Step 2: Now, go to Edit > Preferences or Simply Press Cltr+P to open the Preferences Devices.

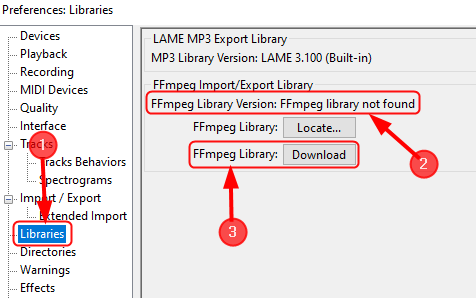
Step 3: Next, click on the Libraries and you can see FFmpeg Library not found. Now, click on Download.

Step 4: Once you click on Download, it will redirect to the Audacity page showing ” Installing the FFmpeg Import / Export Library“. Here, click on ” Windows :FFmpeg installation section“.


Step 8: The FFmpeg Library for Audacity on Windows gets downloaded as shown below.

Step 9: Now, open the FFmpeg Installer file and Run the setup.

NOTE: Make sure Audacity is Closed before running the setup.
Step 10: Read the License and accept it and click on Next for the installation to proceed.

Step 11: Now, make sure the installer will install the required files to “C:\Program Files\FFmpeg for Audacity ” , and click on Next.

Step 12: Click on Install.

Step 13: Finally, Click on Finish to complete the setup.

Step 14: Audacity can now open/import and edit large-range audio formats without any problem.
Sometimes you may still get the same error, even after installing the FFmpeg library. This means that you have installed FFmpeg when Audacity is Open or you have installed it to a non-default location ( Directory) in your system. Audacity will now ask you to configure Preferences to locate the FFmpeg library. This is done by following the steps given below.
Step 1: Open Audacity, click on Edit > Preferences , or simply Click Cltr+P.

Step 2: Click on Libraries > Locate.

Step 3: If a Success notice appears indicating that Audacity has now automatically detected valid FFmpeg libraries and asks you to identify them manually, Click on NO.

NOTE: Most of the time FFmpeg library will be installed in the correct location only.
Step 4: But, again if a message saying ” Locate FFmpeg ” appears, it means that we need to locate the “avformat-55.dll“.To do so, click on Browse to locate the folder.

Step 5: Now, we need to go to the appropriate folder that contains FFmpeg.

Step 6: Now select “ avformat-55.dll“, and click Open.

Step 7: Now, you have navigated the folder that contains FFmpeg, click on OK.

Now, you can open audio files to edit in Audacity without any issue.
Once you have downloaded, installed, and located the directory containing FFmpeg and you still get the message “FFmpeg Not found“, it means you have installed the wrong libraries. Now you need to download the correct libraries based on your operating system.
That’s all.
You will now be able to import and edit any audio file you want in Audacity without facing any issues. Let us know how this article helped you.
Thanks for Reading.