While installing the game services for your Xbox device, you may face this error message – ‘Something unexpected happened. Error Code – 0x80073D26‘. The main reason behind this issue is conflicting third-party apps. Though, sometimes the corruption in the registry keys may cause this issue in the first place. Just follow these instructions to solve this particular issue on your computer.
Fix 1 – Delete GamingServices key from registry editor
You have to modify the registry associated with the registry.
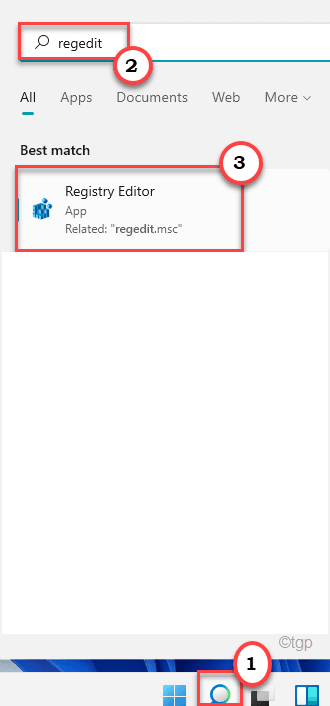
1. At first, click on the Windows icon and write “regedit” in the search box.
2. Then, from the search results, tap on “Registry Editor” to access it.

Warning – Registry Editor is the most sensitive part of your system. Before you modify/delete a key from the registry, we recommend making a backup of the registry on your computer.
After opening the Registry Editor, click on “File“. Then click on “Export” to make a new backup on your computer.

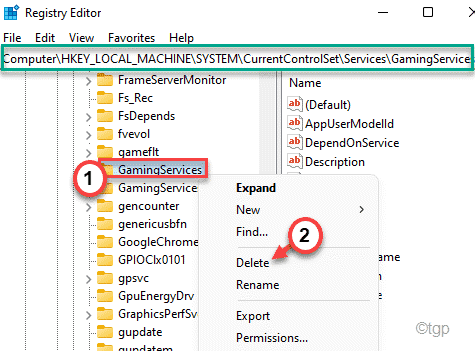
3. On the left-hand side, go to this section ~ Computer\HKEY_LOCAL_MACHINE\SYSTEM\CurrentControlSet\Services
4. Now, on the same right pane, scroll down and you shall find the “GamingServices” key.
5. Then, right-click on the key and tap on “Delete“.

6. You will be asked for your confirmation once more. Click on “Yes” to continue further.

7. After that, same way, right-click on the “GamingServicesNet” and tap on “Delete“.

8. Again, click on “Yes” to confirm your action.

After that, close the Registry Editor and restart your computer once. Follow these steps afterward.
Fix 2 – Run the PowerShell command
You can run two PowerShell commands to uninstall and further re-install the Gaming Services.
1. At first, press the Windows key and type “powershell” in the search box.
2. Then, right-click on the “Windows PowerShell” and tap on “Run as administrator“.

3. When the PowerShell terminal opens up, copy-paste this command and hit Enter.
get-appxpackage Microsoft.GamingServices | remove-AppxPackage -allusers

This will remove the Gaming Services from the Store.
4. Now, you can install the Gaming Services again. To do so, execute this command using the terminal.
start ms-windows-store://pdp/?productid=9MWPM2CQNLHN

After successfully running the second command, close the PowerShell terminal and reboot your computer.
This way, the problem will be fixed.
Fix 3 – Upgrade using Media Creation tool
1 – Go to this link https://www.microsoft.com/en-us/software-download/windows10
2 – Click on Download to download media creation tool
3 – Select Upgrade this PC now and click next

Let it Upgrade your PC and then check again
Fix 4 – Reset the Microsoft Store
You can try resettings the Store once and then, further try to update/install the Gaming Services.
1 – Search cmd in Windows search box. Right click and choose run as administrator

2 – Type wsreset in command prompt window and hit Enter key

This will reset the Windows Store.
Fix 5 – Update in Microsoft store
1. Open the Microsoft Store from the Start menu.
2. Then, on the left-hand side, click on the “Library“.
3. On the right-hand side, tap on the “Get updates” to find the updates for your device.

Now, Windows will start to install the pending Gaming Services update along with other updates on your computer.
If that doesn’t work, you can update the Gaming Service manually.
1. In the Libary page of Settings, tap on the drop-down and select the “Sort by name“.

2. Now, you can easily locate the “Gaming Services“.
3. Then, click on the download icon to download the particular service on your system.

This will start to download the update.
This should have fixed your problem.
Fix 6 – Reset the Gaming Services
If nothing is working out for you, there is one slightly advanced solution that you try.
Step 1
1. At first, press the Windows key+I keys together.
2. In the Settings, tap on the “Apps” on the left pane.
3. Then, on the right pane, click on the “Apps & Features“.

4. Now, scroll down to find the “Gaming Services” app.
5. Then, click on the three-dot menu and tap on the “Advanced options“.

6. Now, click on the “Reset” option and then, tap on “Reset” to finally reset the Gaming Services.

After resetting the Gaming Service, you can close the Settings window.
Step 2
Now, you have to remove the Gaming Services files from your WindowsApps folder. But first, you have to take ownership of that folder.
1. Open the File Explorer.
2.
Then, go to this location –
C:/Program Files
3. Next, right-click on the “WindowsApps” folder and click on “Properties” to adjust it.

[
NOTE –
If you can’t see the ‘WindowsApps’ folder, it might be hidden.
a. In the File Explorer, click on the three-dot menu and tap on “Options“.

b. Then, click on the “View” tab.
c. Further, check the “Show hidden files, folders and drives“.

d. Finally, click on “Apply” and “OK” to save this changes.

Now, you will see the ‘WindowsApps’ folder.
]
4. After that, go to the “Security” section.
5. Further, tap on “Advanced” to go to the advanced settings page.

6. Usually, this folder is owned by other users.
7. So, to change the ownership, click on “Change“.

8. Further, click on “Advanced“.

9. You have to tap on the “Find Now“.
10. Here you will notice a list of users and groups. Select the “Users” account from the list.
11. Click on “OK‘.

12. Finally, click on “OK” to alter the ownership.

13. Now, check the box beside “Replace owner on subcontainers and object“. Click on “Apply” to save the changes up to this point.

14. Now, you have to give full control of the folder to your account.
15. Simply, click on “Add“.

16. After that, click on “Select a principal‘.

17. Again, click on “Advanced‘.

18. Again, click on “Find Now“.
19. Choose the “Users” from the list.
20. Save the change by clicking on “OK“.

21. Finally, tap on “OK” to save it.

22. Next, check the box beside the “Full control” to get full control of the folder.
23. Then, click on “OK” to save it.

24. Finally, click on “Apply” and then on “OK“.
25. Coming back to the Advanced Security Settings, click on “Apply” and “OK” to complete the process.

26. Now, double-click on the “WindowsApps” folder to access it.

27. Here, locate all the folder that starts with the “Microsoft.GamingServices” identifier.
28. Select them and tap on the “Delete” icon on the menu bar.

Now, close the File Explorer window.
Step 3 –
Now, you have to delete some registry keys, if they are not automatically deleted yet.
1. Press the Windows key+R keys together.
2. Then, type “regedit” and hit Enter.

3. Now, paste this location in the address bar and hit Enter.
HKEY_USERS\.DEFAULT\Software\Classes\Local Settings\MrtCache\C:%5CProgram Files%5CWindowsApps%5CMicrosoft.GamingServices_2.45.11001.0_x64__8wekyb3d8bbwe%5Cresources.pri

You will be navigated to the key location and the key you have to delete will be highlighted on the right pane.
4. On the right-hand side, right-click on the highlighted key and tap “Delete“.

5. Confirm your action with a tap on “Yes“.

6. Now, following the same instructions remove these keys from the registry –
HKEY_USERS\.DEFAULT\Software\Classes\Local Settings\MrtCache\C:%5CProgram Files%5CWindowsApps%5CMicrosoft.Gamingservices_2.45.11001.0_x64__8wekyb3d8bbwe%5Cresources.prid6937194966bce

HKEY_LOCAL_MACHINE\SYSTEM\CurrentControlSet\Services\GamingServices

HKEY_LOCAL_MACHINE\SYSTEM\CurrentControlSet\Services\GamingServicesNet
Close the Registry Editor.
Then, reboot the computer.
Step 4
After all these steps, all you have to do is to re-install the Gaming Services again.
1. Open a browser window and go to this Gaming Services in Store.
2. Now, tap on “Get” and click on “Open” to open the link in the Store.

3. Now, you can easily install the Gaming Services again.
This will solve the issue are facing. Your problem will be solved.