Many of the windows users use the google chrome browser without even signing it with any google account. Some people even if they have signed in with any google account, they may not have enabled the sync option to sync all the data including the bookmarks which can be accessible everywhere. Sometimes, you just need the bookmarks to be stored only on your system and not saved in the google account. Therefore, it is always better to export the chrome bookmarks and import it whenever it is necessary. You can even categorize those chrome bookmarks. If you are wondering how to do it, please continue reading this post which explains you how to export and import the chrome bookmarks on Windows 11 system.
How to Export the Google Chrome Bookmarks in Windows 11
Step 1: Open the Google chrome browser on your system by pressing Windows key and typing chrome.
Step 2: Then, hit the Enter key.

Step 3: In the new tab, copy and paste the below path in the address bar and press the Enter key.
chrome://bookmarks/
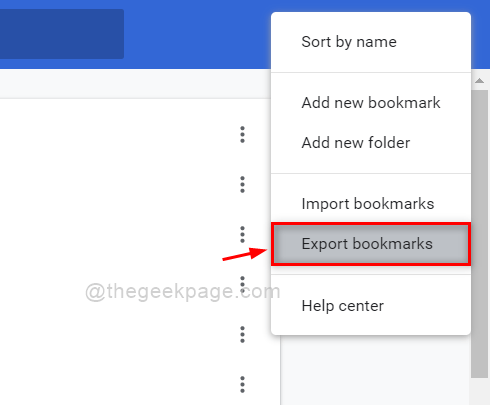
Step 4: Then, Click three vertical dots (show more options) at the rightmost corner of the bookmarks page as shown below.

Step 5: Click Export bookmarks option in the list of show more options on the bookmarks page.

Step 6: Then, it will popup a Save As window where you need to select the location for bookmarks to be saved.
Step 7: Please give it an appropriate name how you want and click Save button as shown in the below screenshot.

Step 8: The bookmarks get exported immediately in the location you chose.
Step 9: Close the chrome application if you want or continue browsing.
That’s it.
How to Import the Google Chrome Bookmarks in Windows 11
Step 1: Open the Google chrome browser on your system by pressing Windows key and typing chrome.
Step 2: Then, hit the Enter key.

Step 3: In the new tab, copy and paste the below path in the address bar and press the Enter key.
chrome://bookmarks/
Step 4: Then, Click three vertical dots (show more options) at the rightmost corner of the bookmarks page as shown below.

Step 5: From the list, click Import bookmarks option for importing the bookmarks saved earlier on your system.

Step 6: In the Open window, Go to the location where you had exported the bookmarks on google chrome.
Step 7: Then, Select the bookmarks file(chrome html type) and click Open button as shown below.

Step 8: Now, click on Bookmarks bar option on the left side of the bookmarks page.
Step 9: You will see a folder named “Imported”, which has all the bookmarks imported recently.

Step 10: Now Close the Google chrome application if you want.
That’s it guys.
This is how you can export and import the bookmarks on the google chrome application in Windows 11.
I hope this post was helpful and you found it interesting.
Please let us know in the comments section below.
Thank you for reading!