The Event Viewer log gives a comprehensive detail about the various kinds of errors that occur on your system. In the description of the error code, you will notice the source of the error and the EVENT ID of that particular error. One of those errors is the ‘Event ID 1000’. There may be multiple reasons why this error happened. If you are seeing the same error code in the Event Viewer Log on your system, just follow these fixes.
Fix 1 – Run simple SFC DISM scan
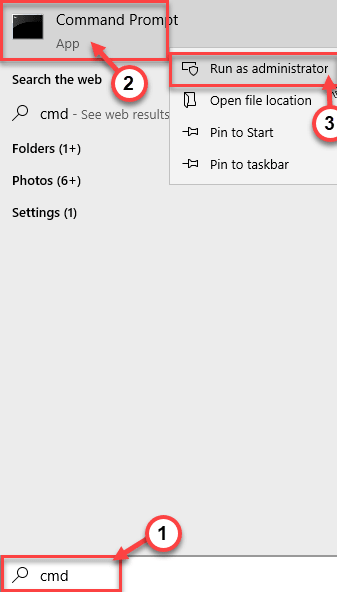
1. Click on the search box and start to write “cmd“.
2. Further, right-click on the “Command Prompt” and click on “Run as administrators“.

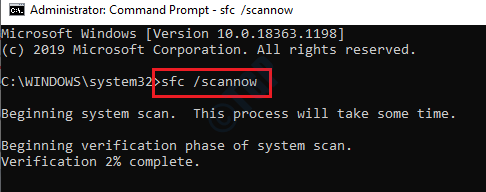
3. Paste this code in the terminal. Thereafter, hit Enter to run the scan.
sfc /scannow

SFC scan will commence.
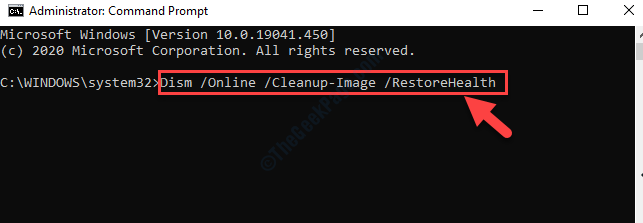
4. To launch a DISM scan, write this command in the CMD terminal and then hit Enter.
DISM.exe /Online /Cleanup-image /Restorehealth

Both of these scans will take some time to complete. After running these scans, restart your system once.
Fix 2 – Clean boot the Windows
Clean booting your computer should fix the issue on your system.
1. Press the Windows key+R keys together.
2. Write this code in the Run terminal. Click on “OK“.
msconfig

3. Simply go to the “General” tab.
4. In the second step, choose the radio button beside the “Selective startup” option.
5. After that step you have to tick the box beside the “Load system services.

6. After doing that, go to the “Services” section.
7. Next what you have to do is check the “Hide all Microsoft services“.
8. Finally, click on the “Disable all“.

This will disable all the third-party services on your computer.
9. Just, click on “Apply” and then on “OK“.

If you see a prompt for restart, click on “Restart now” to restart your computer in clean mode.
Fix 3 – Update Windows to the latest version
Sometimes this issue occurs in the older version of Windows.
1. Open up the Settings window.
2. Then click on the “Updates & Security” settings.

3. Then, click on “Check for updates“.

4. Windows will download the updates on your computer.
5. Click on “Restart Now” to restart your computer.

This will install the latest build in your system.
Fix 4 – Run Microsoft Safety scanner
Run the Microsoft Safety Scanner on your system.
1. Click on this link to download the Microsoft Safety Scanner.
2. Double click on the “MSERT” on your computer.

3. Now, check the box beside the “Accept all terms of the preceding license agreement“.
4. Finally, click on “Next“.

6. Once the Scan type screen appears, there are three scan options available to choose from-
a. Quick scan – Quickly scans for malicious softwares, malware, spy kits, etc. Takes less than 5 minutes to run a quick scan.
b. Full scan – A comprehensive scan throughout your system to detect and remove any affected files.
c. Customized scan – You can customize some specific folders chosen by the user.
At first, click on “Quick Scan“* and then click on “Next” to perform the scan of the files.

The scanning process will take a while to complete the process.
7. Finally, click on “Finish” to finish the process.

Try to launch the application again. You won’t see ‘Event ID 1000’ again on your system.
*NOTE–
After you run a quick scan, if the scan detects any corrupted files on your system, run a ‘Full scan’ of your system files.
Fix 5 – Reinstall the application
If the log is still showing ‘Event ID 1000‘ on your screen, reinstall the application on your computer.
1. Press the Windows key+R keys together.
2. Then, type “appwiz.cpl” and click on “OK“.

3. Once the Program & Features window, right-click on the problematic application and then click on “Uninstall“.

Follow the steps to uninstall the program on your computer.
4. Once the application is uninstalled, download and install the same application again.
Restart your computer once. This should fix the problem you are facing.
Fix 6 Reinstall .NET Framework
One of the fixes involves a fresh reinstallation of the .NET Framework on your system.
STEP 1 Remove .NET Framework files
1. At first you need to download the .NET Framework Repair Tool.
2. Now, double click on “netfxrepairtool” and accept the agreement.

3. The .NET Framework Repair Tool will detect the issues with the .NET Framework and fix the issues.
4. After that, click on “Next” to make the changes on your computer.

Finally, reboot your computer to save the changes.
STEP 2 Download and re-install .NET Framework
1. Press Windows key+R to open the Run window.
2. In the Run window, type or copy-paste “optionalfeatures” and then hit Enter.

Windows Features window will be opened.
3. In the Windows Features window, check the option “.NET Framework 4.8 Advanced Series“.
4. Then, click on “OK“.

Windows Features will now install the latest .NET Framework on your computer.
If you face any problem enabling the .NET Framework on your system, follow these steps to install the framework manually.
1. Open a browser window.
2. Now, search for “NET Download“.
3. Click on the search result “Download .NET framework“.

4. Now, in the list of .NET Frameworks, click on the latest one on the top.
(Example- .NET Framework 4.8 is the latest one in my case)

5. Then, click on “.NET Framework 4.8 Runtime” to download the installer.

Close the browser window.
6. Go to the location where you have downloaded the file.
7. Double-click on “ndp48-web.exe“.

Follow the on-screen instructions to install .NET framework on your computer.
8. Click on “Close” to close the installer window.

Reboot your computer.