While booting up an old Windows device, you may have stumbled upon this error message “Error: out of memory. Error: you need to load the kernel first.” on the booting screen. An additional prompt will say “Press any key to continue...”. But, even if you press a key, the system won’t start up. Some BIOS settings like Secure Boot can block access to the Kernel and show you this error message. So, follow these easy steps to enable Secure Boot and fix the problem quickly.
Solution – Disable Secure Boot
The secure Boot feature has to be disabled if you want to solve this problem.
1. Shut down your computer.
2. Then, start it up.
3. While the computer is booting up and showing you the manufacturer’s logo, find which button is associated with “BIOS SETUP“. Now, press that button multiple times to boot into BIOS.
* NOTE– The actual key to open the boot settings on your computer may be different on your machine. Please pay close attention when your system is booting up. If you can’t use it for the first time, don’t worry. Let the system boot and then again repeat the procedure.
In some keyboards, you may have to use the “Fn” key alongside the other key. So, if F12 is associated, you may have to press the Fn+F12.
In our case, it is the “Delete” button. It may be different on your system.

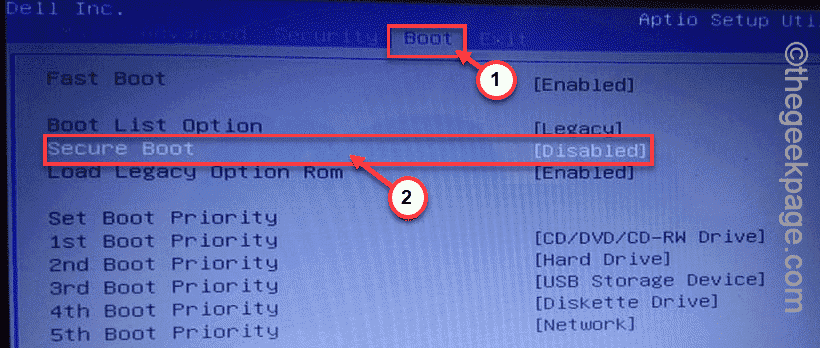
4. In the BIOS setup screen, go to the “Boot “tab using the arrow keys on your keyboard.
In some computers, you may find the Secure Boot feature in the Advanced Boot settings.
5. Now, go down to select “Secure Boot” and then press Enter.
6. Now, choose “Disabled” and then hit Enter to disable Secure Boot on your computer.
7. Next, go to Advanced Settings.
8. Now, here look for some settings like this “PCI Subsystem settings“. Open that.
9. Next, make sure the “Above 4G Decoding” setting is set to “Enabled“.
10. Apart from that, you may find the “Resize BAR Support” setting. If the “Enabled” option is available, set it to that. Otherwise, just set it to “Auto” mode.
11. Now, press “F10” from your keyboard or the associated key to save the settings on your computer.
Finally, let your computer boot normally.
It will boot and you won’t see the error message again.

