Event ID 56 Application Popup error can cause a sudden Blue Screen of Death issue and restart your computer out of nowhere. Though the actual reason behind this problem can differ from system to system. So, if you have experienced this problem on your system and searching for a quick resolution for this problem, run through these easy solutions one by one and fix the issue.
NOTE –
Usually, this Error Event ID 56 doesn’t occur a lot and in usual scenarios, doesn’t affect your system anyhow. So, if you haven’t faced any BSOD issues because of it, just leave it alone.
Fix 1 – Remove unused devices
If you still have some old residual devices plugged into your system, the PnP manager can create the unique ID 56 for those devices.
1. At first, turn off your computer. It will be better if you disconnect the system from the power source.
2. Once it is turned off, detach all the unused external devices one-by-one from your computer.
These external devices can be external HDD/SSD, USB hubs, unused WiFi dongles, etc.
3. Now, once you have removed all those, make sure there aren’t any old CDs/DVDs left in the optical drive.
4. Then, connect the machine to the power outlet and start the system.
You won’t see Event ID 56 again.
Fix 2 – Update the graphic drivers
Update the graphics driver using the Device Manager.
1. At first, press the Win key and the X keys together.
2. Then, tap “Device Manager” on the elevated context menu.
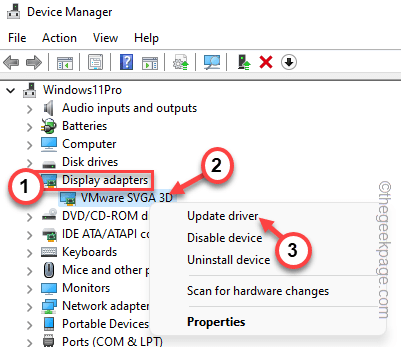
3. When you reach the Device Manager page, expand the “Display adapters” section.
4. Here, you can view the graphics card driver. Just, right-tap that driver and tap “Update driver“.
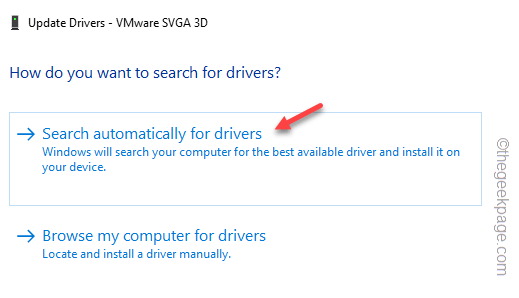
5. Now, click the “Search automatically for drivers” option to let this automatically search for the driver and install it on your computer.
Otherwise, you can also use the other option which is “Browse my computer for drivers“.
Now Windows will update the graphics card to the latest version.
For some users, this message may appear –
The best drivers for your device are already installed
In that case, follow these steps –
1. At first, click on “Search for updated drivers on Windows Update“.
2. Settings page will open. On the right-hand pane, check whether you can see any display driver downloading or not.
3. If there aren’t any display drivers in the update queue, click on “Advanced options“.
4. Next, tap “Optional updates“.
5. Finally, expand the Optional updates section to view all the updates.
6. Next, check the display adapter update and tap “Download & install“.
Now, just close the Device Manager and the Settings window and restart your computer.
After restarting the system, you won’t see the Event Error ID 56 again.
Additional Instructions –
Do you have an NVIDIA/AMD dedicated graphics card? Then, you can use the GeForce Experience and AMD Radeon Aderanalin softwares respectively to update the graphics card.
1. Open the Geforce Experience app or AMD Adrenalin app.
2. Just, head on to the “Drivers” tab. Allow a little while for it to detect the latest graphics package.
3. Just, download the latest driver and install it on your computer.
Once it is downloaded, install the driver.
Fix 3 – Reset the BIOS settings to default
Try resetting the BIOS settings to the default state.
1. You can open the Settings page very easily.
2. Just press the Windows key+I keys together.
3. Then, tap the “System” menu.
4. After that, click on “Recovery” to open that setting.
5. In this Recovery settings page, locate the Advanced startup option.
6. Then, tap “Restart now” and the system will boot into the Advanced Startup mode.
7. Just, tap “Troubleshoot” on the screen to go forward.
8. Next, just click “Advanced options” to navigate to the next page of settings.
9. Advanced options page lists all the advanced system tools.
10. Here, tap “UEFI Firmware Settings” to open that.
11. Now, click “Restart” to restart the system and open the BIOS page.
Once you reach the BIOS page, follow these steps –
1. In the BIOS page, look for a key that upon pressing will reset everything to normal. It will read something like this – Restore default settings or Reset BIOS settings.
Generally, this particular key is a function key (F9), but it may vary from system to system.
2. If you see a warning message has appeared, select “Yes” and hit Enter to restore the default BIOS settings on your computer.
After restoring the default BIOS settings, let the computer restart normally.
Fix 4 – Disable unused devices
Sometimes just removing the old, obsolete audio devices isn’t enough. So, disable those unused audio device drivers as well.
1. You can find all the device drivers in the Device Manager.
2. Right-click on the Windows icon and tap “Device Manager” to access that from the context menu.
3. When on the Device Manager page, expand the “Audio inputs and outputs”.
4. Here, you can view several audio devices. So, right-tap the one you don’t use regularly.
5. Just, right-tap the driver and tap “Disable device“.
6. If you see a warning prompt has appeared, tap “Yes“.
This way, disable all those unused audio device drivers.
Check whether you are still facing the problem or not.
Fix 5 – Update the BIOS
Update the BIOS to the latest version. You should download the latest version of BIOS from the official manufacturer’s website.
1. Open the Laptop/PC manufacturer’s website.
2. There, just input your model/serial number in the appropriate box (you can find the serial number at the back of the device or you can just google it).
3. Next, click “Submit” to submit it.
4. This will load all the latest versions of the drivers.
5. Then, just expand the “BIOS” section to view the drivers.
6. Next, tap “Download” to download the driver.
7. After that, open File Explorer.
8. Next, double-tap the BIOS installer file to open that.
Just follow thes steps on the installer page and complete the BIOS installation process. Restart your computer when you are prompted to do so by the installer.
When the system reboots, the Event ID 56 Application Popup error won’t appear again.


