The Temp folder is used by almost all the running applications of your system. So, if you encounter the “Error writing a temporary file. Make sure your temp folder is valid” message, that means some application is facing trouble accessing the Temp folder. You can try the following resolutions to fix the issue on your own. But before doing so, you can try these quick fixes –
Quick Fixes –
1. Just quickly reboot the system. If a bug was causing this issue, it should get resolved by this.
2. Do not run the installer directly from the compressed file. Uncompress the installer from the zip file and then run the installer.
Fix 1 – Verify the Temp folder path
Verify whether you are using the correct Temp folder path on your system. The wrong Temp folder path may lead to this error.
Step 1 – The destination of the Temp folder, normally is in this region of the File Explorer –
%USERPROFILE%\AppData\Local\Temp
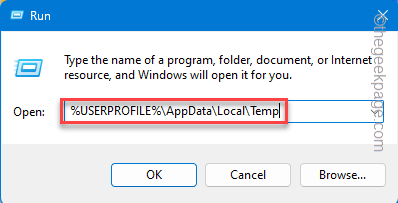
Step 2 – Wondering how to verify whether this path is valid or not? Open a Run box using the Win+R keys together.
Step 3 – Paste the actual Temp location there and click “OK“.
%USERPROFILE%\AppData\Local\Temp
If this takes you directly to the Temp folder, then the Temp folder location is valid and you have to explore other solutions for the remedial.
But, if it shows, “Location or address not found” like a statement, understand the Temp folder location on your system is invalid.
Fix 2 – Create a new Temp folder
Create a new Temp folder in C drive and change the variable.
Step 1 – Hold the Win+E keys together.
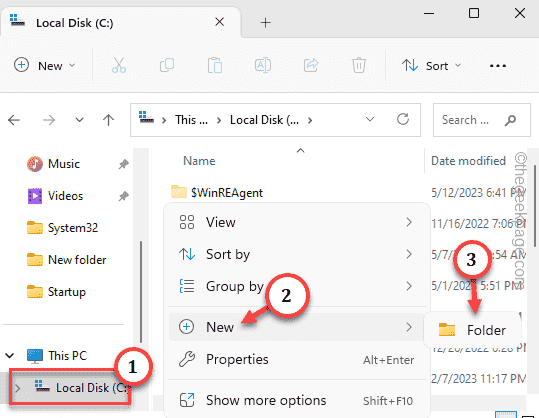
Step 2 – Subsequently, when the File Explorer opens up, go to the C: drive.
Step 3 – Right-click on the space and tap “New“. Select “Folder” to create a new folder.
Step 4 – Name this “Temp“.
Step 5 – To bring up the Run box, hit both the Windows and R keys on your keyboard at the same time.
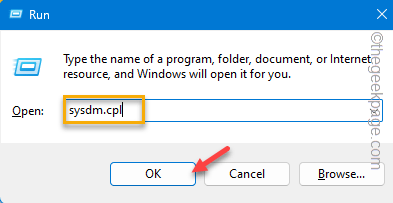
Step 6 – Simultaneously, put this in the box. Click “OK” after this to open the System Properties.
sysdm.cpl
Step 7 – Get to the “Advanced” section.
Step 8 – There you will see “Environment Variables“. Open that.
Step 9 – In the User Variable section, double-tap the “TMP” value to edit that.
Step 10 – Place this address in the ‘Variable Value:’ box.
C:\Temp
Step 11 – Click “OK“.
Step 12 – Finally, click “OK“.
Close all the opened tabs on your Desktop and restart your computer.
When the system gets back, check if the issue still persists.
Fix 3 – Start the installer as an admin
If you are having this read/write issue while installing a new application, do that with administrative access.
Step 1 – Simply go to the location of the installer file.
Step 2 – Locate it amongst other files.
Step 3 – Directly right-click the installer and tap “Run as administrator“.
Running the installer setup file abolishes all the read/ write permission issues that the setup file would face without it.
If you are still seeing the “Error writing a Temp file” message, go for the next solution.
Fix 4 – Clear the Temp folder and retry
Manually clean the Temp folder. This should eliminate any possibilities of contradiction between existing files.
Step 1 – Proceed by opening the Run box using the Win+R keys.
Step 2 – Go ahead and write “%temp%“. Use the “OK” button to open the Temp folder.
Step 3 – Delete everything from the Temp folder.
Restart the system. After that, try to install the problematic app once more.
Check if this offers any help.
Fix 5 – Ensure the Temp folder has enough permissions
The Temp folder needs proper read/ write permission for any application to write or read it.
Step 1 – Open the File Explorer.
Step 2 – Navigate to the location of the Temp folder –
C:\Users\UserName\AppData\Local
Step 3 – Right-click the “Temp” folder and click “Properties“.
Step 4 – Go to the “Security” tab.
Step 5 – Select your username and tap “Edit“.
Step 6 – Just tick the “Allow” box beside the Full Control.
Step 7 – Save the changes, click “Apply“, and “OK“.
Try to install the application once more.


