Many users have reported seeing “Error code 1606. Could not access network location.” when installing any software program like Autodesk. The possible causes for this error are:
- An issue with Registry Subkeys related to the Shell folders
- The previous installation remains in the system
- Wrong permissions assigned to the Public Documents folder
In this article, we have listed some troubleshooting strategies to help you overcome this error.
Fix 1 – Check Registry editor
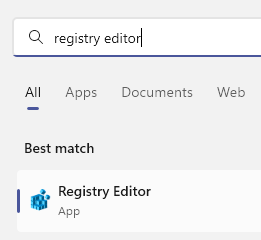
1 – Search Registry editor and click on it to open registry editor

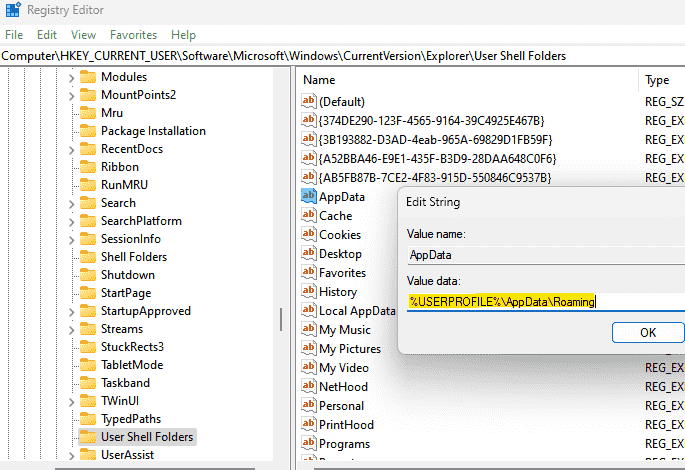
2 – Now, Go to the following location in the registry editor
HKEY_CURRENT_USER\Software\Microsoft\Windows\CurrentVersion\Explorer\User Shell Folders
3 – Now, in the right side double click on each items given below and check with the value data for each item given in the right side.
If the value data is not same as given below, then change the value data as given below.
{374DE290-123F-4565-9164-39C4925E467B} %USERPROFILE%\Downloads
AppData %USERPROFILE%\AppData\Roaming
Cache %USERPROFILE%\AppData\Local\Microsoft\Windows\Temporary Internet Files
Cookies %USERPROFILE%\AppData\Roaming\Microsoft\Windows\Cookies
Desktop %USERPROFILE%\Desktop
Favorites %USERPROFILE%\Favorites
History %USERPROFILE%\AppData\Local\Microsoft\Windows\History
LocalAppData %USERPROFILE%\AppData\Local
My Pictures %USERPROFILE%\Pictures
My Music %USERPROFILE%\Music
My Video %USERPROFILE%\Videos
NetHood %USERPROFILE%\AppData\Roaming\Microsoft\Windows\Network Shortcuts
Personal %USERPROFILE%\Documents
PrintHood %USERPROFILE%\AppData\Roaming\Microsoft\Windows\Printer Shortcuts
Programs %USERPROFILE%\AppData\Roaming\Microsoft\Windows\Start Menu\Programs
Recent %USERPROFILE%\AppData\Roaming\Microsoft\Windows\Recent
SendTo %USERPROFILE%\AppData\Roaming\Microsoft\Windows\SendTo
Start Menu %USERPROFILE%\AppData\Roaming\Microsoft\Windows\Start Menu
Startup %USERPROFILE%\AppData\Roaming\Microsoft\Windows\Start Menu\Programs\Startup
Templates %USERPROFILE%\AppData\Roaming\Microsoft\Windows\Templates

4 – Now, Go to the location given below
HKEY_LOCAL_MACHINE\Software\Microsoft\Windows\CurrentVersion\Explorer\User Shell Folders
in the right side double click on each items given below and check with the value data for each item given in the right side.
If the value data is not same as given below, then change the value data as given below.
{3D644C9B-1FB8-4f30-9B45-F670235F79C0} %PUBLIC%\Downloads
Common AppData %ProgramData%
Common Desktop %PUBLIC%\Desktop
Common Documents %PUBLIC%\Documents
Common Programs %ProgramData%\Microsoft\Windows\Start Menu\Programs
Common Start Menu %ProgramData%\Microsoft\Windows\Start Menu
Common Startup %ProgramData%\Microsoft\Windows\Start Menu\Programs\Startup
Common templates %ProgramData%\Microsoft\Windows\Templates
CommonMusic %PUBLIC%\Music
CommonPictures %PUBLIC%\Pictures
CommonVideo %PUBLIC%\Videos
5 – Restart Computer
Fix 2 – Rename the Shell Folders in Registry
1. Press Windows + R to open Run. Type regedit to open Registry Editor.
2. Navigate to the following location or copy-paste it into the navigation bar.
HKEY_LOCAL_MACHINE\SOFTWARE\Microsoft\Windows\CurrentVersion\Explorer
3. In the Explorer folder, look for the key Shell Folders. Rename it with three dots at the end (Shell Folders…).
4. Under the Explorer folder, find the User Shell Folders.
5. Select the folder and press Fn + F2 to rename it.
6. Remove the User at the beginning so that the folder’s name changes to Shell Folders.
7. Close the Registry and restart your system. Check if the problem is fixed after startup.
Fix 3 – Make Changes to the Shell Folders Registry Key
1. Open Run by pressing the Windows and R keys simultaneously.
2. Type regedit to open the Registry Editor.
3. Go to the location mentioned below or copy-paste it in the navigation bar of the Registry.
HKEY_LOCAL_MACHINE\SOFTWARE\Microsoft\Windows\CurrentVersion\Explorer\Shell Folders
4. On the right side, double-click on the entry named Common Documents.
5. In the Edit String window, check whether the Value Data field has a valid folder path for Documents. In case, the path is not valid, copy and paste the default location for Documents in your system (C:\Users\Public\Documents).
6. Exit the registry and restart your system. Check if the error is fixed at the next startup.
Fix 4 – Modify the Permissions of Public Documents
1. Press Windows + E to open File Explorer.
2. Go to the following location C:\Users\Public.
3. Inside the Public directory, right-click on Public Documents and choose Properties.
4. In the Properties window, go to the Security tab.
5. Choose the current user account that is active. Click on the Edit button.
6. In the Permissions group for the selected user, check the box for Full Control in the Allow column to grant all permissions for the user.
7. Click on Apply and then on OK to save the settings.
8. Now check if the installation can be performed without any error.
Fix 5 – Use the Program Compatibility Troubleshooter
1. Just hold Windows and R key combinations simultaneously to open the Run dialog.
2. Type control to launch the Control Panel.
3. In the list of items, double-click on Troubleshooting.
4. Now you are in the Troubleshoot computer problems window. Here select the option Programs.
5. In the Troubleshoot problems – Programs window, you will find the Program Compatibility Troubleshooter under the Programs group.
6. Right-click on it and select the option Run as administrator.
7. If prompted by UAC for administrator permissions, select Yes.
8. Click on the hyperlink Advanced in the Program Compatibility Troubleshooter window.
9. Now check the box next to Apply repairs automatically.
10. Troubleshooter starts the scan to detect any problems. Wait for this process to finish.
11. It will list a set of programs in the next window. Here, choose the program which is creating issues for you.
12. In case the problematic program or installer is not on the list, select the option Not Listed.
13. In the case of the Not Listed option, select the path of the installer using the Browse button.
14. Select Try recommended settings as the troubleshooting option for the problematic installer.
15. Click on the Test the program… button to check whether it works with the recommended compatibility settings for the program.
14. Once this process of applying the settings is complete, perform the steps for the program installation and check if the error is fixed.
Thanks for reading.
We hope this article has been informative enough to help you solve the error code 1606 while installing any program on Windows PC. Comment and let us know if you are facing any issues with respect to the fixes mentioned in this article.
