Windows 10 provides its users the syncing capability between various Windows devices. Meaning the settings like managing passwords, themes, keyboard preferences, language preferences, etc done in a system will be automatically synced in other windows devices (provided you are using the same user account). However, some of the users reported that they are facing synchronization issues in their system with the error message as follows –
Sync is not available for your account.Contact your system administrator to resolve this.
Potential Reasons to see this issue are :
- The administrator might have turned Off Sync in your system.
- Microsoft Account is not yet verified.
- Some account information is incorrect.
- Glitch with Work or School accounts.
- Corrupted systems Files in the system.
In order to solve the sync issue, in this article, we have compiled a list of fixes that can help.
Fix 1: Disconnect and Re-connect Work or School Account
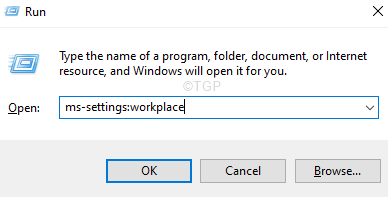
Step 1: Open the Run Dialog.
Step 2: Enter the below command and hit Enter
ms-settings:workplace
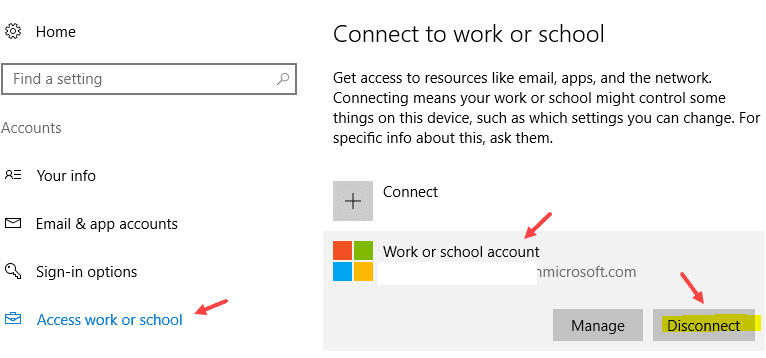
Step 3: In the appearing window, locate the account linked to Work or school account and click on it.
Step 4: Click on the Disconnect button.

Step 5: In the confirmation prompt that you see, click on Yes.
Step 6: Restart the PC.
Step 7: Now, Enable Sync Settings( Refer to Fix 2 given below)
Fix 2: Enable the Sync Settings
At times the error is seen as the account is not verified from the system you are using. To verify that ,
Step 1: Open Run Dialog using the keys Windows+R.
Step 2:Enter the below command and hit Enter.
ms-settings: sync
Step 3: Click on the Verify button next to the Your passwords won’t sync until you verify your identity on this device message.
Step 4: A verification code will be sent to your Microsoft Account and you will be asked to enter this code.
Step 5: Once, you are verified, you will be able to sync your settings across the devices.
Step 6: Now, locate the section named Remember my apps and toggle the button next to it to turn it on.
Step 12: Also, toggle the button next to Remember my preferences to turn it on.
Check if this helps.
Fix 3: Verify your Microsoft Account via Web
Step 1: Open the Microsoft Account Login Page
Step 2: You will be prompted for your Username and Password. Enter your Microsft Username and then enter your password.
Step 3: After logging in successfully. Click on the Your Info tab from the top menu options as shown below.
Step 4: Under the Account info section, you will see a link named Verify if your account is not verified.
Step 5: Click on the Verify link. A code will be sent to your email id and you have to verify yourself.
Step 6: Enter the code when you’re prompted.
Step 7: Restart your computer.
Step 8: Open Run Dialog using the key Windows+R
Step 9: Enter the below command and hit Enter.
ms-settings: sync
Step 10: If you are using Windows 10, under the sync settings section, toggle the button to turn it on.
Step 11: If you are using Windows 11, locate the section named Remember my apps and toggle the button next to it to turn it on.
Step 12: Also, toggle the button next to Remember my preferences to turn it on.
Check if this helps.
Fix 4: Enable Sync settings from Registry Editor
Step 1: Open the Run Dialog using the keys Windows+R
Step 2: Type regedit and hit Enter.

Step 3: In the UAC window that opens asking for permissions, click on Yes
Step 4: In the Registry Editor window, on the search bar at the top, copy-paste the following location
HKEY_LOCAL_MACHINE\SOFTWARE\Microsoft\Windows\CurrentVersion\Policies\System
In case copy-pasting doesn’t work, navigate using the navigation bar at the left-hand side of the window.
NOTE:
Registry editing can harm the system even with the slightest mistake. It is advised to take the backup of the registry key before proceeding. To take a backup, In the Registry Editor–> Go to File –> Export –> Save your Backup file.
Step 5: Within the System folder, on the right-hand side, right-click anywhere on an empty area.
Step 6: Select New>DWORD(32-bit)
Step 7: Name the newly created as NoConnectedUser
Step 8: Double-click on the NoConnectedUser key to modify its value.
Step 9: In the Edit DWORD window that opens, set the value to 0
Step 10: Restart the system.
Check if this works, if not try out the next fix.
Fix 5: Enable Sync Settings from Group Policy Editor
NOTE: This fix works only in Windows 10 Professional Edition.
Step 1: Open the Run Terminal using Windows+R.
Step 2: Type gpedit.msc and hit Enter

Step 3: In the Group Policy Editor window, from the left-hand side menu, navigate to the below location. You can double-click on the selection to expand it.
Administrative Templates > Windows Components > Sync your settings
Step 4: From the right-hand side, double-click on Do not sync.
Step 5: In the appearing window, select the Enable option.
Step 6: Click on Apply and then click on OK.
Note: If you have admin rights, you can tick on Allow users to turn syncing on under the Options section.
Check if this works.
