Windows throw up the error message “C:\Program Files\WindowsApps\MicrosoftTeams_21239.300.960.1678_x64_8wekyb3d8bbwe WebView2Loader. is either not designed to run on Windows…” when an essential file gets corrupted due to some reasons. As a user, you can’t put this error message aside. The affected app will not run without your interference. Uninstalling and reinstalling the app is the perfect solution, but before that, you should try a few easier solutions first.
Workarounds –
1. The first trick you should try is to restart the computer and retry running the app with administrative rights. Just check whether the error message is recurring.
Fix 1 – Download and install the VC 2015
You can download and install the latest version of the Visual C++ Redistributable 2015. MSVCP140.dll corruption can be fixed this way.
NOTE – If you already have the latest version of Redistributable files installed, you can just repair it and fix the problem. For that, go to Fix 2.
Step 1 – Know the system type
Check whether your system is based on 32-bit or 64-bit. If you are using Windows 11, it is 64-bit. You can directly proceed to the main part of the solution.
1. At first, hit the Windows key and the R key.
2. When this action opens up the Run box, type this word and hit Enter.
msinfo32
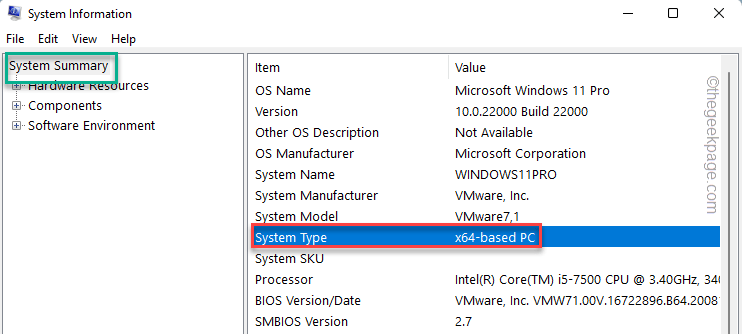
3. When the System Information page appears, make sure to select the “System Summary” tab.
4. On the right-hand side, simply look for the “System type“. Check whether the system is “x64-based” or “x32-based“.
Now, you can close the System Information page.
Step 2 – Download and install VC 2015
Follow these steps to download and install the latest version of Visual C++ Redistributable 2015.
1. Here is the direct link to the Visual C++ Redistributable Package for Visual Studio 2015 Download link.
2. Once you have reached the website, scroll down a little bit and tap “Download“.
3. Now, you’ll be offered two options. Depending upon which type of system you are working with, check that.
Like, if you are using a 64-bit system, you have to tick the “vc_redistx64.exe” box.
4. After that, just tap “Next” to download the package.
Once you have downloaded the package, open File Explorer and go to the download location.
5. After downloading the setup file, double-click on it.
6. Now, accept the agreements and click “Install“.
This way, complete the installation process swiftly.
Once you have completed the installation, restart your system. After restarting it, launch the app and check.
Fix 2 – Repair the redistributable packages
If the latest redistributable package is already installed, you should try repairing it.
1. If you right-tap the Win icon on the taskbar, a context menu opens up.
2. Here, tap on the first item, “App and Features“.
2. This shows the complete list of installed apps on your system. Just look for the “Microsoft Visual C++ 2015 Redistributable (x64)” package in the list.
3. Once you have found that click on the three-dot button beside the app name and click on “Uninstall“.
4. Once the Setup window opens up, click “Repair” to initiate the repairing process.
This will repair the Visual C++ 2015 Redistributable package along with all the component files like MSVCP140.dll. Now, repair the package and restart the system.
After restarting the system, try to run the app and test it.
Fix 3 – Uninstall and reinstall the package
You may uninstall and reinstall the VC Redistributable package from your system.
Step 1
1. You can press the Win key along with the R key.
2. Then, type this in the box and hit Enter.
appwiz.cpl
3. This opens the Programs & Features page.
4. Then, go down and look for the “Microsoft Visual C++ 2015 Redistributable” app.
5. Just right-click the app and tap “Uninstall“.
6. When the Setup window opens up, click “Uninstall“.
Wait until the uninstallation process is complete. Then, restart your computer.
Step 2
Now, you can download and install the Visual C++ files.
1. Download the latest version of Microsoft Visual C++ 2015 Redistributable.
2. Then, run the setup file to complete the installation process.
Once you have gone through the complete process, close everything and restart your computer.
Fix 4 – Uninstall and reinstall apps
Whether it is Adobe PhotoShop or Teams, just uninstall it and reinstall it again.
1. Press the Win key and the X keys together.
2. Then, click “Apps and Features” to access.
3. When the Apps and Features page opens up, find the application that you are trying to uninstall.
4. Then, right-tap the app and tap “Uninstall“.
Now, follow the steps on the uninstaller to complete the uninstallation.
Then, download the latest version of the app and install it. This will fix the corrupted file issue.


