Windows Installer, also known as Microsoft Installer, is a component included in the Windows OS which is used for deploying applications (software installation, removal, and maintenance) on your Windows PC. In order to identify problems related to Windows Installer you can make use of the logging service provided in Windows. You must have noticed that at times installation of some applications fails because Windows Installer was not able to perform the process.
If you are confronting an issue when you install applications on your Windows PC, then you can look at the logs maintained by Windows Installer. First, you need to enable these logs if you want to refer them when you face software installation issues. Once the Windows Installer logging is enabled, you need to try installing the program so that Windows Installer can record the progress of the installation in a log file. These log files can help in troubleshooting the issue with the installation of software packages.
Windows Installer logging can be enabled by adding keys and values to the Registry. You can try the installation after the registry entries have been added and enabled. Now, the progress of the installation will be tracked by Windows Installer and added to the Temp folder. The name of the log file can be any random name but the first letters of the name will have “Msi” along with a .log extension at the end of the file. These log files will contain all the error codes generated by Windows Installer after logging has been enabled.
To open the Temp folder, open the Command Prompt and type the command below
cd %temp%
After typing the above command you will see the command prompt change to the location of the Temp folder.
In this article, we have discussed two ways using which you can enable Windows Installer logging on your Windows 11/10 PC.
Method 1 – Enable Windows Installer Logging Via Registry Editor
Since you are making a modification to the registry, it is always recommended that you make a registry backup or have a restore point created before moving ahead so that you can restore the system back to its original state if any issues occur after the changes.
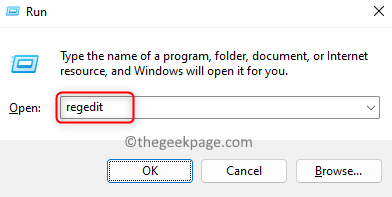
Step 1. Press Windows + R to open the Run box.
Step 2. Type regedit and hit Enter to open the Registry Editor.
Click on Yes when prompted by User Account Control for permissions.
Step 3. Copy and paste the path given below in the navigation bar or use the folders in the left pane to navigate.
HKEY_LOCAL_MACHINE\Software\Policies\Microsoft\Windows\Installer
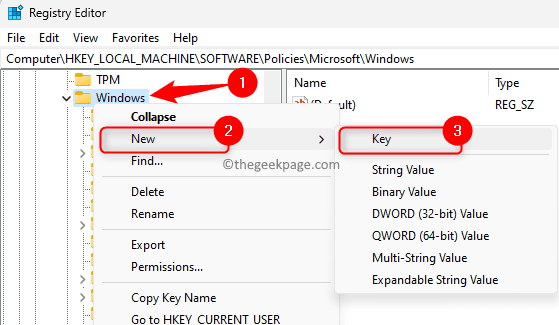
Step 4. If you are not able to find the Installer folder, right-click on the Windows folder in the left pane and choose New –> Key.
Name this new folder as Installer.
Step 5. Now, right-click on the Installer folder and choose the options New –> String Value.
Name this String as Logging.
Step 6. In the right pane, double-click on the Logging entry to open its Edit window.
Step 7. In the Edit String window, set the Value Data field to voicewarmupx.
The value data field can have letters in any order. Each letter here is used to enable a different logging mode. The letter functions for MSI version 1.1 is as given below:
- v : Verbose output
- o : Out-of-disk-space messages
- i : Status messages
- c : Initial UI parameters
- e : All error messages
- w : Non-fatal warnings
- a : Start up of actions
- r : Action-specific records
- m : Out-of-memory or fatal exit information
- u : User requests
- p : Terminal properties
- + : Append to the existing file
- ! : Flush each line to the log
- x : Extra debugging information. The “x” flag is available only on Windows Server 2003, and later, and on the MSI redistributable version 3.0, and on later versions of MSI redistributable.
- “*” : Wildcard: Logs all information except the v and the x option. To include the v and the x option, specify “/l*vx”.
Step 8. Click on OK and close the Registry editor.
Step 9. Reboot your PC after enabling logging for Windows Installer.
Try installing the program so that the log file can be created.
Note:
Once you have completed your troubleshooting process for a particular application installation, you need to disable the logging for Windows Installer. Keeping it enabled can have effects on system performance and disk space. In order to disable it, you need to delete the Logging entry in the registry. Else, every time you install or remove an application a new log file will be created.
Method 2 – Enable Windows Installer Logging Using Group Policies
Step 1. Open the Run box using the Windows and R key combination.
Step 2. Type gpedit.msc and hit Enter to open the Local Group Policy Editor.
Step 3. Using the folders in the left panel, navigate in the order of the folders mentioned below.
Computer Configuration –> Administrative Templates –> Windows Components –> Windows Installer
Step 4. Look for a setting associated with Logging in the right pane.
Double-click on Turn off logging via package settings to change its properties.
Step 5. Select the Enabled option.
In the Options, select the logging options that you would like to use from the two options in the dropdown.
The log file will be seen in the Temp folder.
Step 6. Click on Apply and then on OK to save the changes.
Step 7. Reboot your PC and check the log file while trying to deploy an application.
That’s it!
You must now have been able to generate a Windows Installer log file if you are facing an issue with any program deployment on your Windows PC. We hope you must have found this article informative enough in enabling the Windows Installer logging. Please comment and let us know your thoughts on the same.


