Windows 11 was launched with new variety of structure and layout for better user experience and good looks. Recommended items is a section in the start menu window in which the recently opened or installed or downloaded items are displayed for the convenience of users. But unfortunately, some of the windows users find it annoying to see the recommended list on the Start menu and want to remove it. If you are one amongst them, then this article will guide you on how to turn on / off the recommended list on start menu window on windows 11 pc.
How to Enable or Disable the Recommended List on Start Menu in Windows 11 through Settings App
Step 1: Press Windows + I keys together on your keyboard to open Settings app.
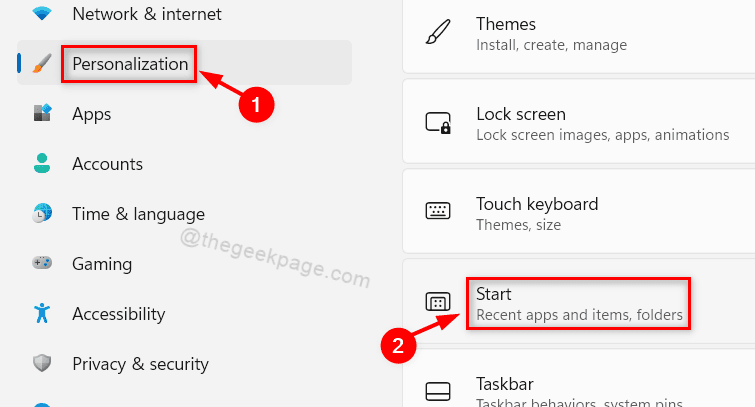
Step 2: Click on Personalization on the left side of the window of settings app.
Step 3: Then Click on Start settings on the right side of the window as shown in the below image.

Step 4: Click on Show recently added apps toggle button to turn it On in the Start page if you want to enable it.
Step 5: Then, Click Show recently opened items in Start, Jump Lists and File Explorer toggle button to turn it On to show the recently opened items on recommended items.

Step 6: In case you want to hide the recommended items section, then you can turn Show recent added apps toggle button Off by clicking on it.
Step 7: Also you can click Show recently opened items in Start, Jump Lists and File Explorer toggle button to turn it Off as shown in the below screenshot.

Step 8: Close the Settings app window.
This will display or hide the recommended list on start menu on windows 11 system.
How to Enable or Disable the Recommended List on Start Menu in Windows 11 through Local Group Policy Editor
Step 1: Press Win + R keys together on your keyboard to open run dialog box.
Step 2: Then, Type gpedit.msc in the run dialog box and hit Enter key.

Step 3: Click and navigate through Computer Configuration > Administrative Templates > Start Menu and Taskbar on the left side of the editor window as shown in the below screenshot.

Step 4: Double Click on Remove “Recently added” list from Start Menu on the right side of the window.

Step 5: Click on Enabled radio button in the remove recently added list from start menu settings if you want to hide the recommended items.
Step 6: Then, finally click Apply and OK to make the changes as shown below.

Step 7: If you want to show the recommended items, click on Disabled radio button in the remove recently added list from start menu settings.
Step 8: Click on Apply and OK to make changes.

Step 9: Close the Local Group Policy Editor window.
This will show or hide the recommended items on the start menu as you wish on your windows 11 pc.
That’s all guys!
Hope this article was informative and helpful. Please leave us comments below.
Thanks!