How To Enable/ Disable NTFS Compression In Windows To Improve Performance:- NTFS file compression is a feature available in Windows operating systems. The NTFS file compression feature plays a great role in compressing files to save space on NTFS hard drives. This feature works perfectly in some situations and with some file types. But in some other cases, it could degrade the system performance as this is a resource intensive process. In that case, you might want to disable or enable the NTFS file compression feature available in Windows. Well, don’t worry. You are in the right place. Dive into the article to explore the best ways using which you can efficiently disable or enable the NTFS file compression feature in Windows.
Method 1 : By Making Changes In Local Group Policy Editor
STEP 1
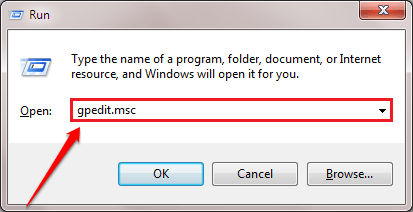
- Press WIN+R keys together to open the Run dialog box. When it opens up, type in gpedit.msc and hit enter key.
STEP 2
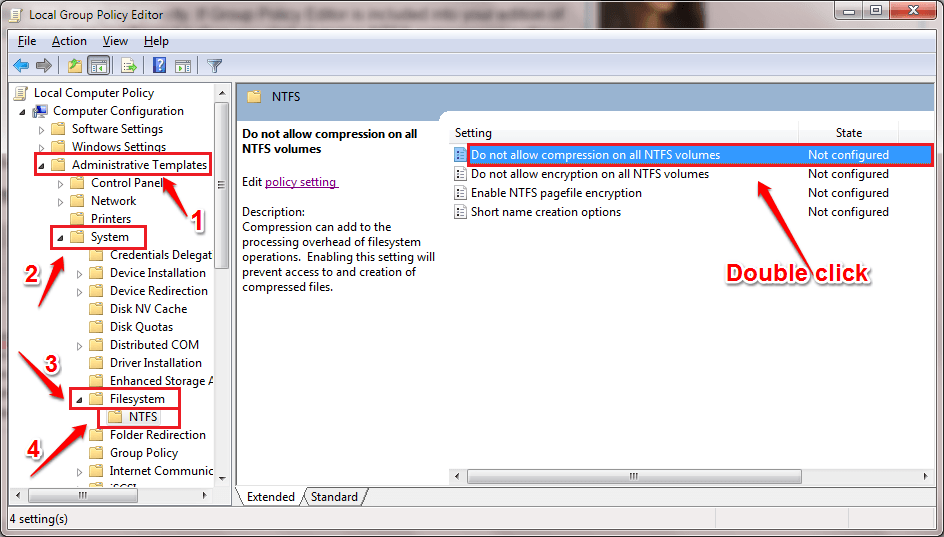
- When the Local Group Policy Editor window opens up, navigate to the following path:
Computer Configuration --> Administrative Templates --> System --> Filesystem --> NTFS
- As next, find the entry Do not allow compression on all NTFS volumes from the right window pane and double click on it.
STEP 3
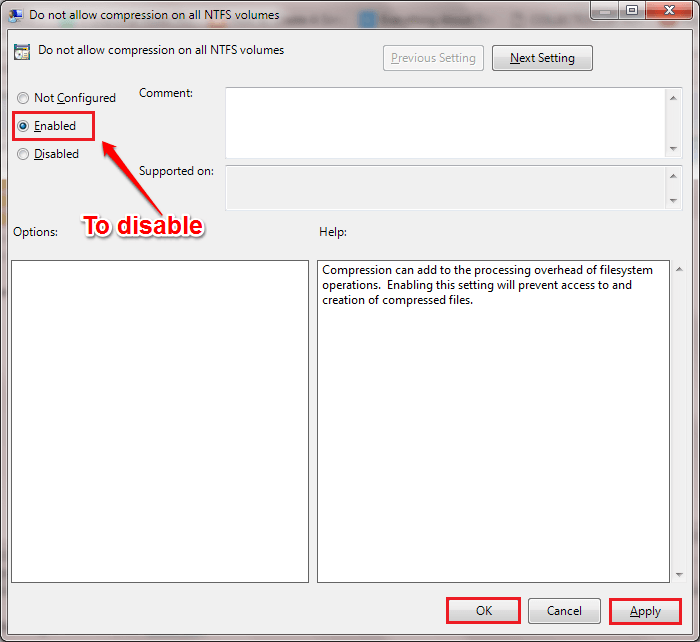
- In the new window that opens up, check the radio button corresponding to Enabled option to Disable the file compression feature as shown in the screenhot given below. Once you are done, hit on Apply and Ok buttons.
STEP 4
- To Enable the file compression feature, check the radio button corresponding to Disabled option as shown in the screenhot given below. Once you are done, hit on Apply and Ok buttons.
That’s it. Restart the system for the changes to take over. If it doesn’t work for you, you could try the other 2 methods explained below.
Method 2 : Using Command Prompt
STEP 1
- First of all, open the Command Prompt in the administrator mode. For that, start typing in cmd to Windows search and when the Command Prompt appears in the search results, right click on it and choose the Run as Administrator option.
STEP 2
- Now copy paste the following command into the Command Prompt to Disable the NTFS file compression feature and hit enter key.
fsutil behavior set DisableCompression 1
STEP 3
- If you want to Enable the NTFS file compression feature, copy paste the following command into the Command Prompt and hit enter key.
fsutil behavior set DisableCompression 0
That’s how you can disable or enable the NTFS file compression feature using Command Prompt. Restart the system for the changes to take over.
Method 3 : By Making Changes In Registry Editors
The next method involves some changes to the registry editors. You might want to create a system restore point just to be on the safer side as registry changes are a bit dangerous. You can refer to our article on the topic How To Create Restore Point In Windows 10 A Step By Step Guide to create a system restore point.
STEP 1
- Press WIN+R keys together to open the Run dialog box. When it opens up, type in regedit and hit enter key.
STEP 2
- As next, navigate to the following path and make sure the path is correct:
HKEY_LOCAL_MACHINE\SYSTEM\CurrentControlSet\Control\FileSystem
- In the right window pane of the FileSystem key, find and double click on the value named NtfsDisableCompression.
 STEP 3
 - To disable the NTFS file compression feature, enter 1 as the value in the Value data field. Hit OK button and restart the system for the changes to take over.
 STEP 4
- To enable the NTFS file compression feature, enter 0 as the value in the Value data field. Hit OK button and restart the system for the changes to take over.
 Hope you found the article useful. If you are stuck with any of the steps, feel free to leave comments, we would be happy to help. Stay tuned for more tricks, tips, and hacks.


